Newbie Question: how to know what editing is needed

Messages
1,651
Name
Have a guess.....
Edit My Images
Yes
Hi guy and gals,
Just a quick thought. I've been reading all the tutorial guides and how to's on editing pictures, but the problem I have is identifying what form the editing should take.

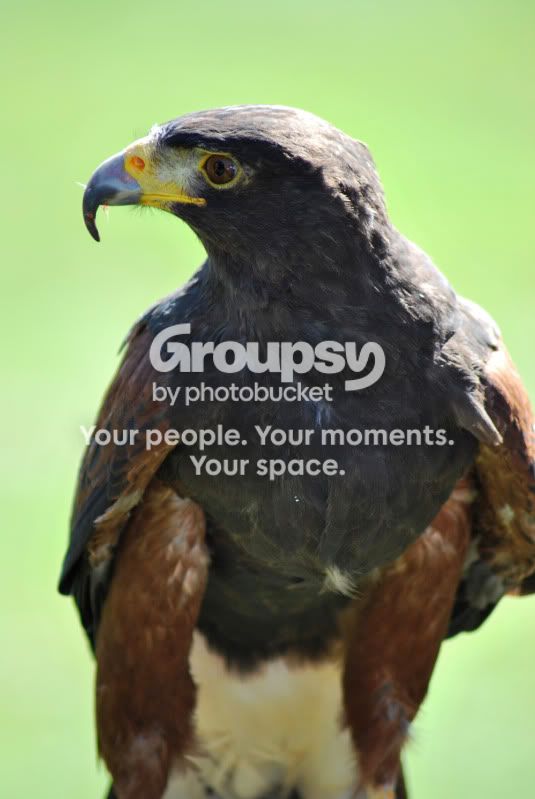
I have posted a couple of photo's and got a comment of "Not too bad. Slightly soft, overexposed and talons & left wing amputated" for the hawk picture.

So, back to the original question..... I'm presuming it takes years of practice to get to the stage of being able to tell if the exposure is not correct, etc, but what would I have to do to get the picture looking its best (as it's my fave pic).

Cheers

Andy
 
It'll take you days, if that to work out which pics are over-exposed once you learn to recognise it.

Which software are you using? I'd recommend lightroom 3 - if you are using that, just go to Develop, shuffle the exposure down about a stop, the blacks up a little bit, fill light up a tiny bit and clarity up, and vibrance up slightly.

There isn't much you can do with the wing or talons being off the picture, realistically. Technically it would be possible, but it would take someone very good and it'd take them a lot of time.

If you want to go a little bit further, you could do something to make the background a little less bright. Change it to a darker green, something more natural.

The key in all of it is to make sure it stays looking natural and never looks like you have done anything to it. It's very, very tempting whilst you are doing post-processing to shuffle every slider to the top but the end result will just look wrong.

(And never apply the changes to the only version of a file you have. Do them separately so you can resort to the original if you do something wrong)
 
Thanks for the quick reply :). I have Aperture and CS5. I now know what I'll be doing tomorrow lol
 
Photoshop CS5 has everything I said above appear immediately if you took the image in raw format (start using that if you haven't been upto now...it's easier) but they are all in there for jpegs too, just a little more hidden away.
 
I haven't used RAW before signing up for this site (which was only a few days ago), but after reading the benefits I will start shooting using RAW.


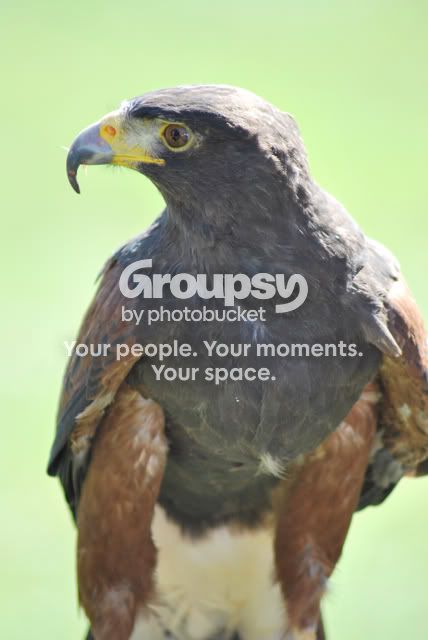
Does this look any better?
Before:
DSC_0116.jpg


After:
HarrisHawk.jpg
 
i know it's confusing at the start

i posted up some images i thought were fine UNTIL somebody pointed out how to make it better............so really it's a time/experience thing.

if you allow people to edit your post - you will see what they change
you need to check the edit box in your User CP
 
Hi guy and gals,
Just a quick thought. I've been reading all the tutorial guides and how to's on editing pictures, but the problem I have is identifying what form the editing should take.

I have posted a couple of photo's and got a comment of "Not too bad. Slightly soft, overexposed and talons & left wing amputated" for the hawk picture.

So, back to the original question..... I'm presuming it takes years of practice to get to the stage of being able to tell if the exposure is not correct, etc, but what would I have to do to get the picture looking its best (as it's my fave pic).

Cheers

Andy

This is about judgement, and making the judgement is made a lot easier if you have a good working environment, and a calibrated screen - your starting point will always be the same

The next question is about aesthetics - Some people prefer boosted colours, oversharp images, others cant abide it.. you need to decide why and what you are photographing for

The next point is about getting it right inthe camera. If you find that the auto setting in your image editing software is always indicating that you are one stop out.. lerarn from that and adjust how you shoot. Next time round, everything might just be pretty much spot on... the knock on of getting it right in the camera, is that when you start your PP, you have a lot more latitude for making the image absolutely perfect
 
The getting it right in camera thing is definitely 100% the way to go, read up as much as you can on getting exposure correct & metering modes. I would doubly recommend reading up on how to correctly interpret a histogram - one of the most important aspects of understanding what an image may need post processing wise.

I agree that it's experience that will allow you to judge what an image would benefit from in post processing, try out different methods of lightening, sharpening, blurring, etc & just see what works for you :thumbs:

If you're not sure then I'd advise just going ahead & using everything :lol: No, seriously though - use levels, curves, colour balance, etc (all as adjustment layers) & that way you can always just turn the adjustment layers off if you feel you don't need them. Always leave your sharpening as a separate layer too (you can just duplicate your base image) as that way you can adjust how much sharpening is applied via the opacity sliders.
 
CP settings updated. If anyone wants to have a fiddle with any of the images, please feel free (but let me know how you did it so I could have a go as well lol)

Andy
 
I have thought the same too. Where does one start when trying to look at a pic and then deciding what needs to be tweaked and how? I guess it is all down to practice.
 
So, back to the original question..... I'm presuming it takes years of practice to get to the stage of being able to tell if the exposure is not correct.

Definitely worth learning how to use/read your cameras histogram - it will really help you to understand this aspect of your images.
 
Andy, I too had a go at processing the hawk image and, with just a few small tweaks, have made what I hope is an improvement.

The changes I made can all be found under the Image/Adjustments menu option in CS5.

The first thing I did was adjust the levels. If you look at the histogram of your image, it is quite a long way away from the left hand edge, which means the dark parts are washed out. All I did was move the little black arrow on the left under the histogram across to the right to where the histogram actually starts.

The next thing I did was add a small curves adjustment, to increase the contrast slightly. This was just a case of moving the mid top right portion of the curve up very slightly, and the mid bottom left portion down slightly.

Next was a small boost in vibrance. I think I only pushed this up to a value of 10 or so.

The final thing I did was to sharpen the image. I did this using the unsharp mask, which can be found in the Filter/Sharpen menu. I think the values I used were Amount:112 Radius:1.2 pixels and Threshold:3.

This is how it turned out.

Before:
DSC_0116.jpg


After:
hawk.jpg


Hope that helps.

p.s. Next time, try not to cut his feet off. ;)
 
Last edited:
Andy, I too had a go at processing the hawk image and, with just a few small tweaks, have made what I hope is an improvement.

The changes I made can all be found under the Image/Adjustments menu option in CS5.

The first thing I did was adjust the levels. If you look at the histogram of your image, it is quite a long way away from the left hand edge, which means the dark parts are washed out. All I did was move the little black arrow on the left under the histogram across to the right to where the histogram actually starts.

The next thing I did was add a small curves adjustment, to increase the contrast slightly. This was just a case of moving the mid top right portion of the curve up very slightly, and the mid bottom left portion down slightly.

Next was a small boost in vibrance. I think I only pushed this up to a value of 10 or so.

The final thing I did was to sharpen the image. I did this using the unsharp mask, which can be found in the Filter/Sharpen menu. I think the values I used were Amount:112 Radius:1.2 pixels and Threshold:3.

This is how it turned out.

Before:
DSC_0116.jpg


After:
hawk.jpg


Hope that helps.

p.s. Next time, try not to cut his feet off. ;)

Thanks a lot for that, was really helpful and nice to see what a pro can do with the pic :D
TBH I think I was more shocked that he actually decided to land right in front of me, so it was a case of hope for the best lol
 
Hi Andy, you will always get lots of varying info from people which is good. We were all in the same boat as yourself once :lol: I have pointed out to people in the past that not being a one for reading I just practised with one Raw image for about 30min to an hour a night. Taking one slider at a time I would push it as far to the left and right to see what effect it had on the image, after that adjustments were more gradual. after a short time you will get a feeling of what needs adjusting to bring out the best in the image but let it be known we all cock up from time to time :lol: As there are so many variables between any one Raw file it is hard to say exactly what needs to be done, imo there are only simple ground rules and guidelines to follow. You might find a few pointers here for example http://www.talkphotography.co.uk/forums/showthread.php?t=204910 Scroll halfway down on the first page and you will see Jo has given a good description of what was needed in her circumstances. Hope this is of some help to you.
 
Not sure what your level of Aperture is, but when using the exposure slider hold down the cmd key when doing sliders, this will show you areas that are blown out (overexposed to the point of losing detail).

Start with exposure holding down cmd, slide to try and take away most of the over exposed sections, til the screen is almost black, next do the same with the recovery slider to remove any last little pieces of over exposure.

Next black point slider, make sure you have at least one little bit of black in the photo.

This method will give you a rough exposure which you can then tweak by eye. This will be a lot better if your monitor is calibrated to show correct colours. If your monitor is not calibrated, then using the cmd key for exposure is a great way of getting a good exposure.
 
One of the benefits of shooting in raw is that with photo's like the one of the barn owl you can recover highlight detail from area's that appear blown out when you process the raw file.

Pretty soon you get into a "zone" where you instinctively know which variation of your usual settings the image needs.

With mine I tend to work through them thus. (CS5/Adobe camera raw)

White balance
Exposure
Recovery if bright area's are blown out
Fill light if shadows need sorting out
Darks
Contrast
Clarity
Vibrancy
Saturation

Then onto sharpening in the detail tab.

I zoom to 100% on an area of interest then:

Set the radius to 0.6 or 0.7
Hold down the ALT key and drag the amount slider across until I am happy with the results.
(Holding down the ALT key switches to B&W makes things easier to see)
Then do the same with the detail slider, except this time I move it to reduce the halo's that show up.
I then do the same with the masking slider, so the background is masked but the detail and main subject left alone.
I then use the luminance slider to remove any unwanted "noise".

If I was shooting in high contrast conditions and have a slight purple fringe to the main subject (CA) then I go to the lens correction tab, turn de fringe on in the manual settings tab and use the blue/yellow and red/cyan sliders to remove it, finally I use the vignette controls if the edges of the image are vignetted.

I then open the image, duplicate the layer, do levels, a final sharpening and any cropping resizing, before saving.
I never write over the original RAW file, I save them as if I was storing negatives in the days of film, that way I always have the unaltered original RAW image to go back to at a later date if I wish to re do the photo or have a different idea on processing it.

Right now that might seem complicated, but trust me it becomes second nature in no time, so you can process fairly quickly.

If I have a batch of images I know I will process in the same manner in photoshop, I will use the batch automation, I also use that for re sizing when I have a lot to do.

NB: the ALT key = cmd key on a mac.
 
Last edited:
One of the benefits of shooting in raw is that with photo's like the one of the barn owl you can recover highlight detail from area's that appear blown out when you process the raw file.

Pretty soon you get into a "zone" where you instinctively know which variation of your usual settings the image needs.

With mine I tend to work through them thus. (CS5/Adobe camera raw)

White balance
Exposure
Recovery if bright area's are blown out
Fill light if shadows need sorting out
Darks
Contrast
Clarity
Vibrancy
Saturation

Then onto sharpening in the detail tab.

I zoom to 100% on an area of interest then:

Set the radius to 0.6 or 0.7
Hold down the ALT key and drag the amount slider across until I am happy with the results.
(Holding down the ALT key switches to B&W makes things easier to see)
Then do the same with the detail slider, except this time I move it to reduce the halo's that show up.
I then do the same with the masking slider, so the background is masked but the detail and main subject left alone.
I then use the luminance slider to remove any unwanted "noise".

If I was shooting in high contrast conditions and have a slight purple fringe to the main subject (CA) then I go to the lens correction tab, turn de fringe on in the manual settings tab and use the blue/yellow and red/cyan sliders to remove it, finally I use the vignette controls if the edges of the image are vignetted.

I then open the image, duplicate the layer, do levels, a final sharpening and any cropping resizing, before saving.
I never write over the original RAW file, I save them as if I was storing negatives in the days of film, that way I always have the unaltered original RAW image to go back to at a later date if I wish to re do the photo or have a different idea on processing it.

Right now that might seem complicated, but trust me it becomes second nature in no time, so you can process fairly quickly.

If I have a batch of images I know I will process in the same manner in photoshop, I will use the batch automation, I also use that for re sizing when I have a lot to do.

NB: the ALT key = cmd key on a mac.

Tips now printed and will be used for pic editing :) Cheers buddy :D
 
Back
Top