Beginner Really struggling

Last edited:
  • Like
Reactions: FSV
Thank you for that. I bought a book for the camera which told me to use the button on the front of the camera whilst looking through the viewfinder to see the difference between settings. However I can't see what the difference is when looking through the viewfinder. I am going to make a cuppa and sit down and read your tutorial. Hopefully it will help me improve
 
Hi Blaine

It's a very general question. Can you be more specific about what it is your struggling to understand or even better, post up some images that illustrate what you were trying to do and why you think they've not worked.

Do you understand the 'exposure triangle' - the relationship between shutter speed, aperture and ISO and the effect these 3 variables have on exposure ?

Increasing your aperture (making it bigger) results in a shallower depth of focus however it also allows more light to enter the camera.

Increasing your shutter speed (making it faster) allows you photograph faster subjects however it also lets less light enter the camera.

In simple terms - when you increase your shutter speed - then you would increase your aperture to ensure the exposure is correct.

Depending on your priority (depth of focus or subject speed) - you can set your camera so you control aperture OR shutter speed - and let the camera decide the other for you.

When you need both shutter speed and aperture at a particular value that doesn't add up - you can adjust your ISO or exposure compensation.
 
If you are getting confused with the f numbers and what they do. I always suggest to beginners ,large scene = large number i.e f16-f22

So if you want everything sharper Depth Of Field (front to back shaprness) and you are photographing landscapes then normally you use either f16 or f22
Portraits that you want the background out of focus f5.6- f6.3

i knwo there is more to apertures and sharpness than that, but with those two understandings you can concentrate on taking photos and not getting "hung up" on the confusing stuff, you will learn that as you go along, plenty time

Have a read of Bryan Peterson Understanding Exposure. Great for beginners.
 
I understand the exposure triangle to an extent yes. To be honest I have had the camera for about a year and a half and only recently started to get it off auto mode but I still am only using Aperture Priority and Tv modes on it. It's hard to describe what I mean. I just struggle generally to understand which settings to use in what environments. Like for example what to use for Wildlife, Landscape, Automotive etc. I tend to always find myself going back to auto mode and I don't want this to be the case. I will upload some pictures later on.
 
It takes a while Blaine, dont let it frustrate you :) (easier said than done I know), but you will get there, just persevere and when it clicks into place, you'll be so glad you stuck with trying to figure it out.

am going to spend 20 minutes writing you something based on the types of photography you mentioned above, to give you a startup and the effects of adjusting against those types. Hopefully this might give you a better understanding
 
Last edited:
It takes a while Blaine, dont let it frustrate you :) (easier said than done I know), but you will get there, just persevere and when it clicks into place, you'll be so glad you stuck with trying to figure it out.

am going to spend 20 minutes writing you something based on the types of photography you mentioned above, to give you a startup and the effects of adjusting against those types. Hopefully this might give you a better understanding

Thank you very much!
 
maybe this will help.. the obvious basics.. the smaller the number. the less will be in focus..( shallow depth of field ). every lens has its "sweet spot" for optimum sharpness ( normally this can be around f/8 to f/11 ).
now on to the part you struggle with... what to set aperture for each scenerio... honestly.. there is no defined rule. take landscapes for instance... its all down to how you want your shot to appear.
you can should a big wide landscape that has plenty of foreground interest and has the background fading to a soft blur ( shallow DOF say f/4 ). or you could shoot it so the you focus on the background and have a soft foreground ( again say f/4 but move the focus point to the distance ).. or you might want front to back focus so you choose say f/8- f/11 and focus around 1/3rd into the scene ( hyperfocal distance ) for sharpness and focus throughout the scene.

For portraits you want to in general have the background blurred a little.. so a smaller DOF ( but just sometimes if the portrait/person are outside and part of say a landscape shot ( girl in a waterfall as example ) .. you may want a higher dof to bring the background in as well.

macro photography ( flowers and bugs and the like . you want to blur the background while retaining as much sharpness on the actual object.) The closer the subject the smaller the focus area hence why macro can be quite hard as you are working on a scale of mm rather than metres for say a landscape.

for motorsports and the like if you want the subject to "Pop out" then youw ant background blur ( though this can be obtained from a high DOF and panning while shooting ).

it may sound silly but i suggest go out with camera and find a bridge.

take 3 shots of the bridge from say 30 yards away.. one at your smallest DOF, one in the middle ( around f/8-f/16 ) and one at the largest dof ( f/22 or whatever your lens goes to.

now get to around 10 feet of the bridge and do the same ( doesnt matter if you can get all the bridge in

finally last 3 shots.. stand on the bridge and pick a feature out on it ( a post on the bridge, a bit of wall if its a brick bridge. something that you can isolate.. and again take 3 shots of that subject making sure that you frame the shot so some background is in the frame.

then go home and compare the effects of both DOF and distance.... and wee which images please you..

you can do the same at home with an apple or some other bit of fruit on a table.. shoot it from as far across the room as you can at the 3 scales then again from around 1 foot away.

its the easiest way to understand how it works and the effects it has on subjects and distance..

give it a go and stick up the results.. main thing is to experiment until you feel happy with it and not get to wrapped up in the numbers.
 
Ok, you have mentioned Wildlife: Landscape: Automotive. We'll add people in there too.

Theres a million variables to consider - but dont let that daunt you. 3 simple steps then adjust to get it how you want it and adjust it again as many times as you need to get it right, unless of course, the subject flies away, drives away or walk away then you can't - but start off with simple stuff.

A parked car that isn't going to go anywhere.
A dog or cat lying outside sleeping.
A tree.
A field.


The main things I do FIRST is:
Set the shutterspeed appropriate to what I am trying to photograph.
Then consider your lighting. Always set your ISO to 100 - to begin with, we can adjust ISO sensitivity once we've put our settings together and then adjust. We set it to 100 because we want the least amount of noise in our images.
Then your F-Stop aperture setting because we either want to (1) pop the subject out from the background or (2) have everything in the scene, all in focus. i.e. a landscape.

I did have this being really lengthy but have deleted all my notes as theres too many variables. Start with shutterspeed first, iso low as it can go, then your depth of field, then adjust ISO to compensate for exposure, if necessary open up the aperture (lower the F stop number as much as possible), when your aperture is as open as possible, say F3.5 on your kit lens, then you'll need to up your ISO to account for poor lighting.


If it is too bright, even at 250th with ISO100 and aperture as open as possible (to pop your subjects) start pumping up the shutterspeed to catch less light.


You will get there, just keep taking photographs. Stop using AV/TV if you want more control and persevere.
 
  • Like
Reactions: FSV
Putting the shutter speed thing to one side, what had confused me for years - and sometimes still does - is how I kept thinking that the bigger the F number, the bigger the aperture is! But I've learnt that the f-number is the focus (hence the letter f) range - thus a large f number covering a longer focus range is achieved with a small tight aperture.
So when you fit in a lens that is capable of doing f1.8, that will then create a very short focus range. In other words, the subject close to you is in focus, but the background becomes all blurred.

We all gotta start somewhere, but once it clicks in, the rest will follow. Hang on in there.
 
yep, the aperture is confusing when the numbers getting bigger yet the amount of light getting in, gets smaller. It makes sense once it clicks in though, unfortunately there wasn't even a tutorial that explained it well enough for me, when the numbers started coming out and then focal depth etc.. it just drove me crazy. Best thing to do is take a photograph of the same object using different settings , maybe even write down what settings you used for each take, then you can look at the image and "see" the differences.
 
I found when i started photographer that just one day it all came together,keep at it don't worry to much about making mistakes and it will start to happen :)
 
Blaine, I did something very simple to explain this to my wife. I found a fixed object (in our case 3 beer bottles spaced about 1cm apart, and a set of bullrushes at the local lake. We set the ISO at 100.

In AV mode we focused on the nearest object (i.e. the first beer bottle) and took 1 shot at f2.8, another at f5.6 and another at f11. The results showed the depth of focus (or depth of field) changed as we changed the aperture of the lens. We then switched to TV (Shutter Priority) and took 3 shots of the bulrushes that were moving in the wind, one at .5 sec, another at 1/60 sec and another at 1/500 sec and looked at the differences (we used auto ISO for this bit).

Once you have the understanding of shutter speed and aperture you can then get an idea of how to apply this knowledge to your subject, knowing that a small aperture gives you a shallow depth of field and will generally have a faster shutter speed, and if you want to capture a lot of things in focus, you apply the reverse.

Hope that helps.

Steve
 
One thing that I don't has been mentioned is that a 1 stop change in aperture is a change in the f number by a factor of about 1.4 to the f number (I believe it's actually square root of 2). e.g. 4 - 5.6 - 8 - 11 - 16.

A 1 stop change is the same as doubling/halving the shutter speed or ISO.
 
Keep in mind aperture is expressed as a ratio (focal length/hole in the lens). So if a lens has a focal length of 50mm and the hole is 25mm in diameter then the aperture is expressed as f2.
If the hole is reduced to approx 12mm the the aperture will be ~ f4 (50/12). If the hole is reduced to 2mm then the aperture will be ~f25

Just an expansion on Steve's statement (post #21):
A smaller aperture (numerically larger f number) then the depth of field will be greater, not shallower.
You may find this Depth of field calculator gives you an idea (there is more into depth of field than just aperture).

http://www.dofmaster.com/dofjs.html

--------------------------

In the real world when shooting I tend to think like this:
What is the important things for the shot I want to take?
#1 No unwanted camera movement.
#2 No unwanted subject movewent
#3 Do I want to isolate the subject by use of shallow DOF (there are other ways of isolating the subject)?
#4 Minimum noise in the image (this means shooting at the lowest native ISO)
Sometimes light/subject/gear will not allow you to achieve optimum settings then you need to compromise (for me that means having more noise is better than having an image ruined by camera motion)

What shooting mode I using will depend on what is most important to me.

For motor sport it will be in shutter priority (I do not want to freeze motion - I may as well be shooting parked cars) as I want to have blurred wheels at the minimum.
I will be shooting at around 1/250-1/320 (unless panning), it may be slower in some cases depending on the velocity of the racing cars
Around f8-f11 (on a DSLR will give me a reasonable DOF )so I will set my ISO to give me that.
Shooting at such realtively slow shutter means some sort of support when hand holding long lenses (which is pretty normal) . I normally use a monopod (never ever a triopd).

Example #1
1/320 give me blurred wheels + rain streaks and f9 give me a reasonable DOF even when shooting @320mm

Laurie Burton 1969 TVR Tuscan by dicktay2000, on Flickr

With wildlife you can go a few different ways.
#1 Isolate the subject by using shallow DOF (this means I will be shooting aperture priority with the lens wide open or fairly wide open) and the ISO set (not necessarily minimum) to give me a minimum shutter speed so that camera shake or subject movement is not a problem - if the shutter speed gets shorter than that is not really a problem as it gives me some leeway if ths subject starts to move.

Example #2
1/1250 @ f6.3 (nearly wide open) and ISO 400 (that camera is ok at ISO 400) and F=400mm
In a local duckpond. by dicktay2000, on Flickr
If the birds decide to take off then the shutter speed may freeze a lot of the motion.

#2 Or you may want to shoot wildlife in a scene as in this case where I wanted a bit of DOF. Probably in shutter priority (it was a while ago)
Example #3
1/250 @ f16 and ISO 400, F=70mm
Taking a break by dicktay2000, on Flickr

For landscapes try shooting around F11 to give you fair a bit of DOF especially when using wider angle lenses.

Example #4 with a wide angle lens
6 seconds @ f11 at ISO 100 and F24mm (on a full fame camera)
I was on a tripod (with a remote release) and using a ND grad filter to control the sky. Manual exposure.

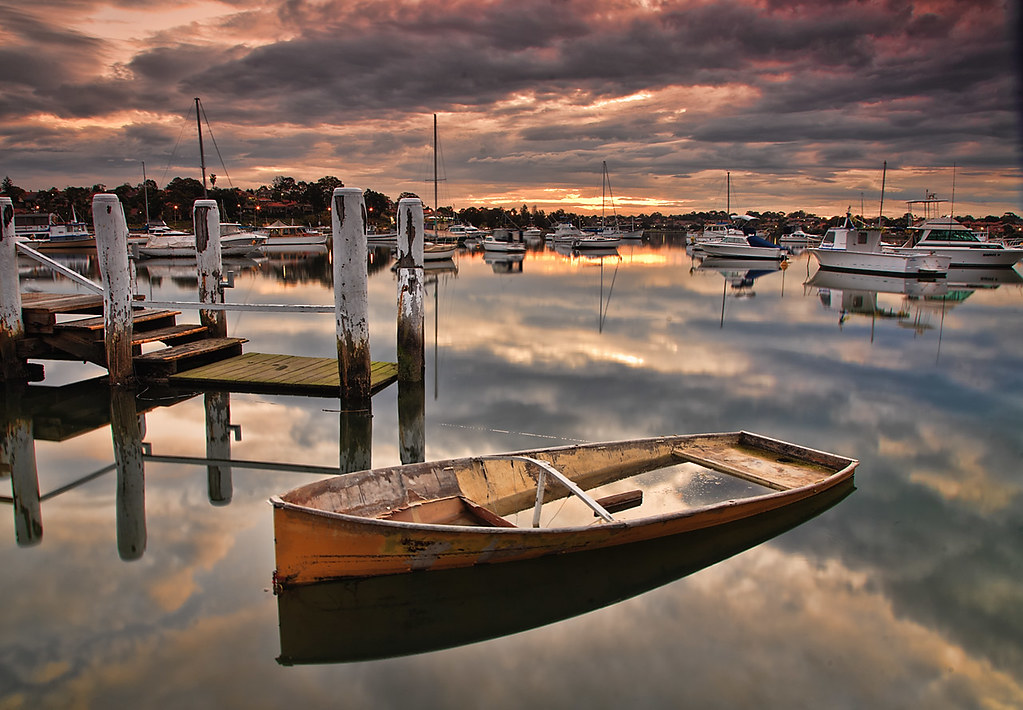
Sunken boat at sunset. by dicktay2000, on Flickr


Sometimes when just walking around city streets etc, with a 'standard zoom" etc, just set your aperture to f8 and you will have enough working depth of field for a lot of street grabs. Just make sure your ISO is hig enough so your shutter speed is fast enough to stop unwanted subject and camera motion (even if a subject is in the shade). You may have heard a saying "f8 and be there".
 
Last edited:
Just an expansion on Steve's statement (post #21):
A smaller aperture (numerically larger f number) then the depth of field will be greater, not shallower.
You may find this Depth of field calculator gives you an idea (there is more into depth of field than just aperture).

http://www.dofmaster.com/dofjs.html

--------------------------

Yes, I should have said as the aperture "number" gets smaller. Sorry for the confusion :oops: :$
 
Hi, Blaine, some cracking advice above.

Stick with it. It'll take a while to 'get it' but when it clicks it's great.

Advice from me, KISS..to start :)

Cheers.
 
  • Like
Reactions: FSV
It was explained to me as 'the camera is a beehive' lol.

The iso is the number of bees gathering honey (light), the shutter speed is how quickly they move to gather it and the aperture is how large the door is for the bees to get through. The larger the door, the less is in focus. And a high number = a narrow doorway.

I don't know if that will help though! It's a pretty simplistic way of describing it.

I'd recommend reading understanding exposure and completing the exercises as you do, they're invaluable.
 
  • Like
Reactions: FSV
So glad I'm not the only beginner struggling to even get off auto settings... I'm going to sit down later and really read through this.... At a glance there are some fantastic answers!
 
  • Like
Reactions: FSV
Another quick thanks from a beginner!

Some of these quick explanations have worked way better for me than the ones in some of the books I've purchased.
 
  • Like
Reactions: FSV
Buy a copy of Understanding Exposure, stick your camera in manual and follow the guidance given....practice, practice, practice! Only by making mistakes will you learn, so don't be shy!
 
Aperture priority:
Keep taking the same shot at different apertures. Then look at what happens to the background. Blurry background at apertures of f/3.5 through to totally sharp background at F/16 etc.

Shutter priority:
Then take photos of something moving at different shutter speeds. Then look at what happens to the object. Blurry to sharp. Blurry at 1/15 of a second. Sharp object at 1/500 of a second.

Look at all the settings used in your photos. Buy Bryan Peterson's book understanding exposure. Finally, don't give up. Eventually one of those shutter clicks will click in your mind too. Been there :)
 
Hi Blaine,

Just another different angle on this to what's been mentioned so far - there's such a thing as trying too hard and that can be quite destructive. There's a lot to take in technically with photography but remember there are absolutely no requirements for what you *need* to learn and when you need to learn it, you can take things at your own pace and learn in your own way. If you're getting a little stressed by not completely understanding settings then don't worry too much about them, take photos and fiddle around with settings until the images start looking something like you want. Once the images look right you can then look at the EXIF data to see what settings were used where and why they worked or failed. In time your understanding of settings will start to become instinctive, and that will probably happen without you even realising it.

There's more than one way of learning all this stuff and digital can make it very easy, just go enjoy taking photos and don't let it worry you. :)
 
to give an idea that its not all technical and mathematical mumbo jumbo...ive been shooting for over 30 years, digital for the past 8 or so years.. and i still dont understand the histogram!
sure i know to far right its bright, to far left its to dark.. BUT... i dont need a bunch of squiggly lines that look like amountain range to tell me that.. thats what my eyes are for.
we can get to wrapped up in the technical side of things yet in all honesty thats not what photography is about. when you look at how long camera have been around the first and foremost aspect is "seeing the shot you want"
shot what looks and feels right to you .. not what some book or chart tells you.. because if we all followed the rules, everyones pictures would be the same.
 
Hi Blaine,

Just another different angle on this to what's been mentioned so far - there's such a thing as trying too hard and that can be quite destructive. There's a lot to take in technically with photography but remember there are absolutely no requirements for what you *need* to learn and when you need to learn it, you can take things at your own pace and learn in your own way. If you're getting a little stressed by not completely understanding settings then don't worry too much about them, take photos and fiddle around with settings until the images start looking something like you want. Once the images look right you can then look at the EXIF data to see what settings were used where and why they worked or failed. In time your understanding of settings will start to become instinctive, and that will probably happen without you even realising it.

There's more than one way of learning all this stuff and digital can make it very easy, just go enjoy taking photos and don't let it worry you. :)
This. Absolutely!

Some of the most talented photographers describe themselves as not really technical.

Forums are full of people who buy their gear based on mtf charts and agonise over technical issues and have never taken a photograph worth looking at.
 
It is very simple, (just to recap what others have said)

Aperture controls the amount in Focus, Small number, small amount in focus, Large number, lots in Focus

Shutter speed controls how much you freeze the action, Small number i.e. 1/8000 no movement - 30s lots of movement

ISO low number i.e. 100 not very light sensitive, ISO 3200 very light sensitive but also lower quality generally

Being able to change the ISO allows us to use a different set of Aperture and Shutter Speed in any given light

Mike
 
So glad I'm not the only beginner struggling to even get off auto settings... I'm going to sit down later and really read through this.... At a glance there are some fantastic answers!

Just remember that the jump isn't from Auto to full manual. It should be from Auto to one of the creative settings. You've paid enough for the camera, let it at least do some of the work!
 
Anyone mind if I chime in and ask something? I get how f-numbers and aperture work for the most part, but how do you figure out what is going to be in focus when shooting with the same aperture but from different distances? Like photographing a toy from a foot away and then photographing the whole shelf the toy is on, with a rug in the foreground from the other side of the room, both at say f5. What difference does distance from the subject have on depth of field? Say if you have a foot behind the toy when close up, what would be in focus in the other shot? I know that the closer you shoot, the less depth of field, but is there a way to work this out other than trial and error?

At f5, depth of field/focus behind focus point seems to be about half the distance from camera to focus point, but how does that increase per decreased aperture/higher f-number?
 
Last edited:
Back
Top