Separating background from subject in Photoshop

Messages
1,416
Name
Mike
Edit My Images
Yes
I have to take a series of photos of Bonsai trees which are shot against a grey background. Somehow I'd like to add either light rays or highlights/shading but only on the background, not the trees.

Anyone any help or advice please?
 
Last edited:
I have to take a series of photos of Bonsai trees which are shot against a grey background. Somehow I'd like to add either light rays or highlights/shading but only on the background, not the trees.

Anyone any help or advice please?
Have you thought about the scatter gels, you fit to the light, which reflect on the background ?

 
Last edited:
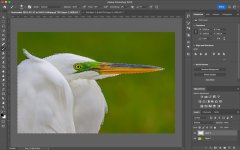
Photoshop now has select subject/remove background functions which can also be used to select the BG and mask subject (invert the selection/mask).

Untitled-2.jpg


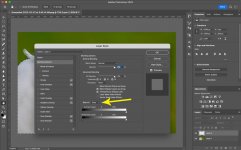
And if the BG is a certain tone (grey) or color (e.g. green) you can double click on your new layer and use the "blend if" options to limit it to certain areas.

Untitled-1.jpg
 
Thanks for the help Steven but whenever I try to add the light rays, they also affect the selection too. I finish up with the area I've selected/inverted looking all washed out from the light rays.

I've been using 'Select Subject' then 'Select and Mask' then 'Invert' and finally 'Save Selection'. I then add a new layer to put the light rays on but this washes over everything.
 
Last edited:
Have you got the main subject layer as the top one and the light rays as the bottom one ???
 
Thanks for the help Steven but whenever I try to add the light rays, they also affect the selection too. I finish up with the area I've selected/inverted looking all washed out from the light rays.

I've been using 'Select Subject' then 'Select and Mask' then 'Invert' and finally 'Save Selection'. I then add a new layer to put the light rays on but this washes over everything.
"Save selection" saves it as a channel; you need to use it to create a layer mask. You can use the saved channel to do that, but all of that isn't necessary.

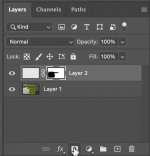
Create your new layer for the light-rays above your main layer. Then go to the main layer and choose "select subject" in the properties panel (or select menu). Then select the light-ray layer and click on the add layer mask button below the layers while holding the alt/option key (inverts the selection and then makes the layer mask). You should end up with a layer mask with the subject masked out in black.

Screenshot-2023-04-01-at-12.23.24-PM.jpg
 
Last edited:
Thanks for all your help and patience Steven. I'll give it a try.
 
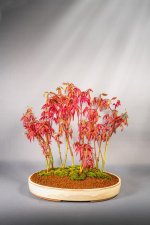
I had a very quick try and it worked really well. Not much time spent on the masking but I can do that when I do that and take more care when I do the photos.

Thanks again for all the help. Really appreciated.

.Bonsai Atropurpurea Light.jpg
 
Last edited:
I had a very quick try and it worked really well. Not much time spent on the masking but I can do that when I do that and take more care when I do the photos.

Thanks again for all the help. Really appreciated.
Don't forget that you can use the blend-if layer options in conjunction... you have R/G/B options as well as luminance (gray); and those can be combined. It's basically a set of secondary invisible layer masks.
 
Blend-if and R/G/B options is something I've never used before so I'll do a search and see what I can find. Really enjoying this, thank you.
 
A follow up question for Steven (SK66) if I may.
I've used the method you posted and it works really well. Is there any way I can get back to the layer mask after I've added it please? I'm still missing bits among the branches that I don't see until I've done the final stage: "select the light-ray layer and click on the add layer mask button below the layers while holding the alt/option key (inverts the selection and then makes the layer mask".
If I understand the question correctly...
Hold down command and click on the layer mask. That will select all parts of the mask that are white (i.e. the BG showing through). Hitting shift/CMD/I will invert the selection and choose the black areas (subject)... or you can use menu>select>inverse.
 
If I understand the question correctly...
Hold down command and click on the layer mask. That will select all parts of the mask that are white (i.e. the BG showing through). Hitting shift/CMD/I will invert the selection and choose the black areas (subject)... or you can use menu>select>inverse.
Thanks again for the help Steven. I'll give it a try.
 
Back
Top