Other Macro Show us your macro rig

A couple of weeks ago, on a rainy day, I went with my 5D3 and 100mm macro to the local butterfly house. I realised I needed an aperture of f11 to get the focus. I have read through this and find some of the set ups amazing. So, my question is if you were going to buy one more piece of kit (and I am not a DIY expert) what would it be? I am not interested photographing the tiny insects ..just want to see how I go with butterflies. I didn't take a tripod as it was school holidays so I hVe one of those (or two ). Thanks for your thoughts.
 

In all honesty I can't think what else you need to buy. What didn't you like about the images? You have a very capable camera, I'm guessing a halfway decent macro lens, not sure what else is needed.

What were the specific issues you faced? We can help with how to overcome specific problems but it sounds like you have more than enough to be able to get decent pictures with what you've got.

Might be best focussing on your technique rather than getting your cheque book out at this stage, but post some examples in this forum and we'll help out where we can.
 
Last edited:
Well, there has been a lot of talk on here about extension tubes, ring flash... Wondered if I was wasting my time if I didn't have stuff like that. Very happy not to spend money! :banana:
 
Well, there has been a lot of talk on here about extension tubes, ring flash... Wondered if I was wasting my time if I didn't have stuff like that. Very happy not to spend money! :banana:
If you are using a macro lens that will 1:1 with butterflies it should be all you need unless you after micro moths or the like.

After that it is about focusing, framing and light.
 
Last edited:
So, I made a diffuser for my pop-up flash (to compliment the Pringles tube jobbie I have for my speedlight)...

pop-up diffuser.jpg

It's a couple of toilet-roll tubes lined with foil, with the neck of a plastic bottle (also foil coated) stuck in the end. I made a bend in the tubes to slide over the pop-up and and a "Heath-Robinson" cuff made from another bit of the plastic bottle to hold it on the lens barrel. The end is covered by some cloth that some electrical item or other was wrapped in when it came out of the box. The whole lot was then wrapped in duct tape to give it a bit of durability.

Cheap as chips, but it works nicely and is less unwieldy than my speedlight.
 
Last edited:
I'll probably get banned for this heresy and it is definitely not suitable for dragonflies in flight.

I have been trying to set a decent reproducible lens test bed for a recently purchased batch of microfiche lenses but everything seemed to suffer from vibration, lack of parallelism and lack of reproducibility. So I came up with the idea of using my elderly model making lathe which recently has been doing sterling service making lens adapters. I removed the saddle and fitted a machine vice to which I clamped the camera via an orphaned QR plate. I replaced the chuck with a faceplate and very gently clamped my Nova 7 tablet to it with some step clamps.. Both camera and tablet were protected with thin foam.

The whole thing is rigid and accurate to within thou or so (my lathe is inherently imperial!)

I got the idea of using an lcd screen as a test from a post on microphotography forum. There are some reservations about it as a test subject but since most people have a phone or tablet images can be exchanged and compared.


A7-00013.jpg

And this is the image using a micro Minolta microfiche x21 lens reversed with a 200mm 'tube' lens, actually an old Soligor 200mm f4.5 focused at infinity.Screen is Nexus 7 323 DPI

A7-0589.jpg

and at pixel level

A7 crop-0589.jpg
 
Last edited:
I'll probably get banned for this heresy and it is definitely not suitable for dragonflies in flight.

I have been trying to set a decent reproducible lens test bed for a recently purchased batch of microfiche lenses but everything seemed to suffer from vibration, lack of parallelism and lack of reproducibility. So I came up with the idea of using my elderly model making lathe which recently has been doing sterling service making lens adapters. I removed the saddle and fitted a machine vice to which I clamped the camera via an orphaned QR plate. I replaced the chuck with a faceplate and very gently clamped my Nova 7 tablet to it with some step clamps.. Both camera and tablet were protected with thin foam.

The whole thing is rigid and accurate to within thou or so (my lathe is inherently imperial!)

I got the idea of using an lcd screen as a test from a post on microphotography forum. There are some reservations about it as a test subject but since most people have a phone or tablet images can be exchanged and compared.


View attachment 65174

And this is the image using a micro Minolta microfiche x21 lens reversed with a 200mm 'tube' lens, actually an old Soligor 200mm f4.5 focused at infinity.Screen is Nexus 7 323 DPI

View attachment 65175

and at pixel level

View attachment 65182
Well that's making the most of what you've got, great result too. I bet it's rock solid. How easy is it to increment the focus distance, and how small an increment do you reckon you can get?
 
How easy is it to increment the focus distance, and how small an increment do you reckon you can get?

The camera is fixed to the cross slide on the carriage so I can adjust to 0.001 inch (25.4 microns) in X and Y directions. The great virtue of the rig is stability. On my usual set up focusing is an iterative process as removing my hand from the Velbon Mag slider makes the focusing adjustment move slightly. On this I can focus. remove my hand from the carriage adjustment handwheel and nothing changes.

It was really only a lens testbed though, totally impractical for normal use,
 
I use three macro rigs.


This my M4/3 macro rig:


An Olympus OM-D E-M10, Olympus 45mm f/1.8, Marumi DHG200 and Raynox DCR-250. What is missing from the picture, but I also use, are FOTGA extension tubes and Meike MK320 with a DIY diffuser.

This is my Nikon 1 macro rig:


Nikon 1 V1, Nikkor VR 30-110mm f/3.8-5.6, Marumi DHG200 and Raynox DCR-250

And my macro rig for the pants pocket. A Ricoh GR Digital III and a DIY diffuser:

P4090005.jpg
 
Unconventional and cheap - but enough of me, here's my rig.

Consisting of a Jessops slide converter lens (T Mount, without the tube/slide attachment) and DIY loo roll tube flash matched to my 5N

IMG_3053 by Pete Johns, on Flickr

Trashy but great fun - uncropped image

DSC08102 by John Pond, on Flickr
 
Last edited:
This is an older photo from when I first made it. I have since added some translucent film across the doughnut shaped area where the light escapes around my center tube. Here are some photos I took with it yesterday:

IMG_5792 by ahs1599, on Flickr

IMG_5734 by ahs1599, on Flickr

IMG_5738 by ahs1599, on Flickr
Excellent shots and it looks like it works very well, now maybe I could try this.

Thanks
 
Here are a few more pics of the assembly. I took a frozen pizza box and opened it up, used contact cement to apply a layer of aluminum foil and cut my shapes to create the "periscope" design. I used one of the scraps for the extender tube to prevent flashback into the lens from the sides - aluminum on the outside, black on the inside. I purchased a 1" tube extension for the outside of the lens so it stays on. Oh, and a little velcro square on the upper inside of the diffuser shaft and the other on the top of my flash and it stays put nicely!

flash diffuser down the barrel by ahs1599, on Flickr

flash diffuser side view by ahs1599, on Flickr

flash diffuser assembled front view by ahs1599, on Flickr
 
Last edited:
Maybe slightly OT, but I did tell @GardenersHelper I would post some pics of my Travel kit:

Travel Kit by Tim Garlick, on Flickr

Travel Kit - Accessories by Tim Garlick, on Flickr

If you click through to Flickr you'll be able to see notes showing what everything is. It may look like a lot, but it all packs away into the camera protector section in the lower half of a regular backpack. I still have room for a laptop and a few travel provisions (the accessories go in the suitcase). Basically it enables me to do whatever I feel like whilst I am away, from landscapes to extreme macro, maybe even some night time long exposures, astro and video. There's a few components I'd like to add or upgrade and if really pushed there are a few items I could leave out (the 2 macro lenses are by far the biggest and heaviest components, and there are much smaller and lighter options available to me); but it all comes in at under the standard 10kg for carry-on luggage, and that's including a backup camera :p
 
Last edited:
This is an older photo from when I first made it. I have since added some translucent film across the doughnut shaped area where the light escapes around my center tube. Here are some photos I took with it yesterday:

IMG_5792 by ahs1599, on Flickr

Blimey, how far from the nest were you?

They look like they are primed and ready to attack ?
 
Maybe slightly OT, but I did tell @GardenersHelper I would post some pics of my Travel kit:

Travel Kit by Tim Garlick, on Flickr

Travel Kit - Accessories by Tim Garlick, on Flickr

If you click through to Flickr you'll be able to see notes showing what everything is. It may look like a lot, but it all packs away into the camera protector section in the lower half of a regular backpack. I still have room for a laptop and a few travel provisions (the accessories go in the suitcase). Basically it enables me to do whatever I feel like whilst I am away, from landscapes to extreme macro, maybe even some night time long exposures, astro and video. There's a few components I'd like to add or upgrade and if really pushed there are a few items I could leave out (the 2 macro lenses are by far the biggest and heaviest components, and there are much smaller and lighter options available to me); but it all comes in at under the standard 10kg for carry-on luggage, and that's including a backup camera :p


:eek::eek::eek::eek::eek::eek:
 
Here's my macro setup.

Nikon D7200, Sigma 105 OS Macro lens, 35mm Kenko extension tube, R1 flash kit with stofens, SU800 chinese copy, homemade diffuser.


Macro setup
by AndyThilo, on Flickr
 
Last edited:
So, I made a diffuser for my pop-up flash (to compliment the Pringles tube jobbie I have for my speedlight)...

View attachment 64197

It's a couple of toilet-roll tubes lined with foil, with the neck of a plastic bottle (also foil coated) stuck in the end. I made a bend in the tubes to slide over the pop-up and and a "Heath-Robinson" cuff made from another bit of the plastic bottle to hold it on the lens barrel. The end is covered by some cloth that some electrical item or other was wrapped in when it came out of the box. The whole lot was then wrapped in duct tape to give it a bit of durability.

Cheap as chips, but it works nicely and is less unwieldy than my speedlight.
I like the look but what have you taken with it?
 
Thanks for that, they look quite nice. Have you taken any beetles or bugs with it (they are the biggest problem for my setup)
 
I use a Canon 50d with a 60mm lens, that's the only lens I have for Macro, I find that if I get too close to the subject that the photo becomes blurred. I like getting close to the inside of a flower.
 
I use a Canon 50d with a 60mm lens, that's the only lens I have for Macro, I find that if I get too close to the subject that the photo becomes blurred. I like getting close to the inside of a flower.

Shirley if you get closer than the minimum focus distance of the lens which is 20 cm from the sensor (as far as I can tell) the picture will be blurred.This is about the same for my Olympus 60mm nacro lens.
Is this what you are saying happens?

If you which to get closer you will need extension tubes or a Raynox or similiar.
 
Last edited:
Latest kit for close-up/macro.

The cameras


0975 20 The cameras
by gardenersassistant, on Flickr

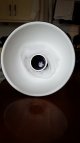
Canon 70D APS-C dSLR with 55-250 STM, shown here on the left with a Canon 500D +2 diopter close-up lens. I use the 70D for natural light shots, mainly flowers, occasionally large insects like butterflies and damselflies, and very occasionally (none this year so far) long exposure still air tripod shots.

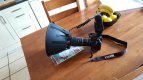
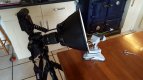
Panasonic FZ330 small sensor bridge camera shown on the right with Venus Optics KX800 twin flash, used mainly for flash (along with very similar FZ200), sometimes used for natural light shots of flowers and large insects.

The close-up lenses uses for flash work


0975 21 The close-up lenses and their concave diffusers
by gardenersassistant, on Flickr

Top image. Each close-up lens is shown with the concave diffuser used with it. These are, left to right, Raynox 150 (4.8 diopters), Raynox 250 (8 diopters), Raynox 150 and 250 stacked (12.8 diopters), front right Raynox MSN-202 (25 diopters), rear right Raynox MSN-505 (32 diopters).

Bottom image. The close-up lenses in their cases, each marked side and top with a different velcro pattern so I can find the one I want (by touch if necessary). The boxes have foam and other padding so the lenses don't rattle around. Each lens has a lens cap but is open at the other end.

Flash head diffusers


0975 22 Flash head diffuser
by gardenersassistant, on Flickr

Each diffuser has three layers, two of "plastic paper" and one of expanded polystyrene. They attach to the flash heads with velcro.

Raynox 150 and 250 setups on the FZ330


0975 23 Raynox 250 and 150 setups
by gardenersassistant, on Flickr

On the left, Raynox 250 setup. Raynox 150 setup on the right. The Raynox 150 is the least powerful of the lenses used with flash and needs the largest concave diffuser. To stop it waving around in the breeze it is supported by the KX800 focusing light using a strip of velcro. The slack in the support lets the concave diffuser move as the camera lens moves in and out.

The focusing light lets me use these setups at night, and can also help the autofocusing work in poor daytime light/in shade.

Concave diffuser and flexible arm arrangement


0975 24 Concave diffuser and flexible arm arrangements
by gardenersassistant, on Flickr

The close-up lenses and concave diffusers have velcro on them so the concave diffusers can be attached to the close-up lenses as shown on the left. One of the flash heads has been moved out of the way for this shot, and it is in the sort of position that can be used to illuminate dark backgrounds while the other head is used to illuminate the subject.

As shown on the right, the arms are crossed over as it turns out this is the best configuration to get the heads into a suitable position and adjust them without stressing the wiring that runs through the flexible arms.

The LCD hood


0975 25 LCD hood
by gardenersassistant, on Flickr

The hood fits the FZ200, FZ330 and 70D.

The batteries


0975 14 Batteries for cameras and flash - matchsticks show next flash batteries to use 1300h
by gardenersassistant, on Flickr

There are two matchsticks, one in the AAA batteries and one in the AA batteries. This tells me which set of batteries to use next so I can keep them rotated. When I change batteries while shooting I put the used batteries in upside down so I know which ones to charge later and move the matchstick to the next set of batteries.

The rest of the kit


0975 19 Kitbag plus kneepads, hat, wellies and steadying sticks 1300h
by gardenersassistant, on Flickr

You can see the close-up lenses in one slot in the bag and the batteries in the next slot. The diffusers are in another slot and various other bits and pieces are in the bag.

I carry the FZ330 and the second camera (70D or FZ200) travels in the bag. Hanging from a bulldog clip on the outside of the bag is a folded, sturdy rubble bag which I can put things down on if the ground is wet.

Other important parts of the kit - knee pads, wellies, hat and the steadying sticks which I am starting to use more. The plunger is used to spread the load and avoid damaging flower beds, but it turns out to be unnecessary a lot of the time.
 
In the last week or so I have had a couple of PM's re the Diffusion on my Ring Flash, so here are some shots of the set-up.

IMG_2262-Edit.jpg

Canon 7D, Canon 100mmf2.8USM, Raynox 150, Yongnuo Ring Flash

IMG_2275-Edit.jpg

Mounted on the lens as follows : Lens / 58mm UV Filter / 58mm to 43mm Step Ring / Raynox 150 / 49mm to 52mm Step Ring / 52mm UV Filter / 52mm Flash adapter.

IMG_2249-Edit.jpg

These are the Diffusers, made out of Milk Carton, twin layers cut to shape and Sellotaped at the ends and a drop superglue to hold both layers together. The milk carton idea came from Paul Iddon, so I take no credit whatsoever for those.

IMG_2271-Edit.jpg

The Diffusers are held to the flash by 4 strips of surgical tape, as this should still allow plenty of light through.

So, there you go.
 
Hello again.

Today I would like to show you new diffuser for my smartphone. It’s a complement to the line of diffusers, which I have designed some time ago.

DSC03011.jpg

DSC03008.jpg

DSC03009.jpg

I called it Litescala. The device works on the same principle as the previous models, except that instead of four, it has two outlet channels.
Below a few outdoor shots.

IMG_3541.jpg
IMG_3507.jpg
 
My crusty old Canon 40D, Sigma 105mm 2.8 Macro lens, and a newly acquired Raynox DCR 250, which i've hardly had a chance to use yet.

In the past, I have tried ring lights, and didn't like the reflection shape. I then tried the small 'soft box on flash arm/bracket' option which worked ok, but quite cumbersome. After playing around this morning, this is the highly sophisticated lighting setup I came up with, that got a great result that I was happy with:


Onboard flash, paper diffuser (white card / plastic would be better for longevity of course!) crudely wedged in place under a backwards Cokin type filter holder. That's it! The reason this kind of set up works well is simple - there is sufficient distance between the flash itself, and the diffusion surface for the light to spread enough. When small softboxes etc shoved right onto the flash head and put very close to the lens, the effective light source isn't that much larger than the bare flash head, as there is potentially so little distance between the flash and the surface of the softbox, the light cannot spread out enough. The combination of greater distance between flash and diffuser, and the closeness of the diffuser to the subject gives the softest light.

Here are a few quick and non scientific tests I just shot with this setup:


A badly focussed snapshot from the garden

On the last one, I used a small canon 270 EX instead of on board flash, and of course it worked fine also.
 
Last edited:
Hi All

i was sorting through a box of Photographic junk and found this little old gem, only to be known to those of a certain age :whistle:


A pretty useless gadget in its day because of the lack of TTL flash control.

For a laugh I though I would bring it into the modern age and quickly cobbled together a TTL bracket to hold my Olympus FL-36R flashgun on my G6


And surprise surprise it actually worked, it obviously needs some diffusion material to take the harshness of the light but it worked really well, well for a quick bodge it worked well.

Now got to find something to Photograph with it.

Paul


There's one of those on ebay uk right now http://www.ebay.co.uk/itm/Rima-Blit...368684?hash=item41b53a436c:g:6l4AAOSw6aVUqUe2
 
Last edited:
Love the Heath Robinson stuff on here, great to see and some fantastic results!
 
My rig is usually 52mm tubes, 105mm macro lens, viltrox ringflash, homemade diffuser.
Made up with plastic mixing bowl. Bottom cut out. Outside painted black. Inside painted white.
Empty coffee tin cut in half and fitted into centerof rinflash as a hood to cut back flare.
White foamy packaging aroud that to diffuse the light.
 

Attachments

  • 20170411_154720.jpg
    20170411_154720.jpg
    46 KB · Views: 53
  • 20170411_151117.jpg
    20170411_151117.jpg
    100.2 KB · Views: 56
  • 20170411_170731.jpg
    20170411_170731.jpg
    91.5 KB · Views: 57
Back
Top