small home studio set ups

The flash bit does the work, but they also have modelling lamps, these are continuous lamps that indicate where the shadows will fall. The modelling lamps have no noticeable effect on the exposure.


im back again Garry do you have any camera setting tips also please using 7d mkii and mostly my 100mm 2.8 l macro lens if not no worries im very great-full l for all your help and all the others who have helped too thanks gary
 
one last thing ( honest :) :naughty: ) please Garry this flash kit will it require much post processing ? im not very good with potoshop etc so I try my best to get what i want str out of camera if possible i realise the that it depends on how good i get it right in camera but i was just wondering if id have to change backgrounds due to flash sorry if its a stupid question etc cheers once again
 
Last edited:
one last thing ( honest :) :naughty: ) please Garry this flash kit will it require much post processing ? im not very good with potoshop etc so I try my best to get what i want str out of camera if possible cheers once again
The flash gear won't have a bearing. Just as your camera and lens don't.
What'll make the difference to the amount of PP is your skill using it.

As a shorter answer, my studio stuff requires less PP than my other work, because it's a more considerative process.

But I don't shoot 'beauty' which often requires a huge amount of processing.
cheers phil my skills using pp is zero thats why i try to get it right in camera but im a trier
i hope ill be-able to control the light in my small space
 
Last edited:
cheers phil my skills using pp is zero thats why i try to get it right in camera but im a trier
i hope ill be-able to control the light in my small space
PP is an essential skill, and you'll just have to learn.
As long as you bear in mind that it should be used to turn great photos into outstanding ones, not to rescue bad ones, you'll be fine.
and what are peoples opinions on this set please
https://www.lencarta.com/1200w-5400k-flourecent-continuous-lighting-kit
or is the smartflash3 kit a better option?
The continuous lighting kit is fine, but for your purpose the SmartFlash kit is way better.
 
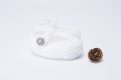
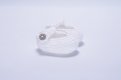
Yes, white on white is always a challenge for all of us, but it's easy enough to get that "Almost spacey/faded" look but with the detail that's missing here..
Your problem is made a bit more difficult by the limitations of your lighting, but it's still do-able.
I would paint the ceiling black (temporarily, to find out whether I'm right or not, you could put a bit of black cloth ['or Blackwrap/Cinefoil] up there)
Then, fit a softbox to one of your lights. Unfortunately, one of the 'qualities) of the Portaflash is that they don't have an accessory mount but there are some so-called universal mount softboxes available, not perfect but perfectly usable. You will need to measure the front of your flash, but I think this one will fit http://www.ebay.co.uk/itm/50x70cm-S...984645?hash=item2a36617b45:g:rQ8AAOSwKIpWAW~s and is about the right size for this subject.
Mount it above and behind your subject, so that it lights the background, the top and part of the front. This will leave a gentle shadow at the front, similar to the one that you already have. The position is shown and explained in this article https://www.lencarta.com/studio-lighting-blog/controlling-specular-reflections/#.VjzW6ysl-hE but in that article, the softbox is placed so close to the subject that it's almost touching, in order to get the diffused specular highlights needed for that particular subject.
In your case, it would need to be quite a bit higher, I can't tell you how much, but start at say 3' and experiment from there. Also, experiment with the angle. Getting it a good distance away will produce a harder light, which is less boring, and it will also reduce the amount of light. Another of the problems that you have with your lights is the lack of power adjustment, so moving it further away will help with this too. If it's still too bright, get a neutral density gel, say 0.3 (1 stop) and put it in front of the light to halve the power http://www.ebay.co.uk/itm/0-3-ND-NE...137619?hash=item256c434413:g:Tn8AAOxycD9TVYcI

In my far from humble view, the single biggest problem is the totally flat lighting and the lack of definition in the shoes, I can see that they're made of wool but the flat lighting has destroyed that look, and you need to introduce a second light, from an acute angle, that will skim across the surface.
With more professional lights, I would fit a standard reflector to the flash, and fit a 10 degree honeycomb to it, but as far as I know there isn't anything available for the Portaflash.
I may be wrong, but I don't think that this flashgun snoot with honeycomb will fit your flash, but at least it will show you what's needed https://www.lencarta.com/flashgun-snoot-with-honeycomb-grid and you should be able to make something similar out of a piece of blackwrap/Cinefoil or even black paper.
The acute angle will be from one side or the other, not from the top, and will need to be positioned with care, but it will work wonders! I don't like to give specific advice when I haven't got the subject in front of me, but logic says that this snooted light should come from both the right and the left of the subject, because one light can't do the job on both ends, which means that you need to fit a snoot to two lights - but have a go with one, which will show you whether I'm right or not. Get these lights as far away as space allows, this makes the light harder, creates harder shadows (and therefore greater definition) but with your lights you may not have enough power to place them as far away as you might wish - and it's this extra power, needed for the snooted light, which made me suggest getting a neutral density gel for the softbox light.

At this point, I would say "job done" but it's possible that you might want to add another light as fill, at very low power, but it's equally possible that this extra light would go some way towards destroying the improvements.

Just try it, and please post your results:)

Hi Garry

I've followed your instructions and have come up with an image
I only have one snoot, and my DIY attempt just blew loads of light so I stuck with just using one but I can pick one up easily
This shot seem to take ages to set up - The final piece that made it work was the Gel that you suggested I used in the softbox - that seemed to give it the definition and detail that was missing in the original

My biggest problem was the shadow around the shoe - it was so big - after playing with height and angles, I got to a place that was ok - I still don't think it's 100%

Should the snoot control any of the shadow - or does that come only from the softbox?

Thanks a million
Andy
 

Attachments

  • Flash Test DSC_6769.jpg
    Flash Test DSC_6769.jpg
    29.2 KB · Views: 50
That's very disappointing, but don't worry - you'll get there.

Right now, the snoot is doing nothing and the softbox is doing too much, i.e. it is doing all the work, it is substantially overexposing your subject and destroying the detail.
One of the reasons for this is that it's much too close to your subject - I suggested trying it at about 3' but it's obvious from the shadows that you didn't do that. It also needs to be further back, and angled forwards a bit more.

You can reduce the over exposure simply by using a smaller f/number, but that won't deal with the problem caused by lack of power adjustment inherent with your flashes.
I said that the snoot(s) should be quite a long distance from the subject "Get these lights as far away as space allows, this makes the light harder, creates harder shadows (and therefore greater definition) but with your lights you may not have enough power to place them as far away as you might wish" and it looks to me that they need to be closer, due to the lack of power (snoots eat power, because they are black inside and don't reflect any significant amount of light).
The reason I wanted them to be at quite a long distance is the same reason as I wanted the softbox to be further away, both to increase hardness (and so increase definition) and to reduce the amount of delivered light due to the workings of the Inverse Square Law, and there is yet another reason for distance with the honeycombed lights, again caused by the working of the Inverse Square Law - the greater the distance, the less fall-off of light there will be between the part of the subject nearest the light and the part that is furthest from the light.

But it isn't working, so you need to move the softbox further away and the snoot closer

I did try the softbox as high as I could make it. But I was getting really dark black shadow (around the front of the shoe) that I didn't want - As it's baby wear, it needs to be soft and subtle shadow.
Anyway - I was trying different heights and different angles and trying to get the shoe lit as best as possible ...and then introduce the snoot to catch the detail

I ordered another snoot late last night and it should come on Wednesday and so I will attempt this again with two snooted lights - I've got to get this right so I don't care doing it 100 times

I have a huge project coming up where I need to shoot a whole range of baby gear so I need to master this set up and get it working right


Thanks again for your advice - I really appreciate it

Andy
 
The smartflash 3 kit what I'm going to order when I get home Garry I'm worried it will be too big ( bright ) for my shed it's 10ft x8ft I hope I'll be able to cope with the power in such a small space
 
The smartflash 3 kit what I'm going to order when I get home Garry I'm worried it will be too big ( bright ) for my shed it's 10ft x8ft I hope I'll be able to cope with the power in such a small space
Plenty of people are using that kit in small spaces.
As for power, the power is adjustable from full power down to 1/32nd power, so don't worry about it.
 
I did try the softbox as high as I could make it. But I was getting really dark black shadow (around the front of the shoe) that I didn't want - As it's baby wear, it needs to be soft and subtle shadow.
Anyway - I was trying different heights and different angles and trying to get the shoe lit as best as possible ...and then introduce the snoot to catch the detail

I ordered another snoot late last night and it should come on Wednesday and so I will attempt this again with two snooted lights - I've got to get this right so I don't care doing it 100 times

I have a huge project coming up where I need to shoot a whole range of baby gear so I need to master this set up and get it working right


Thanks again for your advice - I really appreciate it

Andy
You're just not getting what I'm trying to say, this is probably my fault for not explaining things properly.
The frustrating thing here is that if we were together in your studio, I could show you exactly how to overcome these (perceived) problems in about 2 minutes - and if only I was sitting at a better computer, I could even draw it for you...

I understand what you need to do, and I also understand the limitations caused by your Portaflash lights, but as I've said before, there are workarounds.
I don't know which model(s) you have, from memory some had no power adjustment at all, others could reduce to half power or to quarter power, but they were so badly made that the power adjustment usually stopped working almost as soon as people started using them so, regardless of the spec, most couldn't be adjusted for power at all. This lack of adjustment means that you can only really affect delivered power by changing the distance between the light and the subject, making full use of the Inverse Square Law, and by adding neutral density gels if needed. By contrast, nearly all current flash heads will adjust between full power and 1/32nd power, which makes life much easier for the photographer.

It would be much easier for you if you bought, say, a SmartFlash kit, but let's learn how to overcome the limitations of your current equipment, which will force you to bodge, and to understand how light works.

What I want you to do is to totally forget about getting a white background for now, and to concentrate all of your efforts on getting both the exposure and the lighting of your subject right. We'll get the background, and any shadow problems, sorted out later!

So, step 1 is to get that overhead softbox right. Get it high, get it behind the subject, get it tilted forward so that most of the light actually lights the back of the subject (which can't be seen), and the top of the subject, which can be seen, with a small part of it only lighting the front of the subject.
Step 2 is to create the definition in the fabric, which is where your snoots come in. They need to skim across the surface, which will create local shadows that show that the shoes are made of textured material (wool in this case) and to make them look much more attractive. To get this definition, the amount of delivered light from these snoots will need to be more than from the softbox - possibly 3 or 4 times as much.

So, step 1 first, then turn off the softbox light and see what you can do with just the snooted lights. If you need to shoot at say f/ll with the softbox light to get the correct exposure and find that the correct exposure with the snooted lights is also in the region of f/11, then we have a problem because the snooted lights aren't powerful enough to do anything. If this happens, you need to do one (or more) of the following, to increase the relative power of the snooted lights/reduce the relative power of the softbox light.
1. Move the softbox light further away
2. Move the snooted lights closer
3. Add a further layer of neutral density gel to the softbox light (if you only have one sheet, simply fold it in half to double its effect)

When you're happy with the lighting on the subject post the results here. This result won't have a pure white background and you may find that the shadow in front of the shoes is too dark, and when this happens either I or someone else will tell you how to deal with these problems - separate problems, separate solutions. Also, tell us what you have in the way of editing software.


The models I have are the 336VM's - They are the ones with Full/Half and Quarter power settings - They all work
I use Photoshop CC 2017 to edit and I shoot in RAW - Nikon D7100

The SmartFlash units are fairly well priced but I'd really like to understand the process before I buy more kit

I will do the above as you suggest - and post the results

As always - Really appreciate your time and help
 
The SmartFlash units are fairly well priced but I'd really like to understand the process before I buy more kit
That's generally very smart IMO... to a certain (large) extent light is light.
Gary is trying to talk you through the process of "building up the lighting." Think of it as several different "1 light setups/images" that will be stacked together... In fact, it may be better to set/evaluate each light separately.

Set up the softbox as indicated by Gary. The goal here is to provide soft and even light. You do this by balancing the size of the modifier vs it's distance... closer is softer and farther is more even (less falloff). When you get the best result possible, turn that light off. If you have to compromise (probable), it's generally going to be better to go for "even light" as "soft fill" is easier to add.
Next set up the snoot as indicated. The goal here is to skim a small/hard light source across just the surface at an obtuse (shallow) angle in order to highlight the texture ("detail" is a combination of highlights and shadows... you need both). When you get the desired effect turn back on the softbox (always evaluate the light from the camera position).
Now the only thing to do is to balance/blend the two effects by managing their respective power... whatever you can achieve will be about as good as possible with just those two lights (probably refinable with positioning). This may leave smaller details that need additional/separate attention, such as reflector/bounce fill for a stronger than desired shadow. To a certain extent the amount of light overall is irrelevant, only the ratio matters. The exposure can largely be controlled by ISO/aperture, and to a lesser degree with SS... if that's not enough, then it's time for ND's or better lights.

In fact, with very difficult subjects (this isn't) it may be easier to actually blend separately lit images/elements. But the only way to know that is to look at the separate lighting/elements individually. It's more like an experiment where you change one thing at a time. It's not a recipe where you just throw everything together and see what you get...

Or you may find that there is a limitation being imposed by the equipment you have (i.e. size/power), and then you can find a solution to the known problem (i.e. buy the right stuff).
 
Last edited:
That's generally very smart IMO... to a certain (large) extent light is light.
Gary is trying to talk you through the process of "building up the lighting." Think of it as several different "1 light setups/images" that will be stacked together... In fact, it may be better to set/evaluate each light separately.

Set up the softbox as indicated by Gary. The goal here is to provide soft and even light. You do this by balancing the size of the modifier vs it's distance... closer is softer and farther is more even (less falloff). When you get the best result possible, turn that light off. If you have to compromise (probable), it's generally going to be better to go for "even light" as "soft fill" is easier to add.
Next set up the snoot as indicated. The goal here is to skim a small/hard light source across just the surface at an obtuse (shallow) angle in order to highlight the texture ("detail" is a combination of highlights and shadows... you need both). When you get the desired effect turn back on the softbox (always evaluate the light from the camera position).
Now the only thing to do is to balance/blend the two effects by managing their respective power... whatever you can achieve will be about as good as possible with just those two lights (probably refinable with positioning). This may leave smaller details that need additional/separate attention, such as reflector/bounce fill for a stronger than desired shadow. To a certain extent the amount of light overall is irrelevant, only the ratio matters. The exposure can largely be controlled by ISO/aperture, and to a lesser degree with SS... if that's not enough, then it's time for ND's or better lights.

In fact, with very difficult subjects (this isn't) it may be easier to actually blend separately lit images/elements. But the only way to know that is to look at the separate lighting/elements individually. It's more like an experiment where you change one thing at a time. It's not a recipe where you just throw everything together and see what you get...

Or you may find that there is a limitation being imposed by the equipment you have (i.e. size/power), and then you can find a solution to the known problem (i.e. buy the right stuff).

Thanks for the reply Steven
I was waiting delivery of the 2nd snoot - Frustratingly it seems slightly different to the other one but now at least I can use two snoots as per the original instructions

I'm following the instructions as close as possible as I want to get the desired effect .... but more importantly learn the overall skill of 'light' so I can continue to do more product photography - I really enjoy it but seemed to have made it hard for myself wanting white on white - but hey, I love a challenge

I did look at a well known website for similar items and really scrutinised their photography and once I'd really broken it down it made me see a lot of cheating - clever but sometime fake looking drop shadow and other P/Shop tricks - It did make me more inspired to get this mastered so I massively appreciate the help form Garry, yourself and anyone else who is happy to share their wisdom

I'm hoping (as long as my little 'un goes to sleep) that I can get back in the studio tonight and attempt this one again ...and of course I'll share the results

Cheers
Andy
 
these studio flash problems are not easy to get round unless you have someone called Gary or Phil to help
they are both a great source of information
 
these studio flash problems are not easy to get round unless you have someone called Gary or Phil to help
they are both a great source of information
There are plenty of good sources of information...
When I started out in professional photography we didn't have the internet, and the very few books that were available on lighting weren't much help. But, we had training jobs in large firms where, over a period of several years, we were able to learn our craft, which basically meant learning every aspect of studio photography (including camera movements and negative retouching as well as lighting).

Now, those jobs have gone and the opportunities to learn in that way have of course also gone, and the skill level has crashed. But technology, mainly the fact that we can see what we're doing with digital and without having to spend a fortune on shooting polaroids (which weren't even available in professional sizes when I started) and the ability to carry out very intensive image manipulation, has has made life much easier and has more than balanced the loss of the learning opportunities.

Let's face it, with today's computer technology, and with the massive improvements to studio lighting, it's easy - just learn the principles, practice and experiment.
The most useful book I've seen is Light: Science & Magic.
Most of the courses I've seen are a waste of time, probably because most of the people who really understand lighting are far too successful and far too busy to run courses, but there are some exceptions. I always have the suspicion that many of the people who do provide courses do so because they can't hack it as photographers...
And most of the videos that I've seen on Youtube are in the same category, again many of them are designed to sell equipment, or to sell subscriptions to online courses, but there are a few exceptions.
And then there are resources like the Lencarta Learning Centre, https://www.lencarta.com/studio-lighting-blog and although in theory this was set up to sell equipment, I do think that it's useful - but then I would wouldn't I :)
 
You're just not getting what I'm trying to say, this is probably my fault for not explaining things properly.
The frustrating thing here is that if we were together in your studio, I could show you exactly how to overcome these (perceived) problems in about 2 minutes - and if only I was sitting at a better computer, I could even draw it for you...

I understand what you need to do, and I also understand the limitations caused by your Portaflash lights, but as I've said before, there are workarounds.
I don't know which model(s) you have, from memory some had no power adjustment at all, others could reduce to half power or to quarter power, but they were so badly made that the power adjustment usually stopped working almost as soon as people started using them so, regardless of the spec, most couldn't be adjusted for power at all. This lack of adjustment means that you can only really affect delivered power by changing the distance between the light and the subject, making full use of the Inverse Square Law, and by adding neutral density gels if needed. By contrast, nearly all current flash heads will adjust between full power and 1/32nd power, which makes life much easier for the photographer.

It would be much easier for you if you bought, say, a SmartFlash kit, but let's learn how to overcome the limitations of your current equipment, which will force you to bodge, and to understand how light works.

What I want you to do is to totally forget about getting a white background for now, and to concentrate all of your efforts on getting both the exposure and the lighting of your subject right. We'll get the background, and any shadow problems, sorted out later!

So, step 1 is to get that overhead softbox right. Get it high, get it behind the subject, get it tilted forward so that most of the light actually lights the back of the subject (which can't be seen), and the top of the subject, which can be seen, with a small part of it only lighting the front of the subject.
Step 2 is to create the definition in the fabric, which is where your snoots come in. They need to skim across the surface, which will create local shadows that show that the shoes are made of textured material (wool in this case) and to make them look much more attractive. To get this definition, the amount of delivered light from these snoots will need to be more than from the softbox - possibly 3 or 4 times as much.

So, step 1 first, then turn off the softbox light and see what you can do with just the snooted lights. If you need to shoot at say f/ll with the softbox light to get the correct exposure and find that the correct exposure with the snooted lights is also in the region of f/11, then we have a problem because the snooted lights aren't powerful enough to do anything. If this happens, you need to do one (or more) of the following, to increase the relative power of the snooted lights/reduce the relative power of the softbox light.
1. Move the softbox light further away
2. Move the snooted lights closer
3. Add a further layer of neutral density gel to the softbox light (if you only have one sheet, simply fold it in half to double its effect)

When you're happy with the lighting on the subject post the results here. This result won't have a pure white background and you may find that the shadow in front of the shoes is too dark, and when this happens either I or someone else will tell you how to deal with these problems - separate problems, separate solutions. Also, tell us what you have in the way of editing software.

Ok straight from the camera

Softbox as high as room allows and pointed as instructions
Two snoots used.

Detail is better on the shoe but the shadow is too big and too dark
If I move the softbox to reduce the shadow I lose the detail

I also need to light the background (but that was step 3)
 

Attachments

  • DSC_6807a.jpg
    DSC_6807a.jpg
    25.2 KB · Views: 27
As you have identified, the shadow is caused by the softbox. But adjusting it should not "loose the detail," the detail is brought out by the snoots. The reason it's loosing the detail is because you are not adjusting the power ratios so that the snooted light is still stronger than the softbox as needed.
IMO the softbox is either too high/far, too small, or some combination. I think I would first adjust the softbox/power ratios and see what that looks like... I guess it's possible that you don't have enough power control.
Another option is to add light to fill those shadows. You could try using reflectors, but it might be difficult to do w/o blocking the snooted light.

But you're not too far off...
.Untitled-1.jpg
 
As you have identified, the shadow is caused by the softbox. But adjusting it should not "loose the detail," the detail is brought out by the snoots. The reason it's loosing the detail is because you are not adjusting the power ratios so that the snooted light is still stronger than the softbox as needed.
IMO the softbox is either too high/far, too small, or some combination. I think I would first adjust the softbox/power ratios and see what that looks like... I guess it's possible that you don't have enough power control.
Another option is to add light to fill those shadows. You could try using reflectors, but it might be difficult to do w/o blocking the snooted light.

But you're not too far off...
.View attachment 112010

I ended up having the the snoots up close, I'm guessing they are just not powerful enough - I'm also struggling with space
I've just had one of the flashes pop - I'm hoping it's a fuse
Starting to think I'm having a bad day

Just for fun I tried using a brolly, snoot and flash head to blow the background BrollyDSC_6883.jpg ...and this was the result
 
People who know me will tell you that I'm rude and curmudgeonly, and I'm sure they're right, so I won't try to change, just to make you feel better:)

1. You may have the softbox as high as the room allows, but you have NOT placed it behind the subject and angled it forwards as I told you, it's pointing almost straight down, which is putting light on the front of the shoes, which I told you it must not do.
2. I also told you that the snooted light(s) are the ones that have to do the work of skimming across the surface of the shoes, to define their texture and create definition, and they're not doing that to any meaningful extent. I also told you that you need two of those snooted lights, that statement was correct for your original layout, but you've now changed that and, for the current arrangement, you only need one.
3. I told you that the softbox light is overexposed, and that the snooted light(s) is/are underexposed, and this is still the case - reduce the brightness of the overhead softbox, and increase the brightness of the snooted light(s) The overhead softbox is (should be) nothing more than a fill, the snooted light(s) are the ones that reveal that the shoes are made of wool, not of some fluffy non-woven fabric.

If I had a raw image in a decent size, there is a lot that I could do with it so demonstrate what you need to achieve, but even with a small jpeg and about 30 seconds of adjustment, I've come up with something.
Now, it has many faults.
1. The colour is way off, this is easily put right so don't worry about it
2. The shadow would be a problem if left as it is, but that is very easily cured, either by correct lighting or in Photoshop, so don't worry about that either
3. The background isn't white, but again that is very easily cured, either by correct lighting or in Photoshop, so don't worry about that either

At least, we now have some definition,
I ended up having the the snoots up close, I'm guessing they are just not powerful enough - I'm also struggling with space
I've just had one of the flashes pop - I'm hoping it's a fuse
Starting to think I'm having a bad day

Just for fun I tried using a brolly, snoot and flash head to blow the background View attachment 112015 ...and this was the result
Stop trying to blow the background, that's very easily done and in fact my cat could do it, and I haven't even got a cat:) but it's causing problems, not curing them. If those snooted lights aren't powerful enough then follow my advice and put an added layer of neutral density filter over the softbox light.
shoe.jpg
 
People who know me will tell you that I'm rude and curmudgeonly, and I'm sure they're right, so I won't try to change, just to make you feel better:)

1. You may have the softbox as high as the room allows, but you have NOT placed it behind the subject and angled it forwards as I told you, it's pointing almost straight down, which is putting light on the front of the shoes, which I told you it must not do.
2. I also told you that the snooted light(s) are the ones that have to do the work of skimming across the surface of the shoes, to define their texture and create definition, and they're not doing that to any meaningful extent. I also told you that you need two of those snooted lights, that statement was correct for your original layout, but you've now changed that and, for the current arrangement, you only need one.
3. I told you that the softbox light is overexposed, and that the snooted light(s) is/are underexposed, and this is still the case - reduce the brightness of the overhead softbox, and increase the brightness of the snooted light(s) The overhead softbox is (should be) nothing more than a fill, the snooted light(s) are the ones that reveal that the shoes are made of wool, not of some fluffy non-woven fabric.

If I had a raw image in a decent size, there is a lot that I could do with it so demonstrate what you need to achieve, but even with a small jpeg and about 30 seconds of adjustment, I've come up with something.
Now, it has many faults.
1. The colour is way off, this is easily put right so don't worry about it
2. The shadow would be a problem if left as it is, but that is very easily cured, either by correct lighting or in Photoshop, so don't worry about that either
3. The background isn't white, but again that is very easily cured, either by correct lighting or in Photoshop, so don't worry about that either

At least, we now have some definition,

Stop trying to blow the background, that's very easily done and in fact my cat could do it, and I haven't even got a cat:) but it's causing problems, not curing them. If those snooted lights aren't powerful enough then follow my advice and put an added layer of neutral density filter over the softbox light.
View attachment 112014

I don't see it as rude - It must be frustrating for anyone to help and not get the results you are instructing towards - I just need the guidance to get this right
I followed your instructions. The softbox was placed exactly as you described
The image that you show doesn't show the shoe for how it actually looks - My attempts, although not as I want still show a soft shoe albeit washed out

At the end of the day I need a shot that is both representative of the product and portrayed well enough for people to want to buy

I'm not ungrateful for your help and certainly don't want to waste your or anyone else time who has the knowledge and desire to help me

Back off for another attempt (the flash was just a blown fuse and modelling light)

If I get anything better than earlier I'll post it back up here

Cheers
 
Just for fun I tried using a brolly, snoot and flash head to blow the background View attachment 112015 ...and this was the result

I don’t class @Garry Edwards as rude as such, more taking up the ways of his adopted Yorkshire

Why not do what he has done before and take a shot to demonstrate what each light is doing, lights and the technology to trigger then and make the light has changed since he learned to light things, light itself has not, so as gruff as the old Welsh man comes across, listen,
 
I don't see it as rude - It must be frustrating for anyone to help and not get the results you are instructing towards - I just need the guidance to get this right
I followed your instructions. The softbox was placed exactly as you described
The image that you show doesn't show the shoe for how it actually looks - My attempts, although not as I want still show a soft shoe albeit washed out

At the end of the day I need a shot that is both representative of the product and portrayed well enough for people to want to buy

I'm not ungrateful for your help and certainly don't want to waste your or anyone else time who has the knowledge and desire to help me

Back off for another attempt (the flash was just a blown fuse and modelling light)

If I get anything better than earlier I'll post it back up here

Cheers
Sorry, but the softbox is nowhere near where it should be - like all studio photographers, I only need a quick glance at a photo to see exactly what type of lighting was used and exactly where it was placed, both the highlights and the shadows tell a full and complete story. I fully accept that you think that it was was angled forwards correctly but it wasn't, and this in itself is making a massive difference.
I agree with you - you need a shot (actually several shots) that give an accurate visual description of the products, so that potential customers will be happy with the product when they actually get it, and shots that make it look attractive, make people want to reach out and touch it - which fuzzy shots devoid of any shadow cannot do.

Your approach seems to be to flood it with light and now seem to be trying to add the missing definition, i.e. you are using the softbox light as the key light, adding the snoot(s) as effect lights and then bouncing some extra light around, but what you need to do is the opposite, because it's the snooted light(s) that need to do the real work, and if done correctly the image will need very little post production. And if you overdo the snooted light, then you can mitigate (reduce) the effect if required just by adding a bit more fill light - that's the correct way round:)

It can be a frustrating process, but once it clicks you'll see the benefits of doing what various of us have suggested, i.e. building the shot up one light at a time and taking a shot using just one light at a time. Flooding it with light can never work.
It's a great pity that you're 300 miles or so south of me, but if you want to wander up to Bradford I can borrow the Lencarta studio and show you, in 10 minutes, exactly how to light this type of shot. Quite a few of the members on here have done that - and I can get one of the guys in the office to show you how to enhance it in PS too.
 
I ended up having the the snoots up close, I'm guessing they are just not powerful enough - I'm also struggling with space
I've just had one of the flashes pop - I'm hoping it's a fuse
Starting to think I'm having a bad day

Just for fun I tried using a brolly, snoot and flash head to blow the background ...and this was the result
This is closer to what I would be going for, but your lighting ratios are still backwards. And you've created a double shadow, probably due to trying to blow the BG.

Because the BG is white, it doesn't need "blown," it only needs to record as white. And because the shoes are small and directly on the BG, a proper exposure of the shoes should result in the BG around them being white (with the fill light being farther away)... there may be some BG that transitions to grey as it gets more distant, but that is easily fixed in post or with *a little* additional lighting back there.

Having the light "behind" means that the shadow should be distinctly directional, i.e. existing only to one side (forward). In your shots the shadow is pretty uniformly "underneath," it is obviously not behind. Keep in mind that, if you start out from behind but then increase the distance, the angle gets shallower... it becomes "overhead." As you increase the distance you also need to keep the angle the same... it winds up being much farther "behind" in order to maintain it's directionality.

It is easier to control the ratios if you control "where" the light is falling... I.e. if none of the fill light is falling on the front of the slippers then the snooted light will automatically be the most prominent light source there. By having the fill light go everywhere evenly it's impossible for the snooted lights to do their job and still give an even exposure. It will either be overexposed where both lights fall, or the areas with just fill will be underexposed... there's no other option. Where the fill light has effect is controlled by falloff (distance) and direction (direction is easier).
 
Last edited:
Steven, Garry,

I'm following this one as a 'learning exercise' - unfortunately the room I would set my lights up in at the moment has other stuff in, so I can't set things up to experiment, so I'm having to try an visualise it all.

Trying to figure out what sort of angle the fill light need to be at - and in the absence of a diagram, wondered if some numbers might help.

EG If the overhead / rear fill is 3' above the shoes, how far back would it need to be - 1', 2', 3', etc ?

If Andy can give a couple of shots, one with ONLY the fill, and one with ONLY the snooted main, would that make it easier to explain how to adjust (power and position) each of them?
 
Steven, Garry,

I'm following this one as a 'learning exercise' - unfortunately the room I would set my lights up in at the moment has other stuff in, so I can't set things up to experiment, so I'm having to try an visualise it all.

Trying to figure out what sort of angle the fill light need to be at - and in the absence of a diagram, wondered if some numbers might help.

EG If the overhead / rear fill is 3' above the shoes, how far back would it need to be - 1', 2', 3', etc ?
Numbers would theoretically help, but at best would be vague.
Let's try to explain this by saying that any decent quality softbox has a deeply recessed front diffuser that controls (to some extent) the spread of light from the softbox. Here is an example https://www.lencarta.com/s-fit-85x85cm-redline-pro-chiaro-softbox - fairly typical. This recess prevents some of the light from going where it isn't wanted.
But, there are many cheap softboxes that don't have this feature, and I would be very surprised if the OP's ones do, because they're an old fashioned design specifically made for flash heads that don't even have an accessory mount, and the light from these spreads around more, which means that the angle usually needs to be more acute (although this too is a bit vague because the spill of light is also affected if it hits a white ceiling)

As a starting point, let's say that it needs to be angled forwards something like 30 - 40 degrees, and far enough back to place light on that part of the background that is directly behind the subject, as well as lighting its top and edges.
If Andy can give a couple of shots, one with ONLY the fill, and one with ONLY the snooted main, would that make it easier to explain how to adjust (power and position) each of them?
Yes, that's exactly what he needs to do, which is why I (and others) have suggested it.
There is always a problem with studio lighting (and probably with most other things too) in that people tend to concentrate on the final result, when what they should be doing is to work on the individual elements that, when finished, will create the final result. Because this particular job is so simple to light it's easy to work out what's going wrong, but we're often presented with more complex challenges where it's virtually impossible to see the wood for the trees. It tends to be beginners who disgreguard the building stages, more experienced photographers have learned from bitter experience that building the light, one light at a time, is the only way to get the job done properly, easily and quickly. Again, I reference my article on building the light, https://www.lencarta.com/studio-lighting-blog/tutorial-building-up-the-light/#.VyC_pnqGN-s but every single article I've ever written has been done this way. This one may illustrate the process better.
 
There are two angles to consider with a softbox. One is the angle of the diffusion surface in relation to the subject, i.e. is the diffusion parallel with the work surface or inline with it's direction (I'll call this "feathering" for simplification). The other angle is it's "direction," this is the angle to the center of the diffusion material (again, for simplification).

Trying to keep with Garry's approach/directions, by placing the light farther away it negates the considerations of falloff (which helps with getting the BG lit/white) and feathering angle... the diffusion should be placed more inline with it's direction (but feathering it more parallel to the surface could help with illuminating more distant BG... It's hard to be more specific). With the intent being directional light that does not illuminate the areas that will be lit with the snoot, and given that the subject is somewhat circular/round in form, I would estimate a directional angle approaching 60* would be necessary (maybe 1.5-2 times farther back than above).

It might be easier to work this "backwards" by first lighting with the snoot, and then adding the backlighting (fill) as best as possible w/o messing up the effect created by the snoot. One thing that may not have been mentioned is that the camera settings should create an ambient exposure that is black w/o the lights... that exposure can then be increased to reduce the contrast/power created by the lighting later if needed.

Edit: Garry replied while I had my response open and I walked away... I think they are in agreement.
 
Last edited:
There are two angles to consider with a softbox. One is the angle of the diffusion surface in relation to the subject, i.e. is the diffusion parallel with the work surface or inline with it's direction (I'll call this "feathering" for simplification). The other angle is it's "direction," this is the angle to the center of the diffusion material (again, for simplification).

Trying to keep with Garry's approach/directions, by placing the light farther away it negates the considerations of falloff (which helps with getting the BG lit/white) and feathering angle... the diffusion should probably be placed more inline with it's direction (but feathering it could help with illuminating more distant BG... It's hard to be more specific). With the intent being directional light that does not illuminate the areas that will be lit with the snoot, and given that the subject is somewhat circular/round in form, I would estimate a directional angle approaching 60* would be necessary (maybe 1.5-2 times farther back than above).

It might be easier to work this "backwards" by first lighting with the snoot, and then adding the backlighting (fill) as best as possible w/o messing up the effect created by the snoot. One thing that may not have been mentioned is that the camera settings should create an ambient exposure that is black w/o the lights... that exposure can then be increased to reduce the contrast/power created by the lighting later if needed.
Your approach is theoretically right, but at an angle of something like 60 degrees serious lens flare would be an issue - avoidable in a pro studio with a bellows lens hood or, even better, a bloody great black-both-sides-flag between the camera and the subject, with the shape of the sensor cut out.
 
Your approach is theoretically right, but at an angle of something like 60 degrees serious lens flare would be an issue - avoidable in a pro studio with a bellows lens hood or, even better, a bloody great black-both-sides-flag between the camera and the subject, with the shape of the sensor cut out.
I would say "could be an issue"... never know for sure until you try :).
(almost definitely an issue if it's w/in the frame).
 
I'm getting an English lesson from an American?
:LOL:
:exit:
 
Gents

I can't thank you enough - I'm blown away with the support...

Ok, I will document my every move and take photos in stages

I have done something wrong but to my power I'm interpreting the instructions the best I can

I've blown another flash (I've never made them work this hard!!) so I'm down to 4, so I'm only 4 units away from needing new kit anyway!!! but I still want to learn the correct way to use it

Garry, thank you for your kind offer to show me 'live' if I was ever in Bradford - That would be amazing.. If I was just a little nearer I'd rip your arm off for an offer like that
 
I will get back into the studio ASAP - I'm back at work today (which gets in the way of everything)
 
Yes, that about sums them up. They were right at the bottom of the pile, even by the standards of the day.
They were basically mains powered flashguns, with a miror-like built in reflector that maximised the very limited power at the expense of even lighting.
Their advantage, other than cost, was size, because back then 'real' studio flashes were massive.
I used them in architectural shots, because they could be hidden away behind furniture etc to produce a bit of light in dark areas. In my very limited experience, the power adjustment made nowhere near as much difference as was claimed (certainy nowhere near as much as half and quarter) and soon stopped working.
However, light is light and they're what the OP has, and they are capable - they just need more work and more care.
 
Hi everyone - I wanted to give you a quick update

I have had a fall out with the PortaFlashes and probably through frustration, we have parted company... or in reality I've put them all in a box and they will either go on eBay or more than probably I will bin them. I'm sad to admit defeat on this one but I actually got far better results using a Sigma Speedlight and a couple of reflectors. It's not exactly how I wanted to do this but I was massively behind schedule to supply a load of photos.

I'm here to say thank you for the support - especially to Garry (who probably has his head in hands while reading this)

So what now? - I need to take a bucket load of photo's of white on white and will do the best I can - In the meanwhile I'll do some investigation on costs for some new lights and see where I can get a good deal - The Lencarta x 3 setup looks a good option but I'm open for suggestions.

Pretty fed up how this turned out but have enjoyed all the tutorials and support

Cheers
Andy
 
Such is life...
As you're getting paid for this, it seems logical to me to just otder the smartFlash kit now, start using it tomorrow and produce pro quality results for your client.
 
Such is life...
As you're getting paid for this, it seems logical to me to just otder the smartFlash kit now, start using it tomorrow and produce pro quality results for your client.

Thanks Garry - I know you're in favour of this kit from what I've seen of your other posts
Is there anything I need to be careful of or watch out for?
 
Back
Top