

You are using an out of date browser. It may not display this or other websites correctly.
You should upgrade or use an alternative browser.
You should upgrade or use an alternative browser.
Speckled wood (I think!)
- Thread starter Emja
- Start date

Kodiak Qc
Suspended / Banned
- Messages
- 20,285
- Name
- French Canadian living in Europe since 1989!
- Edit My Images
- Yes
•
… again, Emma's sweet touch!")
May I suggest…

… again, Emma's sweet touch!
May I suggest…
- the too bright leaf is stealing the show to your subject
- the DRL reads 1:241/255 where 1 is cool but the 14 at
the top should be tweaked so to pull out more natural
micro contrast and colours
OP
- Messages
- 3,250
- Name
- Emma
- Edit My Images
- Yes
Kodiak - the bright leaf was the reason I cropped much harder than usual - your edit rescued much more than I was able to. I still can't understand the numbers...but thank you•
… again, Emma's sweet touch!
May I suggest…
- the too bright leaf is stealing the show to your subject
- the DRL reads 1:241/255 where 1 is cool but the 14 at
the top should be tweaked so to pull out more natural
micro contrast and colours
OP
- Messages
- 3,250
- Name
- Emma
- Edit My Images
- Yes
Thanks Bill...my Google ID seems to have worked for once!Emma, I think that you are correct in your ID as a Speckled Wood, P319 in the usual reference book
Kodiak Qc
Suspended / Banned
- Messages
- 20,285
- Name
- French Canadian living in Europe since 1989!
- Edit My Images
- Yes
Cool, if you have Skype I can show you how to do ityour edit rescued much more than I was able to.
I'll try to explain…I still can't understand the numbers...
It has all to do with the histogram! This tool tells you things
about your picture using a scale of 255 where "0" is pure
black and 255 is pure white and these numbers express
the recorded dynamic range on that scale. There are, as
you guessed, 256 possible values. The "0" contains no data
so it is ignored, the 255 others do contain data. Got it?
Your image reads 1:241/255. So the lowlights are 1/255 and
the highlights at 241/255… so, 1 to 241 on 255.
So far so good?
Lowlights…
Your image contains no total black as the lowest recorded
value is 1 (also called the "black point"). Not setting the black
point properly may have consequences but not in this case.
Highlights…
The highest recorded value in your image is 241 of 255. So
15 values are not there and, if you don't set the "white point"
correctly, it will generate grey data on your image.
The histogram represents the dynamic range of the recorded
data but you can tell it the limits of the black and white points.
DRL = Dynamic Range Levels = black and white points setting.
Sorry if it may not be clear as it is translated from French and
sometimes I have a hard time.
OP
- Messages
- 3,250
- Name
- Emma
- Edit My Images
- Yes
Wow - that's a very detailed answer from someone who doesn't like typing Daniel - thank you for taking so much time. It's interesting to read about the histogram in terms of numbers. I use the visual histogram display on my camera and in Lightroom and tend to use the sliders there to set black and white points in line with what I'm looking for from each picture. I can see that the numbers would allow you to read that information more accurately - especially useful here where I was not happy with parts of the shot. As for your English, I think you need to stop apologising for it - your explanation was as clear as always
Kodiak Qc
Suspended / Banned
- Messages
- 20,285
- Name
- French Canadian living in Europe since 1989!
- Edit My Images
- Yes
GardenersHelper
In Memoriam
- Messages
- 6,344
- Name
- Nick
- Edit My Images
- Yes
Lovely image Emma.
In Lightroom if you hold down the Shift key and double click on the triangle on the Whites slider, Lightroom will set the White point. For your image, it pushes the White point down a little on the histogram, like Daniel did. Similarly, if you hold down the Shift key and double click on the triangle on the Blacks slider, Lightroom with set the Black point. For your image, it pushes the Black point up a little on the histogram, like Daniel did. This is sometimes known as "closing the gaps" at the top and bottom of the histogram.
You have to be a bit careful and not depend entirely on the histogram, because the histogram is a composite of three histograms, Red, Green and Blue, "averaging" them out in some way. Here is the "averaged" ("RGB") histogram of your image as seen in Photoshop CS2.
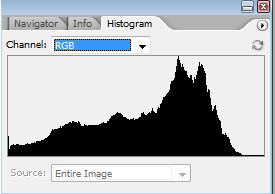
Emja butterfly - CS2 RGB histogram by gardenersassistant, on Flickr
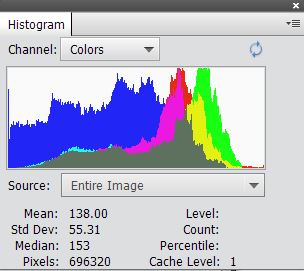
Here is the "Colors" histogram in CS2 showing the individual Red, Green and Blue colours ("Channels").
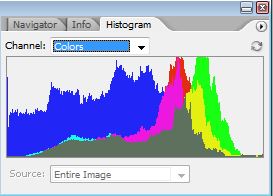
Emja butterfly - CS2 Colours histogram by gardenersassistant, on Flickr
The "averaged" (RGB) histogram can be misleading sometimes, so for example one of the three channels may be overexposed but the histogram may not show that. If one channel is overexposed then that can alter the hue of the brightest areas, occasionally by rather a lot. I think it is fine to use the histogram to give you an indication of what is going on, but I think the final decision should rest with your own eyes as to what looks right/best to you. (I used to routinely close up gaps at the top and bottom of the histogram as a matter of course, until I realised that it was messing up some of my images.)
Incidentally, what you see on the histogram depends on what application you are looking at it in. Here is the Lightroom histogram for your image. Especially for the Blue channel, this is very different from how it looks in CS2.
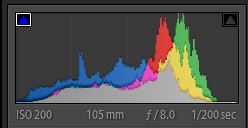
Emja butterfly - Lightroom histogram by gardenersassistant, on Flickr
Here is what you see in Silkypix.
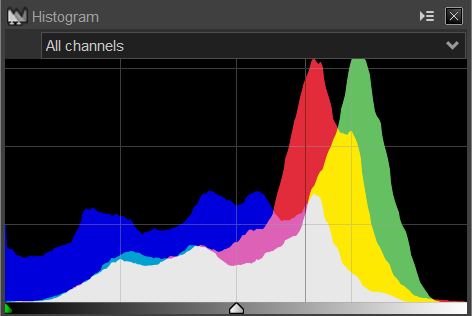
Emja butterfly - Silkypix histogram by gardenersassistant, on Flickr
And here is what Elements shows - the same as CS2 I think.
Emja butterfly - Elements histogram by gardenersassistant, on Flickr
In Lightroom if you hold down the Shift key and double click on the triangle on the Whites slider, Lightroom will set the White point. For your image, it pushes the White point down a little on the histogram, like Daniel did. Similarly, if you hold down the Shift key and double click on the triangle on the Blacks slider, Lightroom with set the Black point. For your image, it pushes the Black point up a little on the histogram, like Daniel did. This is sometimes known as "closing the gaps" at the top and bottom of the histogram.
You have to be a bit careful and not depend entirely on the histogram, because the histogram is a composite of three histograms, Red, Green and Blue, "averaging" them out in some way. Here is the "averaged" ("RGB") histogram of your image as seen in Photoshop CS2.
Emja butterfly - CS2 RGB histogram by gardenersassistant, on Flickr
Here is the "Colors" histogram in CS2 showing the individual Red, Green and Blue colours ("Channels").
Emja butterfly - CS2 Colours histogram by gardenersassistant, on Flickr
The "averaged" (RGB) histogram can be misleading sometimes, so for example one of the three channels may be overexposed but the histogram may not show that. If one channel is overexposed then that can alter the hue of the brightest areas, occasionally by rather a lot. I think it is fine to use the histogram to give you an indication of what is going on, but I think the final decision should rest with your own eyes as to what looks right/best to you. (I used to routinely close up gaps at the top and bottom of the histogram as a matter of course, until I realised that it was messing up some of my images.)
Incidentally, what you see on the histogram depends on what application you are looking at it in. Here is the Lightroom histogram for your image. Especially for the Blue channel, this is very different from how it looks in CS2.
Emja butterfly - Lightroom histogram by gardenersassistant, on Flickr
Here is what you see in Silkypix.
Emja butterfly - Silkypix histogram by gardenersassistant, on Flickr
And here is what Elements shows - the same as CS2 I think.
Emja butterfly - Elements histogram by gardenersassistant, on Flickr
Last edited:
GardenersHelper
In Memoriam
- Messages
- 6,344
- Name
- Nick
- Edit My Images
- Yes
•
… again, Emma's sweet touch!
May I suggest…
I did just that here…
- the too bright leaf is stealing the show to your subject
- the DRL reads 1:241/255 where 1 is cool but the 14 at
the top should be tweaked so to pull out more natural
micro contrast and colours
Daniel, did you do a local adjustment on the leaf?
Kodiak Qc
Suspended / Banned
- Messages
- 20,285
- Name
- French Canadian living in Europe since 1989!
- Edit My Images
- Yes
Daniel, did you do a local adjustment on the leaf?
Yes Nick, with the DRL. Nothing else!
•••
I have to note again that I appreciate you methodic
ways and the applied logic.
The composite of the channels IS the histogram and
in no way to be ignored as it will permit one to use the
best of the recorded data. Mind you, artistic intent is
the best reason to tweak it!
OP
- Messages
- 3,250
- Name
- Emma
- Edit My Images
- Yes
Thanks ChrisGreat explanation Kodiak
Lovely shot Emma and yes that is a Speckled Wood. Love the light - esp the background.
OP
- Messages
- 3,250
- Name
- Emma
- Edit My Images
- Yes
Thank youNice shot and the adjustment from Kodiak did bring a bid more detail on the butterfly
Lovely image Emma.
In Lightroom if you hold down the Shift key and double click on the triangle on the Whites slider, Lightroom will set the White point. For your image, it pushes the White point down a little on the histogram, like Daniel did. Similarly, if you hold down the Shift key and double click on the triangle on the Blacks slider, Lightroom with set the Black point. For your image, it pushes the Black point up a little on the histogram, like Daniel did. This is sometimes known as "closing the gaps" at the top and bottom of the histogram.
You have to be a bit careful and not depend entirely on the histogram, because the histogram is a composite of three histograms, Red, Green and Blue, "averaging" them out in some way. Here is the "averaged" ("RGB") histogram of your image as seen in Photoshop CS2.
/QUOTE]
Thanks for another really detailed explanation Nick - the Lightroom information is especially useful as it's what I use most. I try to use the histogram as a guide, but definitely do a lot of messing about and guesswork with sliders too depending on what changes I like. I guess the problem is that what i see on my screen might be very different to what other people are seeing.

GardenersHelper
In Memoriam
- Messages
- 6,344
- Name
- Nick
- Edit My Images
- Yes
Yes Nick, with the DRL. Nothing else!
•••
I have to note again that I appreciate you methodic
ways and the applied logic.
The composite of the channels IS the histogram and
in no way to be ignored as it will permit one to use the
best of the recorded data. Mind you, artistic intent is
the best reason to tweak it!
I don't understand how that can be the case since "the histogram" is not "the" histogram, it is "a" histogram, any particular one being one of a number of different histograms of a particular image (different applications showing different histograms of the same image). Therefore, even if one of them is definitive/correct, all others which are different cannot be definitive/correct. And which one is correct? We can't tell. Therefore, depending on any one particular (non-unique) histogram cannot permit one to use "the" (i.e. unique) best of the recorded data since different histograms (in different applications) would indicate different adjustments.
Besides which, "it will permit one to use the best of the recorded data" implies that there is a deterministic process which use of the histogram will allow one to use in order to achieve "the" (i.e. unique) best of the recorded data. I have two problems with this. First, I don't believe there is a single, unique "best use of the recorded data". What looks best is a judgement call, and different people will make different judgements, and the same person may make different judgements at different times or for different use cases. And second, I don't believe "closing the gap" is a unique operation. How far down does one pull down (up) the white (black) point in order to close the gap? Is there a single, well-defined correct method of doing so? And are you depending on seeing a gap, visually, in the application's histogram? At what level, for a particular application, is a sparse distribution of values represented as a zero height on the histogram? There can be data points in apparently empty parts of the histogram, just too few to show up in the on-screen representation of the histogram.
I come back to my suggestion of using one's eyes, one's preferences and one's judgement to decide how to adjust images.
I think "artistic intent is the best reason to tweak it!" is a bit odd given the prior reference to "the best" use of the recorded data. Surely it is artistic intent which determines what is best, so if using the histogram gives a version of the image that then has to be tweaked to make it the best version, then the histogram-based version wasn't the best version, so it is not the case that [using the histogram] "will permit one to use the best of the recorded data".
GardenersHelper
In Memoriam
- Messages
- 6,344
- Name
- Nick
- Edit My Images
- Yes
I guess the problem is that what i see on my screen might be very different to what other people are seeing.
Emma, do you mean that in the sense that different people looking at the same thing will see it differently, or in the sense that what appears on other people's screens may be different from what appears on your screen?
If the second of these, then the only way to get round that is to use a calibrated screen, and that will only be a partial solution because most people don't use calibrated screens anyway. But it's the best you can do. And irrespective of how other people see your images, calibrating your screen can be beneficial for you. When I calibrated my screen I found that I could see significantly more detail and subtlety of colour and texture than before, in my own and in other people's images.
Have you tried the Lagom LCD monitor test images? The Black level, White saturation and Gamma calibration images in particular may give you some idea of how near or far your screen is from the ideal.
- Messages
- 12,673
- Edit My Images
- No
I don't understand how that can be the case since "the histogram" is not "the" histogram, it is "a" histogram, any particular one being one of a number of different histograms of a particular image (different applications showing different histograms of the same image). Therefore, even if one of them is definitive/correct, all others which are different cannot be definitive/correct. And which one is correct? We can't tell. Therefore, depending on any one particular (non-unique) histogram cannot permit one to use "the" (i.e. unique) best of the recorded data since different histograms (in different applications) would indicate different adjustments.
Besides which, "it will permit one to use the best of the recorded data" implies that there is a deterministic process which use of the histogram will allow one to use in order to achieve "the" (i.e. unique) best of the recorded data. I have two problems with this. First, I don't believe there is a single, unique "best use of the recorded data". What looks best is a judgement call, and different people will make different judgements, and the same person may make different judgements at different times or for different use cases. And second, I don't believe "closing the gap" is a unique operation. How far down does one pull down (up) the white (black) point in order to close the gap? Is there a single, well-defined correct method of doing so? And are you depending on seeing a gap, visually, in the application's histogram? At what level, for a particular application, is a sparse distribution of values represented as a zero height on the histogram? There can be data points in apparently empty parts of the histogram, just too few to show up in the on-screen representation of the histogram.
I come back to my suggestion of using one's eyes, one's preferences and one's judgement to decide how to adjust images.
I think "artistic intent is the best reason to tweak it!" is a bit odd given the prior reference to "the best" use of the recorded data. Surely it is artistic intent which determines what is best, so if using the histogram gives a version of the image that then has to be tweaked to make it the best version, then the histogram-based version wasn't the best version, so it is not the case that [using the histogram] "will permit one to use the best of the recorded data".
I agree - the "right" balance can only be achieved by treating parts of the image differently, through local adjustments if you like ........ and then using your eyes to achieve the image that you feel is correct
The initial combined histogram is fine as a general guide, but that is all it is ........ if we just consider the B & W points, they may need adjusting more on the subject than they do on the background
OP
- Messages
- 3,250
- Name
- Emma
- Edit My Images
- Yes
I meant the monitor, though both are obviously true and photography would be pretty dull without the first! Thanks for the link - calibration is something I've been meaning to look into for ages and it's good to have a tip where to start.Emma, do you mean that in the sense that different people looking at the same thing will see it differently, or in the sense that what appears on other people's screens may be different from what appears on your screen?
If the second of these, then the only way to get round that is to use a calibrated screen, and that will only be a partial solution because most people don't use calibrated screens anyway. But it's the best you can do. And irrespective of how other people see your images, calibrating your screen can be beneficial for you. When I calibrated my screen I found that I could see significantly more detail and subtlety of colour and texture than before, in my own and in other people's images.
Have you tried the Lagom LCD monitor test images? The Black level, White saturation and Gamma calibration images in particular may give you some idea of how near or far your screen is from the ideal.
Kodiak Qc
Suspended / Banned
- Messages
- 20,285
- Name
- French Canadian living in Europe since 1989!
- Edit My Images
- Yes
The initial combined histogram is fine as a general guide, but that is all it is ........ if we just consider the B & W points, they may need adjusting more on the subject than they do on the background


OP
- Messages
- 3,250
- Name
- Emma
- Edit My Images
- Yes
not much that can be done about the OOF areas ... but there is some nice light in there to exploit
and also try to identify a "focus point" to improve
Thanks so much for your input Bill. I like the brightness of your take, but it looks a bit oversharpened to me- is that the result of working with the jpeg? Do you mean the oof bits of the leaf or butterfly? The softening at the edges of the wing doesn't bother me - it adds a sort of dreamy quality I quite like. The front of the leaf I don't like, but the foliage wasn't very far behind the butterfly and I wanted that nice and soft so it was a bit of a trade off - one I often seem to be making! What do you mean by the focal point exactly? Here I was trying to make the eye the focal point and then giving room to the butterfly on the right - what do you think would have improved the shot? I quite liked the variation in light tones too, but maybe they are just a distraction.
- Messages
- 12,673
- Edit My Images
- No
Thanks so much for your input Bill. I like the brightness of your take, but it looks a bit oversharpened to me- is that the result of working with the jpeg? Do you mean the oof bits of the leaf or butterfly? The softening at the edges of the wing doesn't bother me - it adds a sort of dreamy quality I quite like. The front of the leaf I don't like, but the foliage wasn't very far behind the butterfly and I wanted that nice and soft so it was a bit of a trade off - one I often seem to be making! What do you mean by the focal point exactly? Here I was trying to make the eye the focal point and then giving room to the butterfly on the right - what do you think would have improved the shot? I quite liked the variation in light tones too, but maybe they are just a distraction.
Morning Emma
It is not a particularly colourful Butterfly so I felt that the image needed brightening up and that the area of light on the RHS could be used to contrast with a brighter subject ..... in your original posting the Butterfly is somewhat dull and flat and also needed sharpening to bring out the markings .. but maybe I have gone a bit OOT with the sharpening ..... the image quality of your original posting was a little low so the sharpening is grainy
The distracting OOF area for me is the wing as it is right in the centre of the image ..........probably made worse by the quality of the low res image
They image could be sharper, (it appears soft, or slightly OOF) - I noticed that you used 1/200th sec at ISO 200 and f8 with a 105mm macro lens and maybe try experimenting at f16, in good light, to help just a little with the DOF ....... IMHO there is camera movement (did you use AF or manual focus . presumably AF?), in there and a higher shutter speed would have helped ..... but if you under expose "dark" areas when you bring them back they always emphasise any noise
Focus point - I always feel that it is important to get the spots sharp and clear as well as the head
Last edited:
OP
- Messages
- 3,250
- Name
- Emma
- Edit My Images
- Yes
Cheers Bill. I probably used AF for speed as I usually do with subjects that might make a quick get away. The file is now uploaded to flickr and the head does look in focus there. I do agree with your comments, but f16 would have brought a lot of the bg more into focus on this occasion...I'll keep searching out those distant backgrounds that give the soft effect I love but allow stopping down
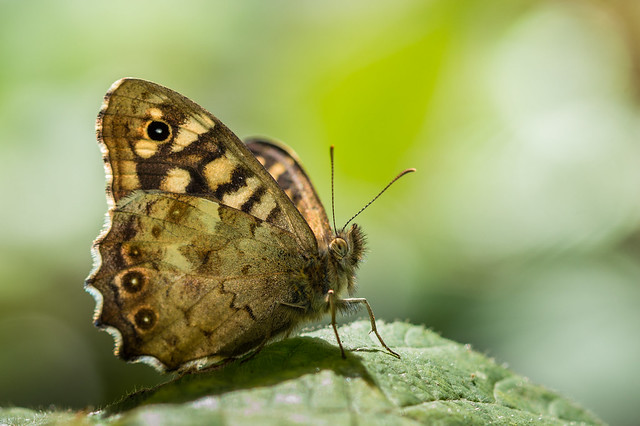 speckled wood by Emma Varley, on Flickr
speckled wood by Emma Varley, on Flickr- Messages
- 13,051
- Name
- Alf
- Edit My Images
- Yes
Emma
I see you are using LR so have a look at this video on the adobe youtube channel
View: https://www.youtube.com/watch?v=-AraTUsPc_0
I see you are using LR so have a look at this video on the adobe youtube channel
OP
- Messages
- 3,250
- Name
- Emma
- Edit My Images
- Yes
@alfbranch - thank you - I'll check it out later