Tutorial The TP Tips Bank

Marcel

Kim Jong Bod
Admin
Messages
29,408
Name
Marcel
Edit My Images
Yes
Marcel submitted a new resource:

The TP Tips Bank - The TP Tips Bank

We are hoping to collate a massive thread containing all those little tips and tricks that people use when theyre out taking photographs, or back home processing their work. Things they've picked up from others, or ingenious ideas that they've devised or dreamt up themselves.

So we're throwing open this thread, and asking everyone to submit any tips and ideas they can think of. When the thread starts to grow, we'll collate them into little sections/categories, with full credit to each member...

Read more about this resource...
 
Last edited by a moderator:
I'll start off with mine

* Canon DSLR Users - Set your custom function 4 to "1". This disassociates the focus from the shutter button and puts it on the exposure lock button at the rear of the camera. Focus and Exposure lock are now on two independant buttons and although it may take a short while to get used to, you'll soon find using them both independantly of each other invaluable :)
 
when trying to do water droplet shots, use baby oil instead of water...


good idea Marcel (y)
 
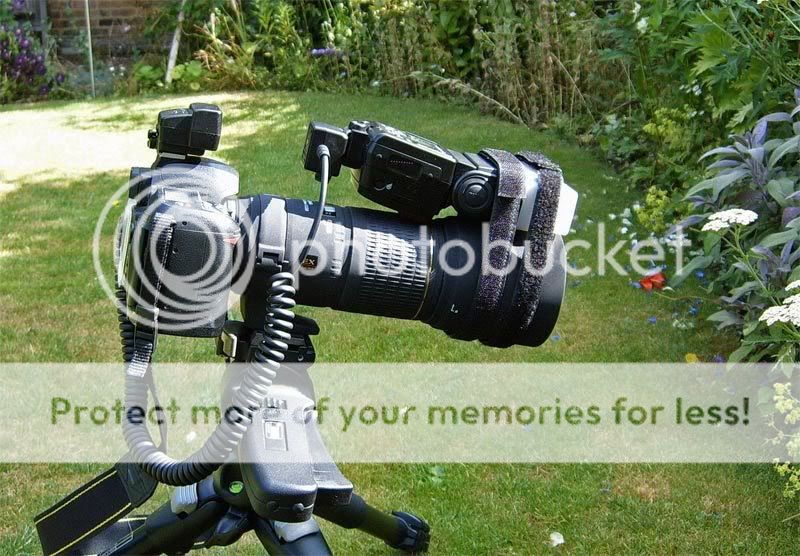
No need to buy expensive macro flash brackets, just use a couple of strips of velcro. Sorted.

S4300008.jpg
 
This might sound bleeding obvious, but get yourself a proper grey card and custom set your white balance before a shooting session. It might ok to you on auto or even on the computer but you'd be amazed at the difference it can make.
 
The grey lining inside Lowepro camera bags/packs is equivalent to using an 18% grey card. Nice touch eh? :)
 
Use a bit of brightly coloured sticky tape to "mark" all those bits of black camera equipment that could easily be dropped, left in the grass etc. (Things like lens caps, shutter release cables). It helps to spot them before its too late!
 
Don't be scared to improvise with your equipment. Example, if you need a flashgun snoot for a one-off shot, why not make one (in true Blue Peter stylee) out of the tube from a loo roll.
 
Some excellent tips everyone! Keep them coming :)
 
Canon 1 Series users may find this PDF useful, it has tips and tricks for camera handling and image quality.

Kind thanks to Diego for sending me the file in the first place.
 
I'll start off with mine

* Canon DSLR Users - Set your custom function 4 to "1". This disassociates the focus from the shutter button and puts it on the exposure lock button at the rear of the camera. Focus and Exposure lock are now on two independant buttons and although it may take a short while to get used to, you'll soon find using them both independantly of each other invaluable :)

Yes. I use this too.

BUT NOTE.....if you need to use autofocus with your remote release cord,,,, the autofocus wont work by the first push on the remote button as it is no longer the shutter button which operates the focus! :nono:
 
Ahh so THATS why it only worked half the time on my 350 (y) Now I know!
 
I'll start off with mine

* Canon DSLR Users - Set your custom function 4 to "1". This disassociates the focus from the shutter button and puts it on the exposure lock button at the rear of the camera. Focus and Exposure lock are now on two independant buttons and although it may take a short while to get used to, you'll soon find using them both independantly of each other invaluable :)


or if you have it set to '0' the shutter button will focus and the exposure lock button will lock exposure.

or am i missing something here?:thinking:
 
No I dont think so!!
What I found is that normally if you want to spot/partial meter on something, you zoom in on it and spot (some mid colour for instance) then when you zoom out again and press the shutterbutton to focus, the exposure is changed at the same time....as you are no longer only looking at the mid grey colour but a much larger part of the scene is in the mix.

It's much easier to just focus with your thumb on the * always.
Well I know what I mean, even if I haven't put it over properly!! :thinking:
 
:bonk: it may seem simple but having just done it (lost a whole set of photos) BACK IT UP:crying: i had to have a new hard drive thought i was safe, then finaly got back to you and had a catch up checked my gallery and boom realised i was a few short. It only takes a couple of mins its worth it.
 
Before putting your camera to bed (back in the bag). Put the settings back to something sensible.

Then you won't end up taking your next shot(s) at ISO1600 -2EV with bracketing on a 10 second timer, which was where you left it.
 
Don't be afraid to mix things up and try something new. Also, always carry more batteries then you think you may need (very true for winter months).
 
If you own a Canon grey lens pouch, with draw string top and black bottom that comes with the likes of a 24-105mmL. Then your prayers are answered, you no longer need a grey card when taking shots because the purpose of said bag is to 1, carry your lens and 2, take the place of a grey card. :naughty:
 
Don't use the preview screen on your DSLR for deciding ultimate sharpness of an image. If it's obviously unsharp then go ahead and bin it, but I've often been tempted to delete unsharp looking shots which have turned out to be fine once viewed on the PC monitor.
 
Check that your lcd screen brightness on your camera is set to the centre otherwise it gives the impression of under or over exposed shots!
 
When taking portraits, especially family groups with small children who are not used to posing, to ask the group to say 'hey' very slowly. Demonstrate it for them in a Leslie Phillips/sexy voice and press the shutter on the 'y'. It never fails to get genuine smiles across the group. Much better than 'say cheese'. Gillian
 
^Good one.

This one may be only for P&S'ers but when taking a portrait set your camera to manual mode, set the manual focus, and finally set the camera to contious shooting. (Setting the manual focus allows the camera to take more pictures compared to auto focus) Also make sure that your camera does not make a sound everytime it takes a shot. The idea behind this is to have the camera keep taking pictures while the family/person is posing and whatnot. Just make sure you have a large memory card. This way has proved most fruitful to myself and my friends.

PS, dont tell them that you are continous shooting because then their pose/smile wears out and it looks fake.)
 
'If it bends ... break it!'

... I cant rmember where I read this but it is meant in regard to limbs, in people photography.
I learned the hard way that rigid wrists, stiff arms, and straight legs always give an air of awkwardness to my pictures.
So, I always try to keep this little saying in mind when shooting people now, especially when taking pics for my nail comps, where I need hands/arms to be predominant in a shot.
 
Thats a great tip glo, haven't heard that before. Cheers :)
 
After reading the posts on CCD cleaning and seeing the example photos I realised my Finepix 4900Z needed seeing to. I found some tips and instructions at http://www.camerashed.co.uk/default.asp which has lots of stuff for Fuji cameras. With Janice's horror story firmly in my mind I trod where angels feared and it all worked beautifully. Yippee :clap:
 
Cripes!!! .... And I thought my 30d was difficult.

4900z ccd clean

Yes it did make me concentrate a bit. I had my laptop apart to clean the heatsink too, just got carried away, you know how it is.
 
For landscapes (and other situations) invest in a hotshoe spirit level, around a tenner in Jessops, a fiver at 7 day shop
 
When reviewing your own images...subscribe to the 'Rule of Turds', if it's crap..it's crap....delete it
 
Boss your camera, don't let the camera 'boss you', i.e. you need to know your camera inside out, it's strenghths and weaknesses, and be able understand them without giving it a conscious thought.
Because it's sods law, you will arrive at a once in a million situation, you need to respond quickly and you are fiddling around trying to remember what buttons to press to change the ISO etc.
 
Keep a bit of blue tac in your bag, brilliant for mounting filters (slot in) when you are using a lens without a holder, have no holder or your nearest and dearest has decided the holder looks better as a plant-pot stand
 
Some excellent tips there les, thanks (y) Love the blu tack one, and the Rule of Turds :D
 
(y) when taking portraits of a toddler to keep them in one place put a clear plaster on their thumb they will be entranced by it and just call their name to get them to look up every now and again
 
Nearly everyone already knows this, but I might as well post it anyway:

When shooting animals and birds, try to get down to their level. If they're on the ground, lie on your belly and take a few shots. You'll get dirty, but it's usually worth it. Sometimes I do this with flowers too - especially if there's lots in one place. Then I can pick one out and blur the rest - giving a nice colourful background of flowers instead of a few sharp patches of earth.
 
Another great tip Ewan, one of the most valuable ones I learnt myself.

I'll be sorting these out into sections eventually, so keep them coming! :)
 
De-Fog & Pop

First thing to do when you open an image you want to keep/print/publish:
Filter->Sharpen->Unsharp Mask set to 20, 60, 0.
You won't believe how the image becomes brighter & clearer. Select/deselect the "Preview" checkbox to see the difference.
Save this as an Action (.atn) & get into the habit of running it every time.

Last thing to do with an image (especially portraits, not so effective for landscapes but try it & see on different images):
Filter->Sharpen->Unsharp Mask set to (go with me here):
500 (yes, 500), 0.1, 0
Highlight the 0.1 value with your cursor & use the "Up" & "Down" arrows on your keyboard to increase/decrease the value. Usually around a value of 0.3 or 0.4 (for portraits - other types may need a bit more) you'll suddenly see the image "Pop" as the colours & contrast just all come together.

Trust me & try them.
 
Arent you supposed to sharpen as the very last thing...after levels, curves etc etc?
 
Arent you supposed to sharpen as the very last thing...after levels, curves etc etc?

Yes

(excepting resize for web... then you might need another sharpen ... or do it after the jury is out on this one)
 
Back
Top