Tutorial Tutorial: Create a two-tone Black & White border on your image

Messages
3,838
Name
John
Edit My Images
Yes
theMusicMan submitted a new resource:

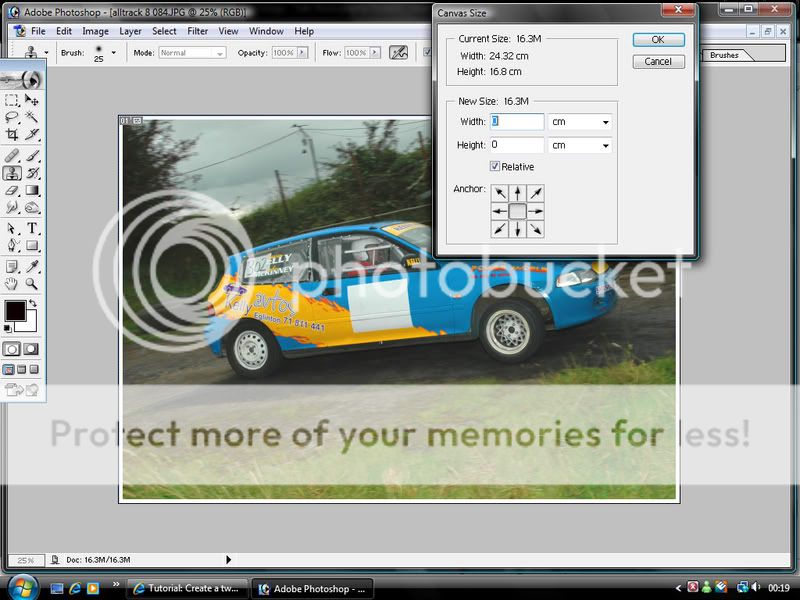
Tutorial: Create a two-tone Black & White border on your image - Tutorial: Create a two-tone Black & White border on your image

Title: Add a Black & White border to any image
Level: Easy/Novice/Learner
Time: 5 mins 1st time, subsequently as an action - seconds
Description: This short tutorial shows anyone how to add a black and white border to any image using Photoshop.

As a newbie to both the wonderful world of DSLR's and Photoshop - I was in awe at some of the fantastic borders I see on various photographs and images on here, and and other www sites - that in one way or another,...

Read more about this resource...
 
Last edited by a moderator:
nice tutorial, would be nice combined with dimensions & size for forum ie for web/gallery. ie image size 800 max then onto web settings.. just a thought :D

ps could also include if want larger size at bottom just hit arrows up and add few more pixels to height

ps Musicman i borrowed your image for demonstaration hope its ok.


flamingo11.jpg
 
nice tutorial, would be nice combined with dimensions & size for forum ie for web/gallery. ie image size 800 max then onto web settings.. just a thought :D

ps could also include if want larger size at bottom just hit arrows up and add few more pixels to height

ps Musicman i borrowed your image for demonstration hope its ok.
Of course it's OK sir, no problem at all.
 
Cheers MusicMan, best go and get myself photoshop then lol
 
Cheers MusicMan, best go and get myself photoshop then lol
... or post your image in the gallery, or send it to me - themusicman at gmail dot com - tick the box that states you don't mind members amending/working with your images, and I would be more than happy to do it for ya!

John
 
great tutorial mate, i was just in the process of writing one for borders too!!! Its a different method though, would you mind me adding it to this thread or would you prefer it if i started a new one (its your thread so i dont really want to be hijacking it)?
 
great tutorial mate, i was just in the process of writing one for borders too!!! Its a different method though, would you mind me adding it to this thread or would you prefer it if i started a new one (its your thread so i dont really want to be hijacking it)?
The more the merrier matey - feel free to add here if you like, no worries about that...:)
 
This is just another method of adding the same type of border and creating an action for it at the same time. It keeps the original image dimensions (so don't crop too tight) , although you cant customise different sides as shown by oldfart. It might look long-winded, but it's not....it's very, very simple!

1.Open the image you want to add your border to.
2. If the actions palette isn't open do so by hitting alt+F9
3. Click the "Create New Action" button at the bottom (shown by red dot below)

1.jpg


4. In the box, give your action a title and set a shortcut key (I just set it to F2), and click the record
button (everything you now do will be recorded until you stop it)

2.jpg


5. Most of this is now going to be done using the default short cut keys.
6. Press D to reset the colour palette to black and white.
7. Press X to set white as the foreground colour
8. Press Ctrl+A to put a selection around the whole image.
9. Select Edit>Stroke and in the box that opens, set size to 11 pixels (you don't even have to select it, as its already selected) and make
sure Inside is checked in Location and click OK.

3.jpg


10. Press X to set Black as the foreground colour
11. Select Edit>Stroke again and set the size to 10 and click OK.

4.jpg


12. Press Ctrl+D to deselect
13. Press the "Stop Recording" button in the Actions Palette.

5.jpg


Finished! Now every time you want a border all you have to do is press the F2 key! Try it!

finished.jpg


Thanks to theMusicMan for starting the ball rolling!!!
 
OK, to add a Drop Shadow to an image in Photoshop requires that you increase the canvas width and height by the amount of the shadow you want to add.

So, increase canvas size by say 20px, then create a layer from the background layer, double click in the layer to bring up the layer properties, or select Layer > Layer Style > Drop Shadow from the menu bar. Then select your layer details in the Layer Style dialogue box that opens. Press Ok and you're done.

How's that?
 
I tried your drop shadow technique
and after a few subtle changes managed this
(a duck wot I saw at silly o'clock this morning)
duck.jpg

I had to make a separate layer for the background,
and colour it white so I could see the shadow

but thanks for getting me headed in the right direction!
 
Nice one Mike - it worked then...? I must admit it was only a quick pointer as to how to create a drop shadow, but you interpreted my brief instructions correctly and have a nice looking drop shadow on that image.

What also sometimes looks good, is first put a small white border around the image, then put the drop shadow around that... it sort of sets it apart a little and makes it more aesthetically appealing.

Thanks for trying this and posting the result though, I'm getting so much information and advice from this excellent forum I thought I'd add a little back. I am no expert by any means, but this border effect is what i use and is easy to do so I thought I'd set up a tut.

Cheers
 
(y)
yup it worked, thanx!
please don't confuse me with an expert, though - I'm just feeling my way
they say you learn from your mistakes - praps that's why I know so much :nuts:
 
nice tutorial one problem im having when in the canvas size box, in my photoshop the canvas colour box doesn’t come up. Any ideas how I can go about getting the black border
 
nice tutorial one problem im having when in the canvas size box, in my photoshop the canvas colour box doesn’t come up. Any ideas how I can go about getting the black border
Hmmmm, what do you see instead? What version of Photoshop are you using...?
 
Hmmm, weird. Possibly it will extend the canvas in either the colour of the foreground or background. So try this... before selecting to extend the canvas size, press the 'D' key to set the background and foreground to black and white. Then extend the canvas, please advise as to which colour photoshop then extends the canvas with.

It's my guess it will be one or the other...


that sorted it thanks :clap:
 
I have tried the original method stated in this thread, but when I alter the number in the width box, the option to change colour greys out.
When I click ok it says the new canvas size is smaller but I still go ahead. Then the picture shrinks so much I can barely see it ? anyone help me out on this one ?
thanks
 
make sure size is in pixels. not sure how you can make it smaller by adding pixels on?? unless you forget to tick little box that says relative then removed size making it smaller???? If you dont tick relative just add pixels on but far easier to use method mentioned.

ps forgot to say if just using black & white its easier to use default background & foreground colours.
 
Re: Tutorial: Create a two-tone Black & White border on your image


Awesome tip theMusicMan,i can finally use something properly on my cs2 programme,it does pay to check the vaults on T.P. cheers mate.
 
You're welcome cannonball. Glad to have a fellow New Zealander as our resident coach...:) Worked for us this year eh!
 
Sure did,and congratulations to the Welsh team and Mr Gatland of course.Hope Robbie does the same with Australia to teach these hierachy buggers in N.Z. rugby a lesson.
 
This is just another method of adding the same type of border and creating an action for it at the same time.


Brilliant Antihero! Thanks for that, I've just recorded my first action (y) Not only that but I ran it as a batch from Bridge and worked a treat. That saved me sooooo much time so thank you.:clap:
 
You can make the canvas smaller by putting in a minus figure. I've used it for removing a border like this on one of my images because I knew what size the border is.
 
Just wanted to say thanks for the tutorial (y)
 
Ahh Thanks for jogging my memory MusicMan (y)

Forgot how to do this :LOL:
 
Thanks Musicman just had a try and it worked! Been trying to work out how to put a border round my photos for ages!
 
Ohh...just spotted this....never thought about putting borders on like this! Top Tip!(y)

Cheers

Simon

Some times I just feel really.....Dim!:D
 
Back
Top