Tutorial for checking please : Beginners guide to RAW

Status
Not open for further replies.

RobertP

TPer Emeritus
Messages
11,726
Name
Robert
Edit My Images
Yes
Edit 6.3.10

Well I've written this up in the Talk basics section over a few days hoping for comments to see if i was on the right lines and didn't get any :lol:

So now I'm going to move this into TP for a while to get some critique and suggestions. I've tried not to get too techy and just say what it is all about.

So.... what have I missed or got wrong? Please reply to this thread. Once we are happy with it I'll move it tutorials and we can direct new raw users to it as a starting point.

Intro.

Going by the number of posts on the topic recently a lot of people don't understand what raw files are, why they might want to use them and of course what to do with them once they have them.

Hopefully with the help of other members here I'd like to put together a tutorial that covers the basics in straightforward terms - hence doing this work in progress in the Talk Basics section. Covering all the above topics may be too much for one tutorial but we will see how it develops.

Based on last time I tried this approach to tutorial writing I realise that I'll end up typing most of it but any technical input and suggestions are welcome and save me some work. Even better if you feel like writing up a section that can be pasted in then please do. I don't claim to be an expert but should be able to pull it all together :)

So first step is to gather a list of things to be covered. Once we have a topic list we can move on to some explanations for them.

I'd also like some picture examples to include. Something shot in best jpg and raw. Then the jpg edited to recover lost highlights (or not recover) and the raw edited to show what the jpg could not. I don't shoot raw+jpg so don't have any but someone must :)

This could take some time but I will add to it whenever I can and it should get completed eventually. When it is this thread will be closed and the new tutorial posted in the tutorials section.

Please feel free to add suggestions and content to this thread. thanks.
 
Tutorial draft 1

What is raw anyway?

Raw is easiest to understand if you compare it to the negative from a film camera. You know it has the image the camera recorded but it is not much use for showing to people.

A chip inside the camera can turn that raw data into a jpeg that you can view easily. Having done that it throws away the 'negative'. The chip will use any settings (picture style) you set the camera to when deciding how much sharpness and contrast etc. to apply.

Alternatively you can have the camera save that raw 'film negative' file and leave it for you to choose what adjustments to make later on your computer. Just like you would make prints from a film negative and not alter the negative itself, a raw file is special in that it cannot be overwritten with an edited version. The raw editing program keeps a list of the changes you want then applies them when you tell it to make a jpeg or other format version of the picture. It also uses the list to give you a preview of what your picture can look like but the actual raw file is never changed.

There is no standard version of a raw file from a camera. So a raw file from a Nikon camera for example cannot be processed using Canon software. New cameras from the same maker may well have different raw files to previous models and you may have to update your software to the latest version if you get a new camera of the same brand.

There is a lot of stuff inside a raw file. The raw data from the sensor, the exif (camera settings list) data, the picture style settings that the camera would have used if it made a jpeg and a small version of that jpeg image.

There are editing programs made by Adobe and others that are not tied to any camera maker and they understand the raw files from many brands and models of camera. They do all suffer the same problems of having to keep up with new camera models and changes to the file format. You may find you need to look for updates if you have a recent model camera. Some old version software is no longer supported with updates which will force you to buy a new version.


Why shoot raw?

You don't have to shoot raw. Often when you process a raw file you end up with an image not much different to the Jpeg produced in the camera. If you got the exposure right, the white balance was right or near enough then the jpeg from the camera may be all you need. The jpeg can be also be edited and can be ready to share or use quickly. If like sports photographers with deadlines you need images quickly or you are still learning how to use the camera and don't need the complication of raw processing then do continue to shoot jpeg.

If you want the best level of detail, more dynamic range (retained detail in bright areas and shadows), the ability to correct wrong exposures and to easily change white balance then shooting raw is the way to go. The downside of shooting raw is that you will have to spend some time at your computer to convert (or 'develop') them.

How much time raw processing takes is down to you and how much you like tweaking. Because the raw file contains the cameras picture style settings, if you use the camera makers own raw conversion software you will have the option to see your picture just as the camera would have done it. This can be a very quick way to convert your raws to jpegs or other format. Unlike letting the camera do it for you (where you can't change settings after the shot), you can with the raw processing software. So you can just accept pictures that look right and only adjust those with problems.

Generally only the camera makers own software will take any notice of picture style settings. If you open the raw file in Adobe Lightroom for example it will make its own preview from the raw data. The preview will not have any sharpening or other adjustments so initially it may look a little dull and soft compared to camera jpegs.

You can still save time with Lightroom (and probably other conversion programs that I have not tried).... 'Auto tone' can do initial adjustments that you then tweak a bit yourself..... if you have say 10 pictures of one location you can convert the first one then copy all the adjustments to the other 9 as they will be similar and need similar changes made. So in brief, raw conversion will always involve some work but you can minimise it significantly :)

Jpeg is a lossy format. That means some information is thrown away when a jpeg is created. Because a jpeg can only have 256 shades of each of the 3 RGB tones making up a pixel colour, some similar but different colours that were in the raw are all made the same in a jpeg so colour 'depth' is lost. This all helps compression and makes the file size smaller. Using a high quality setting all that is not usually a problem. However when things are less than ideal it can mean detail is lost for ever in a jpeg.

Your cameras sensor can record a range of brightness in the scene. At the bright end more detail is recorded than in dark shadow areas. So a well or slightly over exposed picture will have more data in it than an under exposed one (read up on 'expose to the right'). The jpeg creating chip in the camera has to decide how bright is too bright and what to throw away as 'clipped'. This level is lower than what is really clipped in the raw data.

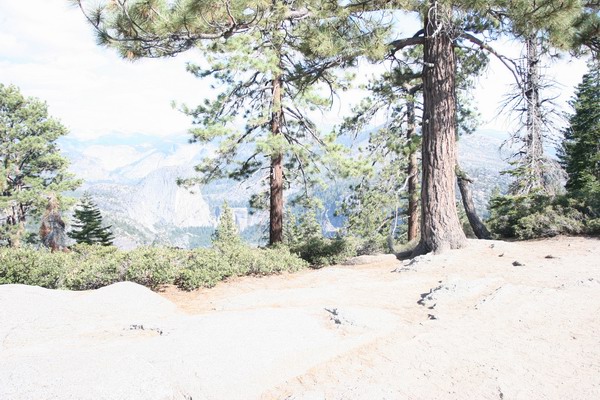
These photo examples show what that means in an over exposed image...

I don't normally shoot raw and jpeg together but do remember trying it whilst on holiday in Yosemite...

Not checking the settings and having forgotten that I had the camera on manual the result was this not very good, over exposed shot.

The in camera created jpeg picture just resized -
IMG_1305_1.jpg


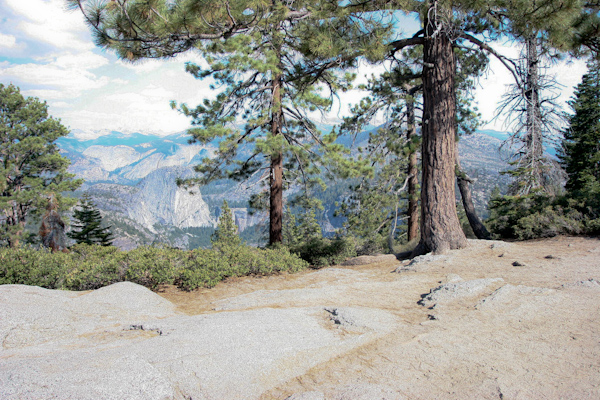
Using Lightroom (which can edit jpegs as well as raw files) to recover as much detail as I can from the original full size jpeg I get this-
IMG_1305_2.jpg


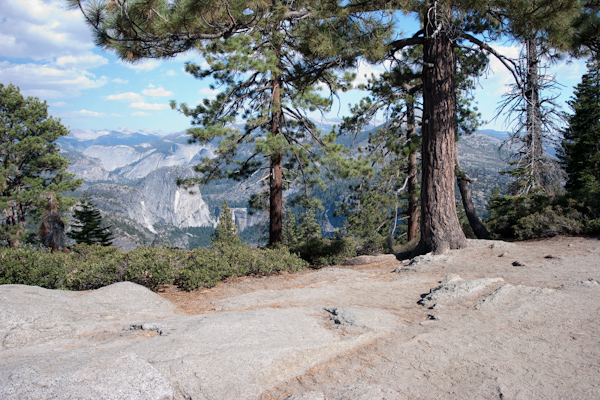
Again using Lightroom but this time working from the raw file i get -
IMG_1305_3.jpg


Now none of those are particularly attractive pictures but you can see the raw file has allowed a much better result.

Getting your computer ready for raw

If you have not already installed software for your raw files there is a good chance your computer will not know what to do with them. Instead of listing like picture files in explorer they may just be unknown file type icons and you cannot show them as thumbnails. To overcome this problem the camera makers have a 'Codec' that you can download from their web site. Installing the codec tells the computer what sort of file it is and lets it display a thumbnail view showing the jpeg saved inside the raw file. So it is worth installing the codec to make browsing easier.

Raw files can be quite large. Whilst you may not use them for everyday picture viewing, just like negatives from film days you don't want to throw them away either. That means storing them. Either on your computer if you have plenty of space on the hard drive or on some sort of backup disk.
You can change a lot of things during raw conversion so one day you may want to revisit an old raw file and make a new edit.

You don't need a high powered super fast computer to edit raw files... but it can help. As you make changes the preview of the picture will update to reflect those changes. A slow computer may take a second to show the changes you made which makes seeing small differences a little tedious. Most recent computers will be up to the job.

The easiest software to start out with is likely to be the one that came with your camera. It will work with your files 'out of the box'. There are many paid for and free raw conversion programs. There is a fairly comprehensive list here. As each new camera comes out so the publishers of the raw conversion programs have to update their software to be able to understand another new raw format. So if your newly installed 3rd party (not from the camera maker) program does not recognise your raw files it may need updating. Further reading on that here.

Different raw conversion programs can produce slightly different results and some may suit your way of working more than others. It is worth looking at other programs once raw becomes a regular part of your 'workflow'.


What to do with a raw file

This really needs its own tutorial as there is so much you could do! Below are the commonest things you would check or tweak. How you actually do it will vary according to the software you use.

How is the colour balance? If it is OK then skip this bit. If the white balance was set wrong then an indoor night shot could be too orange for example or it may just be a little out. There should be a white point dropper tool that lets you pick something on the picture that is white or neutral grey. Make sure you pick something white and not looking white because of clipping (too bright for the camera). You can just adjust the colour temperature until it looks right if you don't like the dropper tool results or have no white or neutral in the picture.


Does the exposure look right? Adjust the exposure slider so the overall look of the picture is the right brightness. There should be a way of showing 'clipping' (things that are so bright they are burnt out or so dark they are solid black) so turn it on. Some clipped areas is OK but if too much you may have to adjust the settings for highlight recovery and/or fill light (or equivalent controls in your software) and possible adjust the exposure again if the clipping is still too great. If your image does not have any solid blacks or clipped bright areas you may wish to adjust the black point level and exposure to get some - if it looks right.
Brightness and contrast adjustments can also improve the image but do it after the exposure adjustments.

You may want to change the saturation a little to brighten colours or make them more subltle.

Low light high iso images may need some noise reduction adjustments.

Raw has no sharpening applied so it may look a little soft. How much sharpening you need to apply is a bit of a black art :) It is a mixture of art and science. There may be pre-sets in your program for 'portrait' or 'landscape' sharpening and those are a good starting point. Main thing is to zoom in to 100% and have a look to see if your sharpening still looks as good as it does in the smaller preview.

Don't worry about getting the settings right or wrong - you are making a picture look how you want it. You may even decide a 'wrong' exposure or white balance for example looks great.

Now you can just stop there and start up your raw editor to view the files changed to how you like them. If you want to share them easily or get them printed then you will need to 'export' them to a normal picture file - usually jpeg. You should be able to select all your edited pictures in your raw editor and export (save) them to a folder on your hard drive as jpegs. Those new jpg files can then be uploaded to a printing company etc. just like you used to with jpegs from the camera - but the quality is how you decided not a chip in the camera.

If you are into editing pictures with Photoshop or other applications like Photomatix for 'hdr' images then starting from raw will give you the bit depth and detail levels they may need and the option of saving in lossless formats like tiff. Personally, I shoot raw, convert to best jpeg in Lightroom and consider the job done :). Raw gives you the option to do as much or as little with your images as you choose.

 
Bumping then moving to TP in the hope of some help :)
 
Overall, it looks OK to me Robert. Well done. :thumbs:

The line
You may want to increase the saturation a little as in camera jpegs often do.
could do with a little bit of editing for clarification. ;)

I would also say that sometimes a reduction in saturation may be needed if saturation is increased, especially if the shadow detail has been increased.

You may also want to link to this thread I started when talking about the possibility of needing to upgrade RAW editing software, in the case of this thread, Adobe Camera Raw.

I would have also mentioned saving as a Tiff for printing large with maximum quality.

Again well done for taking the time to write it, and doing it so well. :)
 
Done the saturation comment and added a link.

Not sure on tiff. They are seriously large files. if a newbie converts all their raws to tiff they may be put off by how quick their hard disk fills up and how slow they can be to view on an older PC?
 
I've never understood this thing about exposure and RAW. Surely if the sensor was overloaded and clipped at the point when the picture was taken, all detail above peak white is lost. Saving the image as a jpeg or raw will make no difference.
 
Looks good to me. I think there are other areas that could be discussed, such as white balance adjustments (comparing RAW vs JPG adjustments). Perhaps that could be a second part or advanced RAW. This is certainly enough to give someone a good grounding if they don't already know the advantages and disadvantages of RAW.
 
I've never understood this thing about exposure and RAW. Surely if the sensor was overloaded and clipped at the point when the picture was taken, all detail above peak white is lost. Saving the image as a jpeg or raw will make no difference.


hmm maybe that does need more explaining.

It's to do with jpeg throwing stuff away. There is a point where the sensor is 'overloaded' but it is a fair bit brighter than the limit used by the camera jpeg. So in raw there is more bright information in there and it can be recovered and in the camera jpeg it has been lost.

does that make sense :)
 
I wasn't advocating converting all RAW files to Tiff, just the images that could benefit from it. A brief explanation of when to save as a Tiff file is all I was thinking of. Images to be printed larger than normal for example, as I assume not many images would be printed bigger than A4, but for when you do, save as a Tiff for maximum quality.

Also for HDR, saving as a 8bit, or preferably 16bit Tiff, can give a lot more information for the HDR software to use and give a smoother conversion.
 
hmm maybe that does need more explaining.

It's to do with jpeg throwing stuff away. There is a point where the sensor is 'overloaded' but it is a fair bit brighter than the limit used by the camera jpeg. So in raw there is more bright information in there and it can be recovered and in the camera jpeg it has been lost.

does that make sense :)

Demonstrated superbly by the sky in your photo above. JPG couldn't get the detail back, RAW could.
 
I wasn't advocating converting all RAW files to Tiff, just the images that could benefit from it. A brief explanation of when to save as a Tiff file is all I was thinking of. Images to be printed larger than normal for example, as I assume not many images would be printed bigger than A4, but for when you do, save as a Tiff for maximum quality.

Also for HDR, saving as a 8bit, or preferably 16bit Tiff, can give a lot more information for the HDR software to use and give a smoother conversion.

Hmm suppose I could add something about more options like x,y,z as you learn more. Trying to keep it not too scary for those not as computer literate as the more experienced amongst us. Don't want things like bit depths making them run away :)
 
If you don't mention Tiff at all, you'll just get questions such as 'it says I can also save as a Tiff, what's that?'. No need to go into too much depth (no pun intended) just something to head off those types of questions. :)
 
Thats an interesting tutorial Robert and I thank you for taking the time to write it. As a relatively new user of RAW you have enlarged on a few points that I wasnt too clear on. A phrase I struggled to get my head round is:
"Some similar tones are made the same and how much of that tone recorded rather than every pixel individually saved"
I am sure its me not reading it right, and while I think I know what your saying, I wonder if you could possibly rephrase or enlarge the sentence please so that newcomers like me can grasp it better.

After doing the RAW adjustments, the file can be converted and transferred to an editor like Photoshop or similar, is it possible to include the advantages of 8 bit or 16 bit files being transferred.
Once again, thanks Robert.
 
Thanks for the feedback Trevor. that line could be improved.

Hard to know where to stop on this subject as it opens so many possibilities. I thought about mentioning passing the file on to photoshop but decided that all comes under advanced users. I never do it and don't even have PS on my computer.

I've also never saved a file as a tiff for printing. I do have some 30" x 20" prints on the wall from jpegs which look great to me. Not saying my way is right just that you don't need tiffs and higher bit depth to get benefit from using raw.

I use raw because it gives me the best results and editing in Lightroom is pretty quick. I don't actually like sitting at the computer editing pictures. So I sort out my raws in Lightroom, save as best full size jpegs so my wife can view them easily, and she then chooses any she wants uploading for printing.

edit. had another go at the jpeg line. might still need more work. writing and drinking beer probably don't mix so I'll leave it for a while :)
 
I've made some more changes to hopefully cover the points mentioned. Anything else?
 
Looks great. I would only add that the highlights recovery and resolution is largely dependent on RAW converter. Two of the best (and slowest) converters on the market (RPP and RawMagick) will do a significantly better job recovering blown highlights and demosaicing tiny details (mainly because they use floating point operations - hence partially the reason they are slow). Don't think this is that important but may be mentioned in case people are interested.
 
hmm maybe that does need more explaining.

It's to do with jpeg throwing stuff away. There is a point where the sensor is 'overloaded' but it is a fair bit brighter than the limit used by the camera jpeg. So in raw there is more bright information in there and it can be recovered and in the camera jpeg it has been lost.

does that make sense :)

I think the problem is that your raw data might be unclipped in the RGB channels but once it has been converted to JPEG in camera there are irreversible adjustments made that might cause clipping to take place. These processes include....

- converting to a colour space;
- applying a tone curve;
- increasing contrast, saturation and sharpening;
- applying picture styles that "do funny things";
- applying a white balance correction.

When the camera first takes a picture it has the raw data to begin with. Then it does all that stuff to the raw data which can cause clipping, and then it throws loads of detail away in reduction to 8 bit files and JPEG compression. The raw data then gets discarded by the camera, and you are left fudged, with possibly blown highlights and limited scope to make adjustments.

If you shoot to raw then you can freely make many adjustments to the data before conversion to the final JPEG, thus making sure that nothing you do forces any pixels into clipping (if they weren't clipped at the time of capture). Even if there was some clipping in one or two channels, good raw software can make an educated guess about what the data might have looked like, if it only has to "mend" one channel, or perhaps two. You also have a lot more data to play with, giving finer tonal gradation and less risk of posterisation when pulling and pushing data. JPEG is fine if you can shoot perfectly in camera, but if you want to retain freedom to fix up some problems, or simply squeeze the maximum IQ from your camera, raw is the way to go.

Shooting raw is not about "taking photographs". It is about "capturing data". The idea is to capture as much data as possible, which means applying a different approach to setting exposures, specifically exposing to the right. You will make the photograph later, in your own good time, and not accept whatever conversion the camera spews out based on the settings you had at the time. If you prefer, shooting to JPEG is like having a baked cake. You can't unbake it. Shooting raw is like assemblling all the ingredients from which to make the cake. You then do the baking later on. If you don't like the results you can go back to the ingredients and try again.

If I can submit another example of raw highlight recovery, here is something that was shot raw and overexposed quite badly. Here's how it looks when processed in Lightroom with no edits (other than cropping tighter on the bird....

20100305_125907_5056_LR.jpg


Here it is after making a couple of quick and easy adjustments in Lightroom (Exposure = -1.3, Blacks = 25)....

20100305_125907_5056_LR.jpg


Since I didn't shoot in JPEG at the time I used DPP to make a high quality JPEG from the raw file, with no adjustments, using the settings I would have used if shooting to JPEG in the first place. I then imported the JPEG into Lightroom and tried to make similar adjustments to render the file usable. The results are terrible. The blown areas are unrecoverable and the colours are completely off....

20100305_125907_5056_DPP_LR.jpg


Now, if we look at the histograms, here is what the histogram looks like for the actual raw data, when mapped to an sRGB colour space, with no clipping at all in the red channel, some clipping in the green channel, and just a hint of clipping in the blue channel....

20100309_132338_38_LR.jpg


By comparison, here is how the histogram looks for the JPEG file produced by DPP. The histogram is really bunched up against the right hand side, and being a JPEG, the bits that look clipped really are clipped beyond salvation. Anything marked in red on the bird is pure white. No useful data, no hope of recovery....

20100309_132417_17_LR.jpg
 
Thanks Tim, great stuff :)

Very detailed explanation of something I referred to in passing. I was hoping some of the more technical members might get involved.

Think I'll delete a few discussion posts out of this thread to tidy it up then move it to tutorials as is.

Edit. thread copied to tutorials with discussion posts removed. This one now closed. Feedback welcome in the tutorials version here
 
Status
Not open for further replies.
Back
Top