Une nouvelle vie

Asha

Blithering Idiot
Messages
11,274
Name
Asha
Edit My Images
Yes
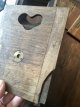
This thread is pretty much due to the request of @ChrisR who basically asked for a commentary on the rebuild of this french 13x18cm Tailboard bellows camera that i was recently given.

( Original details here: OFFICIAL I HAVE A NEW (FILM RELATED) TOY THREAD!! | Page 276 | Talk Photography

I'm not really very good at this type of thread so forgive me for the unproffesionalism and the fact that I'm starting with the almost finished result before posting the earlier stages. ( I never did conform to the norm! :p)

In brief , the outfit is already very close to being usable. :)

It remains fragile even with the minor repairs that i have made and without doubt obtaining photographs from it will prove to be a challenge, however it will only be used occasionally , the rest of the time I'll have it on display ( hopefully sat on its original tripod if it is ever located )

So here is what it looks like as of this afternoon.

1.jpg
 
20 or so years ago, I could have given you a 6' tall Gandolfi tripod that would have suited that camera quite well. Dad used to use it under a full plate camera (sorry, can't tell you exactly what) and there is (somewhere - probably landfill since my delightful sister got rid of everything I would have liked...) a shot of me sitting on top of the tripod aged 4 or 5 years!
 
So starting with the the base of the camera.

The focusing mechanism is intact albiet that if racked out too quickly the teeth of the rails do ride over each over .
Not a big problem..... just needs a slow steady approach.


12B608A2-50F7-46CE-ABF5-D02C77C4F328.jpeg


Attached to the underside of the baseboard is a section that houses the tripod mount.
6220B675-295B-4372-B379-6E62E7FC89A6.jpeg
F1BA7BB3-6CB9-4C1A-ABB7-559D215FD583.jpeg

When the camera is opened up, this piece actually slides forward and interlocks with the front standard. In doing so it supports the front standard perfectly perpendicular to the baseboard.
This particular section was completely split in two and was the first piece to be glued.53560772-476F-4F67-9003-E38A9FBC786A.jpeg3709DE59-7E09-4FFB-8B57-C3D11DA9AF98.jpeg

The baseboard itself had , through mal use I suspect, succombed to several splits which necessitated repair.

5120C2BF-EA30-4B6C-8386-CA8D40C0B362.jpeg

The front standard also had succumbed to damage, notably a split to the top corner

96B63E05-3373-47F6-8EC6-9B247C90EBA1.jpeg

Reattached to the base board and with the tripod support section slid forward , the front standard holds firmly upright as is necessary.
58B24170-BC4D-4AE5-B311-4ABAB99A59E5.jpeg
A84C20C2-F46E-476E-B71B-04216A7914CB.jpeg
8DA9E2B6-BFDE-47FA-9D25-2BC6D93C1DFA.jpeg
7847EBE0-4D60-46A7-8E13-462B3277ABE5.jpeg
74A04E04-E818-4E4F-9C30-72B4B5380A6D.jpeg
877B4969-3F93-47B4-8794-3BEA95523090.jpeg
 

Attachments

  • BDA18163-0ECB-498C-8D52-E1B16D4CF684.jpeg
    BDA18163-0ECB-498C-8D52-E1B16D4CF684.jpeg
    150.5 KB · Views: 3
Looking good. How much extension is there on the bellows?
 
Looking good. How much extension is there on the bellows?
I didn’t measure exactly but somewhere close to 480mm so potentially 1:1 reproduction possible with its 210mm lens or the replacement 210 lens that I have if the original proves unusable. :)
 
Last edited:
Fantastic, Asha, thanks!
 
With the baseboard in now usable condition and the front standard re-attached, it was time to situate the rear standard on the tailboard to ensure that all lined up square/ perpendicular.

Unbelievably both feet belonging to the rear standard were detached with no sign of their original screws.
Perhaps they had been used for another project as there was no evidence that the feet had been ripped out of the wood of the standard.

Anyway, I located enough suitable brass screws that I had lying around from a refurbishment of an old Lancaster Instagraph half plate camera back in 2010 .

Firmly screwed onto the base of the standard, the feet ( four screws for each ), locate in the holes of the baseboard at whichever chosen distance from the front standard, then the rear standard is shifted sideways slightly to 'lock' the feet in place.

2.jpg

3.jpg
 
6B265146-077D-4DD2-896D-63359D2A97B1.jpegAAB88F9E-2FA1-4621-BCEC-B7622C02F125.jpegDDAF99B7-A742-461C-A0E9-9C3EC7ABC76F.jpeg11E738FD-EBFD-4362-86DA-EB77ABD9BA66.jpeg84D86624-0588-417E-B016-B0316850FD4C.jpegDD3CFA90-FE09-492F-B7C3-B22470BB0CAA.jpeg2BE72F75-F65D-4FDB-9639-0D3BA339DF56.jpeg58A94D5B-76A3-4DD5-967A-C306FAD5D95B.jpeg4C30FF1B-ED0E-4F84-B05C-BCBCFD622D98.jpeg
Next up was remounting the orientation mechanism.
Unlike most LF cameras where the groundglass section of the rear standard is rotated to change between portrait and landscape, this outfit involves tbe whole of the rear standard which in turn rotates the bellows.
The rear standard then reseats onto the baseboard with the it’s additional two feet located on it’s edge.
For the bellows to turn there is a simple wooden mechanism consisting of a ring that sits on the front of the front standard but behind the lensboard.
This wooden ring is fixed with screws to a wooden panel to which the bellows are attached.
 
Lens now mounted and new made to measure groundglass installed

The brass screw fitting to lock the shift movement of the lensboard is missing but it’s not detrimental. The vertical movement which is more important is funtional and if the lens is shifted left or right it stays put anyway.
84149E16-7D03-4BFF-B35E-1257AD037282.jpeg12FACD21-8620-4804-BDAA-8D7EC4895A79.jpeg
 
Film holder is typically European , well it would be wouldn’t it lol, with a curtain type darkslides made of pleats of wood.

The interns of the holder specifically designed for glass plates so to test for light tightness with paper or film, Ive inserted card to allow for the difference in thickness.

All that remains now is to cut and load a sheet offarkroom print paper then expose in camera.
It will be interesting to see how the lens performs with its balsam separation.
The image on the groundglass does ant appear too bad so it may not pose such a big problem.
3954F2D9-EC27-49AC-8F1E-2E799D4B2CBF.jpeg54FD3FEA-1EAE-4CA1-A7DA-C18D5CB4C760.jpeg
 
The brass screw fitting to lock the shift movement of the lensboard is missing but it’s not detrimental.


Do you know what thread the insert is? I know the missing screw isn't detrimental but the lens board looks like it could slide out if the screw's not there. Given time, I could probably source a period looking (brassy!) butterfly not and a bit of studding for you.
 
Do you know what thread the insert is? I know the missing screw isn't detrimental but the lens board looks like it could slide out if the screw's not there. Given time, I could probably source a period looking (brassy!) butterfly not and a bit of studding for you.

Thats very kind of you Nod.

I don’t know the thread insert nor do I know how to properly assess it.
Diameter and pitch ring a bell somewhere in the depths if my remaining grey matter but i doubt that I could accurately measure without specific tools .

One thing is practically for certain given that the camera is of french origin, thesize will be metric and not imperial.

If I can I find a method ofmeasuring then I ‘ll of course let you know.
Alternatively I could send you the camera :exit::LOL:
 
Easiest thing to try would be a "normal" tripod mount screw and a slightly bigger one often found on the top of a set of tripod legs (sometimes as a sort of collar around the smaller screw.) Might seem odd on a French camera but it's entirely possible that the manufacturer used the same boss/insert for the tripod mount and other, similar holes.

Failing all that, feel free to send me the camera (with pre-paid return carriage!!!) and I'll se what I can do. Please include any lenses and a few pre-loaded dark slides (?) and as full instructions as possible!

More seriously, if you have a friendly local mechanic, they'll almost certainly have the toolery to determine the size of the thread and may well have a bolt that would do the job.

Actually you have a very good point there re the tripod boss as it’s standard 3/8”;)

And yes I have a very friendly local mechanic who has mounted flanges for barrel lenses onto alu lens boards for me so I could call in with the camera:)
 
If you have a 3/8 adaptor (some tripods and/or heads come with them) it's a very easy check. Same with the 1/4". I'm sure you know that while Whitworth threads fit tripod mounts, the thread is actually UNC in modern times but yours might actually be Whitworth. Hard to be certain since it's a small difference in the angle of the threads that differentiates the 2 "standards"!
 
If you have a 3/8 adaptor (some tripods and/or heads come with them) it's a very easy check. Same with the 1/4". I'm sure you know that while Whitworth threads fit tripod mounts, the thread is actually UNC in modern times but yours might actually be Whitworth. Hard to be certain since it's a small difference in the angle of the threads that differentiates the 2 "standards"!

The 1/4 inch screw of a standard tripod QR plate will complete one full 360 degree turn before it blocks so the diameter would appear to be correct but the thread slightly different .

The actually length of bolt / screw required exceeds no more than 5 or 6mm.

My local spanner guy may well have something suitable although it’s unlikely to be in brass.
 
Found another bolt with a slightly finer thread which will make almost a full turn and a half before blocking.
Placed fir comparison alongside the hexagonal headed bolt in this pic which has the identical diameter and pitch as a 1/4” tripod mount.

I’m unsure which of the two standards image.jpg that you mentioned, UNC and Whitworth, has the finer thread.

image.jpg
 
They have the same pitch and diameter and will fit each other's nuts/bolts. Both will just start in a 6mm nut so your original idea of it being a metric hole could well be correct (and I've been wasting our time!!!) Not got any brass metric fasteners "in stock" but THESE people do all sorts of stuff. Not sure if they ship to the EU but if they don't, I'm sure something can be arranged once the correct size is known.
 
your original idea of it being a metric hole could well be correct (and I've been wasting our time!!!)
:ROFLMAO: Well not a complete waste of time.
If nothing else we’ve come to the conclusion that neither of us has a suitable fitting available :ROFLMAO:

) Not got any brass metric fasteners "in stock"

Well that’s a poor first impression,:confused:
I shall ‘shop’ elsewhere in future:p

but THESE people do all sorts of stuff. Not sure if they ship to the EU but if they don't, I'm sure something can be arranged once the correct size is known
(y)
 
A forced period of time away from togging but I'm slowly returning back into it so what better way than to try out this camera to see if a succesful exposure is possible.

Not the glass plate portrait of Vincent which remains a project for the (hopefully) near future, but an exposure of him onto a paper neg.

The exposure time was 4 seconds which was a double edged sword, being perfect for using a lens cap as a 'shutter', but of course it meant that Vincent had to remain still for the duration.
He did extremely well tbh and the negative looks pretty good .

Using the camera is/ was , as expected quite a challenge especially when it came to the darkslide stage, but all considered, including the balsam seperation, it gives a decent result.

I plan on making cotact prints fromthe 13x18cm ( 5x7") neg in the contact printing fame that came with the camera.
I may try an enlargement to 10x8" if the IQ will allow.


neg.jpg
 
Just for clarity, my mentioning in the new toys thread that the original owner of this camera was Vincent’s father is incorrect, it belonged to his Grandfather !!
This of course relates more to the age of the outfit.
 
Two contact prints madeusing the 13x18cm contact frame supplied with the camera:


E3FDAE61-3DC1-41D2-B7C6-594211386021.jpeg
of which the results look reasonably good given the state of the lens glass and the four second exposure


08C35A8C-70B4-402F-A218-F52A4D08FA89.jpeg
Both of these prints are for Vincent, one of which will be toned as he likes old sepia vintage sty images……a suitable jug of tannin for the job is presently brewing:)
25DFE702-DB00-4DCC-A008-CDBD48FB9BE5.jpeg
 
Yes I do like that Asha.(y)(y)
 
Back
Top