Beginner Want to try my hand at Astrophotography - Help needed!

Messages
754
Name
Daniel
Edit My Images
No
I want to give Astrophotography a go, I've been doing some reading and think I have the basics down but hopefully someone here can guide me in the right direction.

As far as I am aware from what I've read, Manual exposure is a must, obviously a tripod, I'm probably going to be using my 35mm prime lens as the aperture is nice and wide. This is where I need some pointers, I've read about the 600 rule in various places, by all accounts on a crop sensor camera I need to times 35 by 1.5 (52.5) then divide that by 600 and that should give me the correct exposure time?

Last but not least....find somewhere with little light pollution!?

Please feel free to direct me if I am heading down a dodgy path with these assumptions!
 
It's not the correct exposure time, it's the maximum length of time you can have the shutter open with that lens before the stars start to trail.

I normally use the 500 rule as I've found that the 600 rule makes the stars start to trail.

Best of luck, it is fun.
 
Also use ISO3200 as a starting point and use a cable release and mirror up mode if you have it.

Manually focus using live view zoomed in on a bright star
 
Don't you need to divide 600 (or 500) by the corrected focal length rather than the focal length divided by 600 (or 500) as stated in the OP?
 
Don't you need to divide 600 (or 500) by the corrected focal length rather than the focal length divided by 600 (or 500) as stated in the OP?


Yeah, well spotted, he's got it the wrong way round.

so I'd use 500 / 52.5 which gives me 9.52 seconds exposure
 
You could do a lot worse than go here https://www.swagastro.com/ for inspiration and technique, Sara posts on here as Swag72, checkout her shots in the astro/nightshot forum, dont get too disalusioned by her shots though, she has some serious kit and some serious skill :)

Matt
 
Last edited:
Sorry yeah I meant to say 600/52.5 but I'll give the 500 a go too!
 
So my first attempt was a bit of a disaster, I really struggled to focus on anything in Live View so focused on something semi far away that I could see but everything was just a mass of white, not only this but I had my camera on my gorillapod on our wheelie bin in the garden so I was having to lean down to check what was showing up....basically it didn't go well so I packed up. I then decided I wouldn't be beaten, got my beast of a tripod out so that the camera was at least above eye level and I could see properly what was going on and also remembered to change settings in Live View so that I could at least see something and have a good starting point to go off of and these were the results...

DSC_1962 by Daniel Paul, on Flickr

DSC_1961 by Daniel Paul, on Flickr

DSC_1960 by Daniel Paul, on Flickr

DSC_1958 by Daniel Paul, on Flickr

I am fairly pleased with them as a first attempt and definitely want to try it out a bit more with better compositions!
 
Daniel, a lot better than my first attempts! Out of interest what direction was the camera pointing? These sites may be of interest in your area: https://classicsailor.com/2017/11/new-stargazing-sites-chichester/ and http://www.darkskydiscovery.org.uk/int_dark_sky_places.html.

On the last link click on "Where to see the stars" in the left panel and zoom in on the map. Bosham seems good.

Nice one thanks for that, I will have to check a few of them out I think! The camera was pointing North East for the most part, no idea whether that was a good thing or a bad thing but it was where there was the least cloud cover at the time!
 
@Redgie44 couple of ideas, use live view if you have it, try to find a bright object at a distance where by your lens will be at infinity and then fine tune. The other option I have used, but is a little temperature dependent is to during the day, gain sharp focus at infinity. then using white insulation tape, is mark up the lens barrel and focus ring, then when in the dark simply match up the edges of the tape. If you splice the tape finely you can then do 4 bits of tape, one for cold nights and one for warmer nights, as infinity is slightly different based upon atmospheric temp.
 
Last edited:
great first attempt - im planning on giving this a go soon. Always a bit curious how to focus properly

Yeah I'll be honest it was a bloomin nightmare first go round and was ultimately why I gave up the first time. I then sat and wracked my brains as to how to focus better in live view in the dark and the simple solution was to bump up the ISO to the highest which on my D3300 is HI1 I think it is and then dial in a wide aperture etc, that made some white spots barely visable which turned out to be stars once I focused in on them. Glad I perservered though as I learnt to take my time a bit more and have some patience......and also to not give up after the first attempt :LOL:
 
Good first attempt on what was a pretty cold night and for not giving up.
I see you have the same problem as me, and I guess a lot of others, neighbours' damn security lights.
Our local police are now suggesting everyone gets external dusk-to-dawn security lights, oh terrific!
So, like you I am going to need to find some place with darker skies.
 
In Daniel's case a very good location would be about 30 - 40 miles due south. The only problem would be getting a stable location for a long exposure! :D I have seen some truly stunning skies during night sailing across the English Channel.
 
Welcome to your new obsession!

Did you realise you had the Andromeda Galaxy in photos #1 and #2? It's that slightly fuzzy bit towards the top left corner.
upload_2017-11-15_11-10-56.png

Now you know you want to point a bigger lens at it ... but the Rule of 600 comes into play ...
 
Welcome to your new obsession!

Did you realise you had the Andromeda Galaxy in photos #1 and #2? It's that slightly fuzzy bit towards the top left corner.
View attachment 114642

Now you know you want to point a bigger lens at it ... but the Rule of 600 comes into play ...

Thanks for the heads up Stewart I had no idea!! To be honest this whole field is extremely new to me and I am actually weirdly obsessed by it a little!

I might have to get my 18-200 at it but the aperture is not as wide obviously, I don't know how wide I can get away with really!
 
Using a longer lens is tempting but as mentioned above the 600(or 500) rule has an effect if you want stars as points rather than trails, eg with a 200mm lens on a 1.5 crop factor camera the 600 rule suggests an exposure of 2 seconds!

I'd have a go with your 18-200mm at 18mm (which will give you an exposure of around 20 seconds). I don't what the maximum of this lens but I have managed to get some reasonable shots of stars and Milky Way with a f3.5 lens from a dark site.

This - http://www.stellarium.org/en_GB/ - is a good, and free program for finding your way around the night sky.

Dave

Yes the Tamron I have is a f3.5 at it's widest. For the time being I am only really looking at stars as points rather than trails so would I be right in thinking a 2 second exposure would give me that? I would eventually like to get those nice circular star exposures but I believe they're like 10 minute exposures right?
 
Hi Daniel.
a quick 101. If shooting towards the celestial equator you will see star movement quicker than if your shooting at +90° degrees straight up from it (Declination) or -90° straight down, in turn, if you angle your camera to be pointing at Polaris in the Northern Hemisphere and the Southern Cross in the Southern Hemisphere you will see even less star trailing as these two points within the night sky are which all other stars to our perception from our location on the earth revolve around.

So, with your camera and focal length assuming your are shooting in the Northern hemisphere the following shutter times are what you can expose for roughly without the stars appearing to trail

ISO 3200
18mm Focal Length
Declination: 0 (from horizon) = 13sec
Declination: 90 (from horizon) = 26sec

ISO 3200
200mm Focal Length
Declination: 0 (from horizon) = 1sec
Declination: 90 (from horizon) = 26sec

At F3.5 in order to get a neutral exposure in reasonably dark sky conditions you would be looking at around 19 sec
At F5.6 (200mm assumed) you would be looking at +1 or 2 min exposure

As you can see the time to get an exposed shot against the time to keep the stars as pin points is very fine and or is not possible based upon focal length, aperture, shutter speed and declination etc.

So either, you allow more light in i.e a Higher F-Stop 3.5 > 2.8 > 1.4 etc or you need to track the stars as the earth spins allowing you to expose for longer. The latter is the cheaper option with devices like i-optrons Skytracker.

Its worth noting that ISO correlates 1:1 with how much the exposure increases or decreases so... (declination of 90 assumed)

1600 @ 18mm = 26sec
3200 @ 18mm = 13sec
6400 @ 18mm = 6.5sec

The trade off with higher ISO's is the noise ratio in the single is also amplified thus you loose dynamic range. * ISO invariance in sensors is a topic best left for another day, sorry guys :)
Therefore you need to balance the above, with your location, direction, angle and subject.

I hope this helps you and others?

Edit - Declination - Corrected for celestial equator rather than earth horizon as I previously stated
 
Last edited:
Hi Daniel.
a quick 101. If shooting towards the horizon you will see star movement quicker than if your shooting at 90 degrees straight up (this angle from 0 to 90 is know as Declination), in turn, if you angle your camera to be pointing at Polaris in the Northern Hemisphere and the Southern Cross in the Southern Hemisphere you will see even less star trailing as these two points within the night sky are which all other stars to our perception from our location on the earth revolve around.

So, with your camera and focal length assuming your are shooting in the Northern hemisphere the following shutter times are what you can expose for roughly without the stars appearing to trail

ISO 3200
18mm Focal Length
Declination: 0 (horizon) = 13sec
Declination: 90 (horizon) = 26sec

ISO 3200
200mm Focal Length
Declination: 0 (horizon) = 1sec
Declination: 90 (horizon) = 26sec

At F3.5 in order to get a neutral exposure in reasonably dark sky conditions you would be looking at around 19 sec
At F5.6 (200mm assumed) you would be looking at +1 or 2 min exposure

As you can see the time to get an exposed shot against the time to keep the stars as pin points is very fine and or is not possible based upon focal length, aperture, shutter speed and declination etc.

So either, you allow more light in i.e a Higher F-Stop 3.5 > 2.8 > 1.4 etc or you need to track the stars as the earth spins allowing you to expose for longer. The latter is the cheaper option with devices like i-optrons Skytracker.

Its worth noting that ISO correlates 1:1 with how much the exposure increases or decreases so... (declination of 90 assumed)

1600 @ 18mm = 26sec
3200 @ 18mm = 13sec
6400 @ 18mm = 6.5sec

I hope this helps you and others?

This is great and very informative Geoff thank you very much I will bear this in mind for future reference!
 
(this angle from 0 to 90 is know as Declination)
Unfortunately that's not quite right. The Declination measures the angle of the star relative to the celestial equator, not the horizon. If you're at a latitude of L°, the celestial equator is inclined at (90-L)° to the horizon. That can make quite a significant difference.

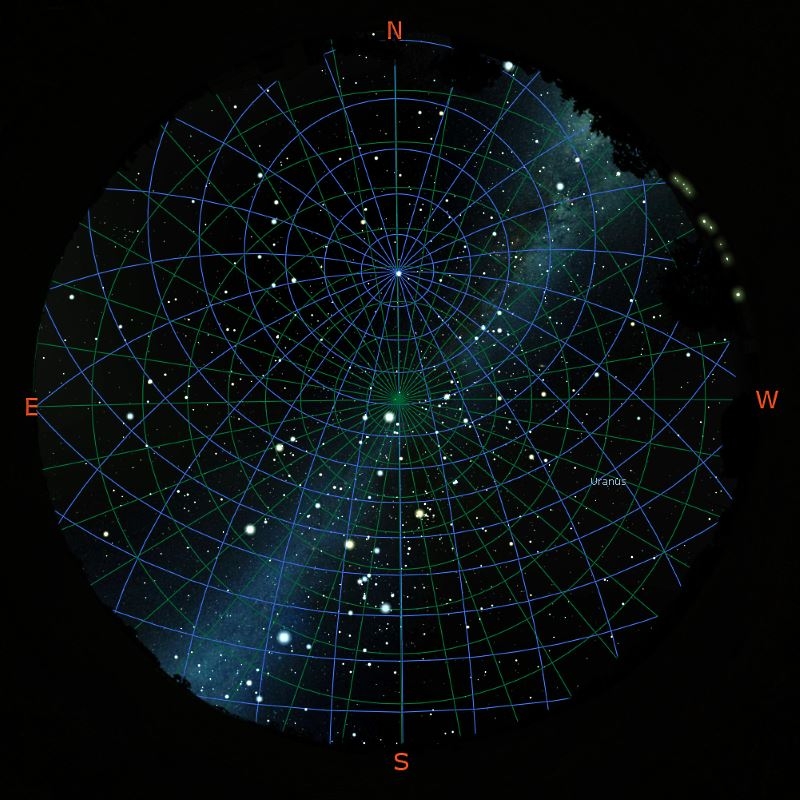
This screenshot from Stellarium shows the celestial grid (blue) and the altitude/azimuth grid (green) overlaid on the night sky as seen from southern England. The centre of the blue celestial grid is the north celestial pole, with Polaris right there, but it is not overhead; it's a fair way down towards the northern horizon. The centre of the green Az/Alt grid is the point which is directly overhead, and at the time represented by this snapshot the bright star which is very nearly overhead is Capella (α Aur).

The celestial equator is the blue grid line which runs from the "E" marker through the middle of Orion to the "W" marker. The rightmost star in Orion's belt, Mintaka or (δ Ori), is almost right on the celestial equator, but it's 38° above the horizon.

upload_2017-11-15_17-23-55.png

The reason this matters is that it's at the celestial equator where stars are moving fastest across the sky, not at the horizon.

Unfortunately I don't know how you've calculated your shutter times, so I can't correct them.
 
Thank you for the correction StewartR. Any chance you can post a bigger image of your example, I'm struggling to see the lines your referencing! I have updated my initial post with this clarification.

PS. I have double checked my math/details and the numbers match if the celestial equator is used :) so I think I got my terminology confuzzled lol
 
Last edited:
Yes the Tamron I have is a f3.5 at it's widest. For the time being I am only really looking at stars as points rather than trails so would I be right in thinking a 2 second exposure would give me that? I would eventually like to get those nice circular star exposures but I believe they're like 10 minute exposures right?

The lens I use for star photos is also f3.5, so your zoom lens set at 18mm and the camera at an appropriate ISO will give you shots of the stars. Settings vary but I tend to use a lens at 18mm, f3.5, 20 second exposure, and an ISO of 3200.

In theory a 2 second exposure with your lens at 200mm will prevent star trailing. However, I don't think a 2 second exposure is going to be sufficient to record very much, unless you were able to use a very high ISO which is likely to introduce a lot of noise.

Star trails giving a good circular pattern need exposures in the region of hours rather than 10 mins. Instead of one very long exposure, which could overheat the sensor, they are most often done by taking a large number of shots each with a relatively short exposure and stacking them with appropriate software. For example, 200+ photos each of perhaps 20-30 seconds exposure, but a lesser effect can be obtain with fewer shots.

In the Tutorials section on here there is a good guide to star trails written by one of TP's members.

Dave
 
Thank you for the correction StewartR. Any chance you can post a bigger image of your example, I'm struggling to see the lines your referencing! I have updated my initial post with this clarification.

PS. I have double checked my math/details and the numbers match if the celestial equator is used :) so I think I got my terminology confuzzled lol
OK. Here's a slightly different view from Stellarium showing the whole sky, so you can see that the celestial pole is quite a long way down towards the northern horizon.
19266-1510829933-d9bd5349de1beab2d8c59f5614fe70ef.jpg


PS. I have double checked my math/details and the numbers match if the celestial equator is used :) so I think I got my terminology confuzzled lol
Sorry Geoff, but that can't be the case. I still can't work out what you've done with your calculations, but if you look at that sky chart above, you'll see that on the eastern and western horizon the stars are on the celestial equator, so they'll be moving fast and prone to trailling; whereas on the southern and northern horizon the stars are at declinations of approximately +/- 40°, so they move more slowly and are less prone to trailling. So it's simply not possible to provide a shutter time formula based solely on the altitude (distance up from the horizon).

The way I'd do it is to use the declinations of the stars you're trying to image, which are readily available online or in apps like Stellarium. If the 600 rule applies at the celestial equator, then for stars at a declination of D we should use 600/cos(D) instead. So for example if your image contained the Andromeda Galaxy and you wanted to ensure it wasn't smudged by trailling, you'd look up its declination which is 41°, and then 600/cos(41°) = 800, so you'd calculate your shutter times based on 800 divided by the focal length instead of 600 divided by the focal length.
 
Last edited:
Thanks StewartR
I'm only considering 0° or +90° from the celestial equator. (as per my edit and correction above) anything in between will yield different shutter times.

I have done a bit of googling... the following seems a good approximation, and I suspect the source document from all other posts and forums I have read up on the subject .
https://www.lonelyspeck.com/advanced-astrophotography-shutter-time-calculator/

Either way, I have had consistent and good results :) using my thought process, perhaps more by luck than anything else :)

Regards
Geoff
 
Last edited:
Your more than welcome... funny how terminology mix up (horizon/equator) can cause so much confuzzling :) very pleased we managed to work it out.

Try learning how to carry out sun sights and star sights with a sextant. Now that is Olympic class confuzzling!! ;)
 
Just got a M43 to T2 adaptor for my Olympus EM5MK2 to fit to my 8" dobsonian.

Manual mount so only really suitable for moon shots I'd imagine?

But it appears it'll be the EFL of a 2400mm lens!!! Might need to use the cable release.
 
Try learning how to carry out sun sights and star sights with a sextant. Now that is Olympic class confuzzling!! ;)
Id like to give it a go! ... when the lights go out so to speak, and if I'm still around it would be helpful skill to have ;)
 
Just got a M43 to T2 adaptor for my Olympus EM5MK2 to fit to my 8" dobsonian.

Manual mount so only really suitable for moon shots I'd imagine?

But it appears it'll be the EFL of a 2400mm lens!!! Might need to use the cable release.
Id recommend going in doors and making a brew whilst its settles :)
 
@Daniel_Paul Your first attempt is way better than mine! I too am getting into this interesting area of photography!

This was my third attempt the other night, this time with a more interesting composure than my first attempts:

Beneath the Stars by Magpie Dom, on Flickr

Apart from Seven Sisters, does anybody know if there are any other interesting celestial bodies of note in this photo?

Me and a buddy drove all the way out to Clun in Shropshire Hills and I was hoping to see the Milky Way but we couldn't see it.

I think maybe we got the timing wrong or should have ventured further away from the village.

It was also impossible to focus as it was so dark and nothing was showing on the viewfinder, not even the brightest stars. Maybe I should also have bumped the ISO up but I was worried about noise.
 
Last edited:
Back
Top