
and the site receives a small commission

You are using an out of date browser. It may not display this or other websites correctly.
You should upgrade or use an alternative browser.
You should upgrade or use an alternative browser.
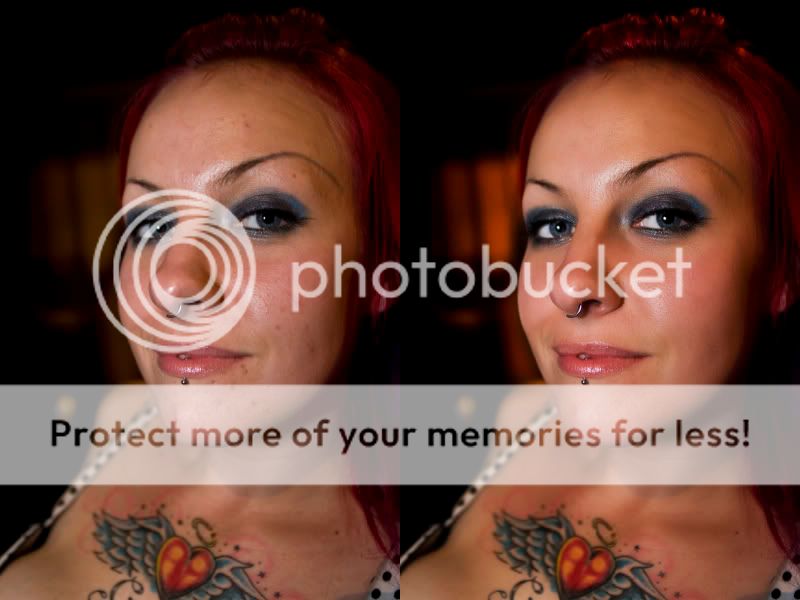
Beauty Treatment (Tutorial Added)
- Thread starter tiler65
- Start date
D
ditchdigger
Guest
wow i would say thats a fast improvement how did you do it|?
- Messages
- 1,241
- Name
- Bal Sanghera
- Edit My Images
- Yes
Very natural looking improvement, nice tones and not to dramatic... care to share how you did it?
- Messages
- 10,072
- Name
- Phil
- Edit My Images
- Yes
Great job! Well done!

London Headshots
Suspended / Banned
- Messages
- 1,340
- Name
- John
- Edit My Images
- No
Healing brush?
London Headshots
Suspended / Banned
- Messages
- 1,340
- Name
- John
- Edit My Images
- No
Is anyone else checking this thread every few hours? I'm dying to know this new technique
Is anyone else checking this thread every few hours? I'm dying to know this new technique


London Headshots
Suspended / Banned
- Messages
- 1,340
- Name
- John
- Edit My Images
- No
Any chance you could tell us the actual technique in the meantime, so those proficient can get cracking straight away? ")
Is it the old:
Duplicate layer, mask everything you want brushed then gaussian blur it leaving hair, eyes etc original?
no
 )
)Hmmm, looks a bit like it. Bit strange popping up a post saying "check this new method of doing xyz" then not telling folks how its done and dragging it on for over a week.
Looks very similar to what I do :
http://www.strathycruise.com/pics/calendar6.jpg
Staff Edit : Images changed to clickable links. Pictures must not exceed current forum limits as per the rules.
Please feel free to replace this with a fresh/resized image and remove this text
Looks very similar to what I do :
http://www.strathycruise.com/pics/calendar6.jpg
Staff Edit : Images changed to clickable links. Pictures must not exceed current forum limits as per the rules.
Please feel free to replace this with a fresh/resized image and remove this text
Marc
TPer Emeritus
- Messages
- 34,275
- Edit My Images
- Yes
Hmmm, looks a bit like it. Bit strange popping up a post saying "check this new method of doing xyz" then not telling folks how its done and dragging it on for over a week.
Where's your sense of anticip.......
.
.
.
.
.
.
.
.
.
.
.
.
.
.
.
.
.
.
.
.
.
.
.
..........ation!
Hmmm, looks a bit like it. Bit strange popping up a post saying "check this new method of doing xyz" then not telling folks how its done and dragging it on for over a week.
Looks very similar to what I do :
Cheeky :razz: ****er, I did not say I would post a tutorial.
Any way I am WRITING IT NOW please be patient.
Marc
TPer Emeritus
- Messages
- 34,275
- Edit My Images
- Yes
TBH if he had just paid a MUA he'd not have to bother with processing skin to make people look different to what they actually are
MUA?

- Messages
- 4,747
- Name
- Adele
- Edit My Images
- Yes
MUA?
Make Up Artist
EdinburghGary
Reply not Report
- Messages
- 19,065
- Name
- Gary
- Edit My Images
- Yes
Excellent Technique, and take your time mate, you don't owe anyone anything. Kudos for doing the tutorial.
Marc
TPer Emeritus
- Messages
- 34,275
- Edit My Images
- Yes
Marc
TPer Emeritus
- Messages
- 34,275
- Edit My Images
- Yes
TBH if he had just paid a MUA he'd not have to bother with processing skin to make people look different to what they actually are
Unfortunately we're not all pros so it wouldn't be that practical to pay a Make up Artist every time we wanted to have a go at portraiture. And in any case, don't tell me that pros don't use computer techniques to achieve these affects.
- Messages
- 4,747
- Name
- Adele
- Edit My Images
- Yes
TBH if he had just paid a MUA he'd not have to bother with processing skin to make people look different to what they actually are
Tbh, a lot of the magazines have MUA's and still process people like this.
- Messages
- 1,086
- Name
- Pip
- Edit My Images
- Yes
Well I'm looking forward to seeing the tutorial so fair play to you for making the effort to write and post one. As Gary said, you don't actually owe us one so I'll be grateful when it appears. Just got to find that subscribe to link button now so I don't miss it...
Here is my tutorial that has been brought on by some of the fuss made ove this post linky
Part 1
Open your image

Then duplicate image

Now to remove the blemishes.
Then with the healing brush tool


with your pointer/mouse/pen hover over a part of the skin near a blemish click alt to select an area of the skin you would like to copy over the spot/damaged skin. I zoom in to 300% to do this as I have found that many smaller clicks work better. It make take a while but it is usually worth it. If you have a blemish near a contrasting colour, you may find that when you click the region it drags across the other colour too. in this case select

And this will copy exact pixels to your cover the blemish. Use this very carefully as it copies the colours too and you can end up with another blemish because of a change in colour/light etc.

Once you have finished removing the blemishes/stray hairs etc you can move on to part 2
Part 1
Open your image
Then duplicate image
Now to remove the blemishes.
Then with the healing brush tool
with your pointer/mouse/pen hover over a part of the skin near a blemish click alt to select an area of the skin you would like to copy over the spot/damaged skin. I zoom in to 300% to do this as I have found that many smaller clicks work better. It make take a while but it is usually worth it. If you have a blemish near a contrasting colour, you may find that when you click the region it drags across the other colour too. in this case select
And this will copy exact pixels to your cover the blemish. Use this very carefully as it copies the colours too and you can end up with another blemish because of a change in colour/light etc.
Once you have finished removing the blemishes/stray hairs etc you can move on to part 2
Part 2
Now we want to identify the skin so we use a colour picker but in this way. Click Select>colour range

This will bring up a new window like this

As you can see it has a silhouette of the model but what we want to do is select the skin colour/tone range. we do this by moving your pointer to a part of the skin in the photo and clicking. This will change the silhoette to this

But as you can see there are some parts of the skin still dark. So we need to click on the add colour tool in the colour range window and then select more of the skin until you have it looking something like this

Now click OK and you will have an image like this one with the marching ants on.

What we next is put this selection on another layer and I do this by pressing cntrl+J (cmd+J for the rich mac users) and we get something like this in the layers palette.

If you turn off the bottom 2 layers you will have an image like this

And as you can see there are parts of her hair, mouth and eyes etc still showing. We need to remove these and I do it with the eraser tool

You can do it with masks but I do the way I am comfortable with. Begin to erase the areas that are not skin, lips included

until you have something like this

End of part 2
Now we want to identify the skin so we use a colour picker but in this way. Click Select>colour range
This will bring up a new window like this
As you can see it has a silhouette of the model but what we want to do is select the skin colour/tone range. we do this by moving your pointer to a part of the skin in the photo and clicking. This will change the silhoette to this
But as you can see there are some parts of the skin still dark. So we need to click on the add colour tool in the colour range window and then select more of the skin until you have it looking something like this
Now click OK and you will have an image like this one with the marching ants on.
What we next is put this selection on another layer and I do this by pressing cntrl+J (cmd+J for the rich mac users) and we get something like this in the layers palette.
If you turn off the bottom 2 layers you will have an image like this
And as you can see there are parts of her hair, mouth and eyes etc still showing. We need to remove these and I do it with the eraser tool
You can do it with masks but I do the way I am comfortable with. Begin to erase the areas that are not skin, lips included
until you have something like this
End of part 2
Part 3
Now we duplicate this layer again cntrl+j etc

As you can see I have renamed the layers accordingly (I forgot that part earlier)
Now we disable all layers apart from the skin layer and this where we enhance the skin. Select Filter>blur>surfaceblur

And select setting something like these.

I know it is overdone but we can adjust these settings by moving the opacity slider

Something like this
When you have got your desired effect switch on all the layers and click on the then named pores (or top layer if you have not named them)
Then select Filter>other>high pass

with settings around this, play around with the settings, the higher the number the bigger/sharper the pores will be.

Click ok and you should have something looking like this

Now we need to change the blending mode


You can try which ever you think is best but I use soft light or overlay.
Again play around with the settings for your desired effect.
Here is what I did this morning (not the edit in the first post)

It took me longer to the tutorial than to do skin technique.
PHEW!!!!!
Now we duplicate this layer again cntrl+j etc
As you can see I have renamed the layers accordingly (I forgot that part earlier)
Now we disable all layers apart from the skin layer and this where we enhance the skin. Select Filter>blur>surfaceblur
And select setting something like these.
I know it is overdone but we can adjust these settings by moving the opacity slider
Something like this
When you have got your desired effect switch on all the layers and click on the then named pores (or top layer if you have not named them)
Then select Filter>other>high pass
with settings around this, play around with the settings, the higher the number the bigger/sharper the pores will be.
Click ok and you should have something looking like this
Now we need to change the blending mode
You can try which ever you think is best but I use soft light or overlay.
Again play around with the settings for your desired effect.
Here is what I did this morning (not the edit in the first post)
It took me longer to the tutorial than to do skin technique.
PHEW!!!!!