Colour Negative Film: Negative Lab Pro vs Silverfast vs Filmdev

Messages
8,318
Name
Ian
Edit My Images
No
So this is probably overly dull, but getting decent colour has been a real thorn in my side for a *long* time now. In the end, I gave up and sent everything to Filmdev asking for "large" scans so I didn't have to worry.

But the expense of paying for a "large" scan that is the same size no matter whether it's 35mm, 6x7, or 6x17 means that when I do send off my semi-large format negs, I ask for smalls. Normally, I don't need anything other than small, but this time, I got a couple of decent photos back that I wanted to print. So I needed to scan them myself.

So I started my scan, and a standard Silverfast scan looked completely different from the Filmdev scan. This triggered me, so I found my old NLP license, redownloaded it, put it in LR, then scanned as a positive and flipped it in NLP. Then I read the instructions for NLP and did it again. These are my findings...

First up, annoyingly, Filmdev seemed to have decided that several of my 17cm weren't worthy of being scanned. I'm not going to complain because it was a small scan free with developing, but I'd have been pretty miffed if I'd paid the extra for a larger scan! I'm guessing the scanner has a 6x12 limit or something...?

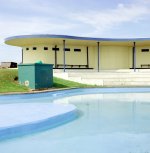
All images taken on Tomiyama 6x17 camera with Kodak Ektar.
Screenshot 2022-03-25 212202.jpg

NLP recommend scanning as a 48bit HDR file in Silverfast, which is what I did and the results were quite stark vs my regular 16bit TIFF. The Silverfast "normal" scan looked pretty awful (hence me going to Filmdev for proper scanning!)

I then went through the process of converting in LR. I didn't do anything fancy with the sliders, just kept everything as default as I wanted to compare default NLP with default Silverfast.

SCREENSHOT.jpg

I was actually quite pleased with the results.
First - all my scans were completely different tonally to the Filmdev one. There is a "tint" to the overall image that takes all the blue out of the sky. Not sure if it's been over-warmed, but I was expecting something a bit more colourful from Ektar. It's taught me that Filmdev are probably ok for internet use but for prints, they're not really up to par - especially with Ektar.

Vuewscan standard vs NLP was a little more interesting. At first glance, they appear quite similar, but the Ektar "punch" was missing from the colour and the blue sky still didn't feel right.

Screenshot 2022-03-25 212941.jpg
I'd call that a "significant" difference in sky tones. But it's also noticeable in the greens too...

Screenshot 2022-03-25 212841.jpg

It looks to me like NLP has separated the greens and browns really nicely. The Silverfast "normal" scan has a wash over it that mushes them, and the Filmdev scan is nasty with a greeny-brown tint that ruins the sky.

In terms of the difference between the HDR scan and the TIFF scan, I'd say "not much". No blown highlights but not much to recover from the shadows. This is Ektar though which doesn't (in my experience) have the dynamic range of something like Portra. Looking at the profiles that come into LR, using the TIFF forces you to use the v21 profile, but using the HDR allows you to choose a lot more options. Reading the website, Nate looks like he's developing the programme to work with the 48bit HDR scans so it looks like I'm going to have to suck up 270Mb/image. I think I'll definitely be deleting the crap (like my test shot above)! That's 1Gb storage per roll of film!

The only downside (and it's quite a big one) is that the Lightroom sliders don't work as you'd expect in the Develop module so you need to use the NLP "develop" controls (under "Advanced"). The only way around this is to use NLP to make a positive copy whish basically exports the image back into the same folder as a "positive" at which point Lightroom controls work as normal.

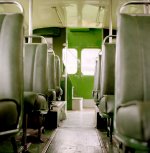
Apologies for the terrible sample image, it was the 1st one I scanned and ended up being the one I tried all the different scan methods to find the best. Got the process nailed by the time I arrived at the one I'm going to print...


Marbury by Ian, on Flickr
 
Last edited:
@Harlequin565 interesting write up, if you'd like to add a 'GFX Scan' into the mix, then get in touch, should still give you approx 25MP image to start with. I'm still experimenting but have been pleased with NLP.

The whole process of sorting out a workflow is a time bandit though, I feel I've spent a long time experimenting but still haven't quite got there.
 
By coincidence, I bit the bullet and bought NLP last night. I've been using Grain2Pixel - the free Photoshop plug in- for a while now and it mostly does a nice job on some types of film, but others - such as Portra - always give me problems. Because NLP allows much greater control I decided it was worth sticking my hand in my pocket after playing around with the free trial for a bit.

I'm very much learning and figuring stuff out with it right now, but I'll be interested to see your findings (and to share my own) in this thread.
 
Thank you @Harlequin565 (and @FishyFish in anticipation and for your past threads) for sharing these results. These digicam-scan approaches are getting much more popular these days, but it's clearly not as straightforward as one might wish, so the more experience (with pics!) we have, the better!
 
Thank you @Harlequin565 (and @FishyFish in anticipation and for your past threads) for sharing these results. These digicam-scan approaches are getting much more popular these days, but it's clearly not as straightforward as one might wish, so the more experience (with pics!) we have, the better!

I'll be scanning mine using my Epson V550 and Plustek 8100 rather than using a diital camera. I'm just wanting to get more consistent and controllable colours from my C41 scans.
 
I managed to get some results I'm quite happy with today on some Lomography Color Negative 100 scanned with my Epson V550 using Vuescan. Scanned as RAW DNG files and then converted with Negative Lab Pro.

1

NLP Test by fishyfish_arcade, on Flickr

2

NLP Test-2 by fishyfish_arcade, on Flickr

3

NLP Test-5 by fishyfish_arcade, on Flickr

Then I tried scanning some Portra 160 that I'd struggled with before, but I hit a brick wall with that and it still looked pretty awful. Need to figure out why...
 
I've had a go at re-scanning some Portra 400 negatives today. Scanned with my Epson V550 using Vuescan as RAW DNG files and then converted with Negative Lab Pro.

While there might be more work to do on the NLP scans (there are a lot of options to ajust the scans), these are the best versions of these pictures I've had to date, and I'm pretty happy with them for my initial attempt. I've never been really happy with my previous versions, whether converted using Grain2Pixel, EpsonScan, or Vuescan. So this is a pleasing result.

The first shot of each pair (a) is my previous attempt with Grain2Pixel, the second (b) is the NLP version from today.

1a

NLP Test - G2P scans-2 by fishyfish_arcade, on Flickr

1b

NLP Test - Portra 400-2 by fishyfish_arcade, on Flickr

2a

NLP Test - G2P scans by fishyfish_arcade, on Flickr

2b

NLP Test - Portra 400 by fishyfish_arcade, on Flickr

3a

NLP Test - G2P scans-5 by fishyfish_arcade, on Flickr

3b

NLP Test - Portra 400-4 by fishyfish_arcade, on Flickr

4a

NLP Test - G2P scans-4 by fishyfish_arcade, on Flickr

4b

NLP Test - Portra 400-5 by fishyfish_arcade, on Flickr
 
Last edited:
Quite a significant difference. Interesting.
 
Last comparison for tonight...

These are scans of the same Portra 400 photo (135 format).
  • The first is an unedited Filmdev Noritsu scan.
  • The second is a NLP scan (from my Plustec 8100) edited in Lightroom to get it looking similar to the Noritsu scan - it's not exactly the same, but close. Just involved adding some contrast, clarity, and a bit of warmth.
  • The third is the unedited NLP scan (same as above, just no additional Lightroom tweaks).

1 - Filmdev

Filmdev by fishyfish_arcade, on Flickr

2 - NLP (edited in Lightroom)

NLP edited by fishyfish_arcade, on Flickr

3 - NLP (unedited)

NLP unedited by fishyfish_arcade, on Flickr

Again, I'm very happy with these results from NLP. The added benefit is that I can get much higher-resolution scans from the Plustek than Filmdev supply.
 
Last edited:
I did a few more NLP test scans last night, this time on a "difficult" roll of Portra 160 that I shot last year. I originally scanned with Vuescan and a Grain2Pixel conversion, but wasn't happy with the results. Doing the inversions in Vuescan itself were no better, and in the end I went back to basics and just used EpsonScan. Epsonscan gave me the best results, but not ones that I was truly happy with.

The first shot here was the most awkward of the roll and even though the NLP version looks more natural (if somewhat brighter) I'm still not convinced about the colours, which still look too warm. I can't decide if it's just because there is naturally a lot of brown in the scene, or if software has gotten muddled up in some way. I also can't really remember what he colours looked like on the morning and wish I'd made a digital shot too by way of some comparison. The NLP version sky looks much more natural in terms of tone though - it was a very bright and cloudless early spring day.

The Epsonscan versions all have some sort of colour cast, but that is likley down to me fiddling with the colour histogram while attempting, and failing, to get the colurs looking correct.

The major benefit of NLP is that I can go back into the RAW DNG scan and re-convert with different settings as many times as I want.

Here are the comparions - all based on the direct output of Epsonscan or Negative Lab Pro with no additional Lightroom editing (although I think the Epsonscan versions were sharpened after import).


1a - Epsconscan

Epsonscan by fishyfish_arcade, on Flickr

1b - Negative Lab Pro

NLP by fishyfish_arcade, on Flickr

2a- Epsconscan

Epsonscan-2 by fishyfish_arcade, on Flickr

2b- Negative Lab Pro

NLP-2 by fishyfish_arcade, on Flickr


3a- Epsconscan

Epsonscan-3 by fishyfish_arcade, on Flickr

3b- Negative Lab Pro

NLP-3 by fishyfish_arcade, on Flickr

4a- Epsconscan

NLP-4 by fishyfish_arcade, on Flickr

4b- Negative Lab Pro

Epsonscan-4 by fishyfish_arcade, on Flickr

@Harlequin565 - hope you don't mind me posting these in here. I don't want to take over your thread with stuff, especially if it takes it in a direction you might not have intended given the title.
 
Last edited:
@FishyFish thanks for posting these. I'm still experimenting with workflow but like NLP, though I still need to play more (ie understand properly) all the possible settings. I have struggled with 35mm on my Epson Scanner, but am happier with the results since using my GFX to scan (and I can get quite stupid (excessive) resolutions from 35mm). I've had better results from 120 with the Epson (and can also get good results with the GFX. Tethering the camera into Lightroom makes the workflow quite quick (I find the scanner quite laborious!)
 
hope you don't mind me posting these in here.
No problem. I don't shoot much colour, and when I do, it's rarely good enough to warrant worrying about colour too much. The more info the merrier is what I say.
 
This is an interesting thread and was not aware of these film processing software Negative Lab Pro or Filmdev and find them interesting.
I have used Silverfast in the past but found the cost for upgrading the software to the latest version of Mac (plus not sure they still support my very old scanner) I dropped it in favour of Vue Scan.
Silverfast as I am sure everyone knows is very powerful but a pain to use and get the best out of without trawling round the web to find things.

I use VueSand on a Microtek 120tf scanner (very old) all scanned as JPEG and then do any messing with images in Affinity Photo, which works for me.
Here are two both taken with Extachrom 100 I think:
 

Attachments

  • Bus Inside.jpg
    Bus Inside.jpg
    117.8 KB · Views: 13
  • Lido Whitby.jpg
    Lido Whitby.jpg
    103.6 KB · Views: 13
was not aware of these film processing software Negative Lab Pro or Filmdev
Just for clarification, Filmdev is a UK processing lab that many on here use as they are relatively cheap, give good results, and offer small scans for free with the dev cost. I just wanted to compare lab scans with my own.

I would be very interested to see the results of a pricier "more professional" lab - i.e. Canadian Film Lab, to see how they stack up against NLP/Vuescan/Silverfast.

Arh! thanks for that just had a look at the FilmDev site, looks interesting but they only appear to do C41 or B&W no E6.

However, have book marked it and certainly worth a try :)
 
Just for interest, there is an app called Filmlab that does negative to positive conversions, and doesn't seem to rely on host software like LR or PS. The other apps, are Negative Lab Pro (requires LR), Grain2Pixel (free, requires PS), CNMY (requires PS or Affinity Photo) or ColorPerfect (requires PS or PhotoLine). So, if not n Adobe customer, options are a bit limited!
 
Last edited:
Stupid question for a Saturday morning.

What advantage does scanning as a negative, then using software to invert it to a positive, or scanning as a "RAW" file then inverting that using other software give over scanning as a positive?

I have tried to use RAW in VueScan but struggle with it but if I want a big file then I will scan output to a TIFF file however I have not found any real difference when printing, but then again my gallery is this house.
 
Stupid question for a Saturday morning.

Not 100% sure on the question(s) as I have positive/negative confusion, so I'll have a crack at both...

According to the notes on NLPs site, scanning raw rather than as a jpeg/tiff gives more detail for the conversion program to work with. And whilst the orange raw scan looks very different to the tiff scan, I can't really tell much of a difference when it's converted. There is a tiny amount of extra detail in the shadows/highlights with a raw file. I doubt I'd be able to tell the difference in print.

Scanning as it is (making a copy of the negative) means that the process of converting the "orange" negative to a positive is done by other software (Neg Lab Pro for example, or some of the other suggestions on this thread). It's also the only option for people who DSLR scan.
Doing it all in the scan software to get a result straight away is obviously the easiest route, however I (and others) don't often get "good" colour results (i.e. results we like).
 
Last edited:
Stupid question for a Saturday morning.

What advantage does scanning as a negative, then using software to invert it to a positive, or scanning as a "RAW" file then inverting that using other software give over scanning as a positive?

All the scanner does is to make a copy of the film image in digital form. If the original image is a negative, then some software is needed to convert the negative image to a positive for viewing. Sometimes (almost always in the past) these two proesses (scan and inversion) are done in the same software (EpsonScan, SilverFast, Vuescan etc). Sometimes (increasingly these days, it appears) people want to "scan" as one process (eg with Vuescan etc, or certainly with a digital camera) and do the inversion in separate software. For various reasons...

I have tried to use RAW in VueScan but struggle with it but if I want a big file then I will scan output to a TIFF file however I have not found any real difference when printing, but then again my gallery is this house.

The advantage ofVuescan's RAW is that you can revisit it and change the settings without having to physically put your piece of film through the scanner again. @StephenM on here uses this as a matter of course, and should be able to advise you further on benefits and/or pitfalls... I believe (but am not certain) that @Andysnap found he could edit Vuescan RAW files with the PP software of his choice, but whether he continued doing that I don't know.
 
Last edited:
I gave up with Silverfast and now only use Epson Scan.
It's easy to use and most colour casts are easily corrected using my/your favourite editor.

I guess Epson Scan is not for everyone but I can't be bothered with faffing around re the Silverfast crappy menu system.
 
Back
Top