Some informative advice above, but I have to say back-up....
You are doing 'close up' photography, which is something of a specialization...if you attempted it with a camera-phone or compact, you would likely get better results, than with a DSLR. This is because all lenses have a near-focus limit, and the longer the focal length (more zoom!), so the further from the subject that tends to be.
Take note; For the Nikon DSLR's 'kit' 18-55mm lens, that near focus limit is about a foot; you will not get anything any closer in good focus.
In a Camera phone or other small-sensor consumer camera, they have a much smaller sensor behind the lens, so to get the same angle of view, they use a much shorter lens, which co-incidentally have much closer near-focus limits.
I have a little micro-sensor action-cam, that has a lens with just a 4.5mm focal length, this has such a short focal length, that it is essentially focus free; The near focus limit is so close to the camera, and the range or critical focus before it gives 'infinity focus' ie everything in focus, similarly so close to the camera, that its factory set somewhere just before hyper focal, and everything from just a few mm in front of the camera will always be 'in focus'. so it does't actually have to have an adjustable focus mechanism, or complicated automatic focus system to work it.
That lens gives approx the same angle of view as a 20mm lens on my DSLR, or a 35mm lens on my 35mm Film Camera, or an80 mm lens on a 120 roll-film camera; B-U-T as the 'sensor' or film behind the lens gets larger, so the lens gets longer to give the same Angle of View so the 'near focus' limit tends gets further from the camera, and the range of 'critical' focus becomes that much larger.
Ie: on a bigger fancier camera, focus gets more critical! And the first bit of advice is simply to 'Back-Up'.. move further from your subject, make sure everything you want 'n focus' is at least further than a foot from the lens, and... use less zoom! Don't try and fill the frame with so much subject,and everything will start to become 'easier'
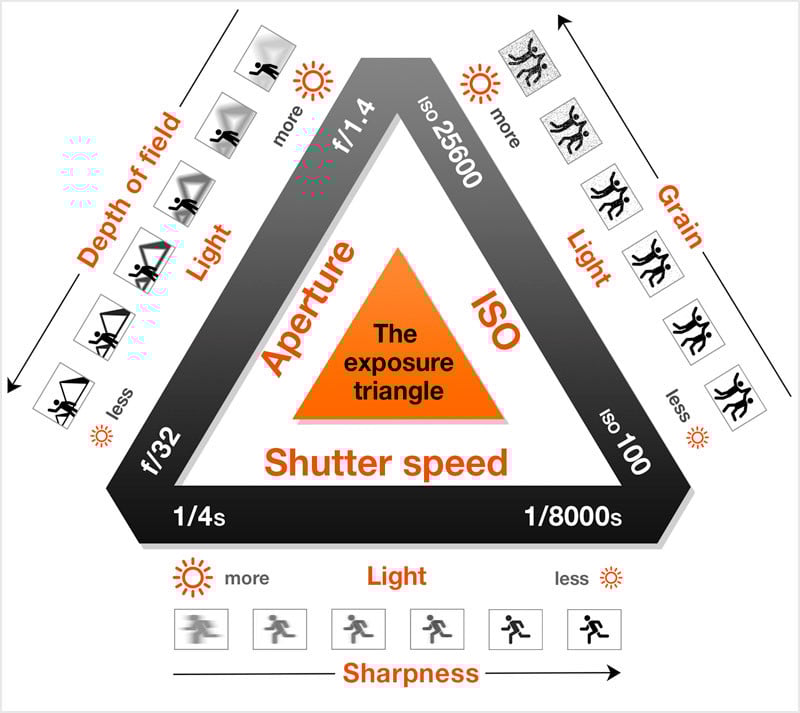
Backing up metaphorically, the exposure triangle and DoF effects are all interesting and good stuff, but jumping a little to a solution without understanding the problem....
There's two or three reasons for blurry pictures.. the first is nailing focus, and as above, the near-focus limit, can be a problem for close-up photography. Associated with that is the matter of Depth of Field or how much front to back focus you get in a scene, which can get complicated, but again, closer you are to your subject, the more critical this will be.
The 18-55 kit lens at 50mm zoom' setting, focused at 0.30cm only has a Depth of Field of about 6mm! But, Back Up, and at 1m you have about 80mm DoF, at 3m, about 80cm of DoF. Ie the further you are from your subject, so you get exponentially more DoF....or the other way about; closer you get to your subject, so exponentially the DoF drops and focus becomes that much more critical... and that is completely irrespective of the F-Number.
Next is motion blurr. Usual example of this is 'action' photography of a stationary camera and a moving subject. Imagine taking a photo of a car moving across the frame. Lets say that the car is traveling at 20mph, or about 36Km/h... that's 10 meters per second... a car is about 3m long, so if you have a shutter speed of 1/50th of a second, the car will have moved about 20cm or half the length of a side window in the time between the shutter starting to open, and the shutter closing.... and the pillar between doors will streak into the widows either side, and the car will get a bit blurry.... turn that inside out, and park the car, but dont hold the camera all that steady! Now you get the same effect of 'streaking' depending how much the camera moves in relation to the car.
Now, put the two scenarios together, and get up close; at 30cm range you 'only' have 6mm of DoF, and your focus is incredibly critical; you only need breath in and have the camera shift a few mm and you have moved your focus completely out of the DoF zone or possibly completely off the subject you had originally focused on,
This is the reason for the advice to use a tripod; but that only works properly if you also use a remote release so you don't jolt the camera when pressing the shutter.. and the focus is good to start with.
You also have issues with Auto-Focus cameras in that the auto-focus system is trying to guess what in the scene it should focus on; computers are absolutely fantastic at measuring things ad doing sums... but they are completely clueless as to what they are looking at or what they should be measuring! In a modern DSLR there's a lot of fancy electronics trying to nail focus for you, and there's probably a fair few different 'focus' modes the options menus for how many red dots the thing tries to use, or which ones it gives priority to and stuff like that.... but... they are far from the most reliable bit of automation in a camera, and it wont help them any if the camera is moving a little whilst it tries to pick its target and do the sums, especially if that focus is that much more critical because the subject is so close!! More reason to use a tripod, OR, just turn the ruddy thing off and focus the lens yourself by what you see through the view finder!
I do have to say though that the Nik-Kit 18-55, great lens as it is for the lack of money it doesn't cost, effectively given away 'free' with the camera body, it is a jack-of all-trades, it is not optimized either for 'close up' or 'macro' photography, nor for 'manual focus' operation... I m not knocking it, it is my 'most used' lens on my DSLR, and after buying some very expense lenses to get the sort of range I have for film cameras, I have struggled to find anything significantly 'better' to justify 'upgrading' from it! BUT, it is an all-round general purpose lens, and it isn't the best either for close up work or manual focus operation.
For more 'serious' close up photography, exponents will possibly use 'macro' lenses, better optimized for close focus, or more seriously extension tubes or extension 'bellows', to change the lens' 'near focus' limit, which will usually render any AF inoperative and they will have to focus manually, ad they will likely choose a dedicated 'manual focus'lens, that will usually have a much greater range of focus travel and a better controlled focus action, making it 'easier' to manually nail critical focus at that sort of subject range... but again, back-up.. that's heading into the realms of solutions before understanding the problem....
Thing is what you got is the kit 18-55 lens, and it just isn't the ideal it of kit for this more specialized genre of photography you are trying to tackle... so you need to help it out a bit!
For where you are at, the thing to recognize is that you are trying to tackle a more specialized genre of photography, at the same time, trying to get to grips with a very 'convoluted' camera that has an awful lot of 'twiddle-ability'.. you can get completely lost in the trees looking for the wood, there; and more advice and explanation of that advice can just be planting more saplings!
KISS IT! Keep, It Simple Silly!...the 'problem' is bluriness... nailing focus.. recognisng what you are trying is one of the ore tricky things for the Camera to do.. back off; dont have such high expectations. Work on the basics.
Dont try and fill the frame with 'so'much subject. Back Off, give yourself space between camera and subject, give the camera and yourself a better chance to nail focus. Don't use so much zoom, for more chance still.
Work on your hand-holding technique, keeping the camera steady. Its a lot cheaper than a tripod! Use the optical view-finder, and cradle the camera, right hand holding the grip, left supporting the lens and operating the focus ring, and... possibly the focus control with the AF switched off. Tuck your elbows into your wast, keep your feet slightly apart, and give the camera the best steady support you can.
Holding the camera at almost arms length using the preview screen on the back like you'd hold a camera phone, first rather defeats buying a sophisticated Single-Lens-Reflex Camera, that has a sophisticated periscope mechanism in it to let you look through the lens that takes the photo, for starters! But also, using the review screen begs you hold the camera at arms length, away from your body, where you dont have the steadiest support, and with a larger, bulkier camera it's going to wobble! It's just not good basic, fundamental, ad pretty simple' technique.
Next up, learn to breath! More backed up super-simple stuff, to keep the camera as steady as you can. And be gentle with the buttons! squeeze the shutter release gently! Don't stab it or try and crush the camera!
When my daughter was doing her O-Level photography course, she, I ad my O/H did a little 'shutter-speed-limbo'; to see just how steady we could hand-hold a camera. Quite interesting results, but ham-fisted O/H really struggled! She'd either 'stab' the shutter and make the camera shake when she pressed it, or she would squeeze it so hard she was twisting the whole camera through about 20 degrees of rotation past the shutter releasing! Sometimes both! Be Gentle!
A couple of interesting side facts for you; Ad-Men's claims in the brochures often say things like Image Stabilization, or IS on a lens can let you hand hold 'up to' three stops slower shutter speed.... it's a bit backwards that....but really that sort of claim only holds true if your hand holding technique is not that great to start with..
Old rule-of-thumb used to be that you could had-hold down to a shutter speed of about 1 over the lens' focal length; so if you were using a 35mm lens, you could hand hold down to about 1/30th, a 50mm lens, down to about 1/60th, a 135mmlens, about 1/125th, and anythng longer you needed 1/250th or higher...
Daughter, starting out was hand-holding quite well, and managing, with 50mm lens, to hand hold 'down' to around 1/25th without IS turned on; with it she maybe got as low as 1/15th.. that's not quite a full stop's difference. Remarkably, six months later, she was hand-holding a 135 portrait lens in fairly poor light, and doing so quite successfully, without IS down to about 1/30th! Practice of age, saw me get a bit lower and able to hand hold without IS to about 1/15th, maybe 1/8th... So Image Stabilization, can make a difference, but not 'that' much, and good technique an do a bit better.... most revealing it of the exercise was the O/H, who struggled to keep it un-fuzzy, even at 1/focal length, WITH the image stabilization! If your technique is that poor to start with, then it doesn't have a hope really, ad wont make up for the short-comings.. to wit good technique is always better than expensive technology! So learn to hold the camera properly! It is back up basics; that just 'work' and make every-thing work better!
Hence, the KISS philosophy, and backing up to core basics skills, before getting all technical.
Trouble with asking questions like this on a photo-forum,is that if you ask four photographers a question you'll get a dozen answers and three arguments! Its all too easy to get bogged down in the techicalities.. and YES, trying to tackle close up photography you are dabbling in the margins of specialization... but, its like learning basic first aid, and being taught the techniques of a surgeon! There's a heck of a lot in the middle to be learned, but, you really need to start by learning how to use a safety-pin, and not dismissing it as something so-simple, it ought to be 'obvious'.. it may.. but, you need to start with the basics first, or you get gaps and wobbly bits in the wall, where the less 'obvious' has been missed.
For where you are at, suggestion that a macro lens or extension bellows or a tripod would 'help' at this stage probably wont work; like the fancy camera, will be planting more saplings in the forest to stop you finding the wood. Keep t Simple Silly... back up, work on the basics; back off, dot get so close, dot try for such ambitious frame filling shots, learn the basics, learn to get the best you can fro hand holding, and to nail focus giving the gear you got the easiest time, you can.. then you can work forwards from there, on a firm foundation, and if you want to start buying more specialized gear, you will have much easier time getting to grips with it, and get better results, having learned to give it the best chance through good technique.


")


