Just like life, one shaft after another (build log, video added)

one minor issue.....

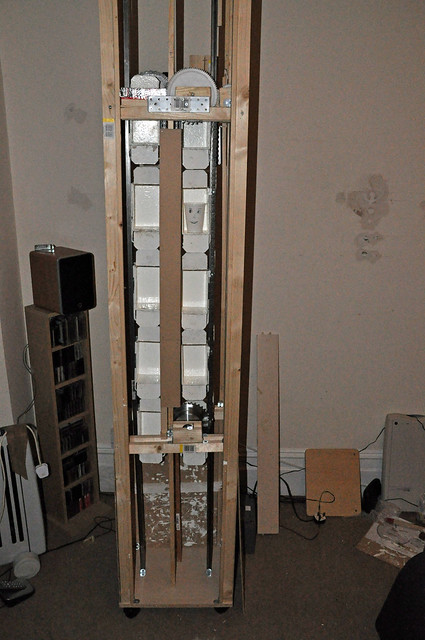
making this run at silly speed is not a good idea, in doing so, some of the cabins have started to un-nut themselves, even though i'm using locking nuts, so speed control is essential
*nods*
Silly speed would also be a scale issue. I couldn't imagine the suits at the LSE paternoster counting the seconds 'til they can throw themselves into a car as it shoots past their floor. :D

Can't wait to see the finished item. (y)
 
*nods*
Silly speed would also be a scale issue. I couldn't imagine the suits at the LSE paternoster counting the seconds 'til they can throw themselves into a car as it shoots past their floor. :D

Can't wait to see the finished item. (y)

:D

it would be a sight though


another issue is noise, even at this scale, at silly speed it clangs and bangs quite considerably, not so when slowed down, it also shakes the tower.

At full size, the shaking would be the whole building and the noise errm would be loud somewhat.

It was fairly noisy when I went on the full sized one esp going through the terminals at the top and bottom

:)
 
[YOUTUBE]KIhAmkVZrpc[/YOUTUBE]


The rear chain anchors have been replaced with double locking nuts, the same as the front anchors (y)

no jamming this time, even at silly speed :)
 
I've found a suitable speed controller that will work with the motor and latch circuit :)
 
Sounds good I think ...like it should. :D

:clap::clap: love it.


For the noise you could try sliding nylon bushes between the nuts holding the cabins (they are rotating metal to metal yes?) ...some nylon pipe that you can cut into small bushes maybe.

Also, if you've not sussed this, to help the unwinding nuts, just stick another lock nut in reverse at the end and tighten them against each other to lock.
 
Last edited:
Sounds good I think ...like it should. :D

:clap::clap: love it.


For the noise you could try sliding nylon bushes between the nuts holding the cabins (they are rotating metal to metal yes?) ...some nylon pipe that you can cut into small bushes maybe.

Also, if you've not sussed this, to help the unwinding nuts, just stick another lock nut in reverse at the end and tighten them against each other to lock.


Cheers for the info (y)

The unwinding nut issue has now been sorted, the noise is caused by the shunt rings sliding on the guide rails, at slow speed this will be reduced :)
 
The centre post has been cut to size, it will be installed with the landings :)
 
I've made some changes to the hoistway, took away the huge base and cut a smaller one, also added caster wheels so the tower can be moved if needed :)
 
6443050055_4b3477ce14_z.jpg


The latch circuit is now built and working, however during testing I had a bit of a brain fart and connected the +ve -gnd backwards :bonk:, the result was a puff of black smoke, IC1 5v regulator and Q2 npn switching transistor were both knackered.

After breaking out the de-soldering iron and replacing the 2 offending parts, connected the power again (the right way round) voila it sprang to life.

The next circuit to be built is a polarity protector for the latch and speed controller, it will be based on a relay and diode, with 2 LEDs to indicate reversed and correct polarity, this will also protect the battery


edit: I eventually ditched the thyristor latch and bulit a bistable from a 555 timer IC, as the thyristor latch didn't work as expected, plus the buzzer ****ed me off, so I left it out of this one
:)
 
Last edited:
The speed controller has arrived and the reverse polarity protection circuit built, now to assemble the control box and centre post :)
 
Do you have to turn both keys at the same time or it shuts down for ever? :D

Nice work Em. what's next?


Cheers Adam,

The next thing to do is finish the centre post, clad the hoistway and tweak / oil the guide rails :)
 
the centre post is built, just needs painting and drilling for the switches :)
 
I have only just found this thread and have read it through with great interest. There used to be a paternoster lift in the old Granada office building in Bedford. I wonder if it is still there?

In one of my former lives in storage and materials handling, I sold carousels (mainly vertical ones) and of course the principles are identical. The Germans call them umlaufregale which loosely means 'revolving shelves' which is what they are. Initially used in offices to store filing, they have become popular in storing such things as electrical components and other smaller items - particularly expensive ones. The are also used (more popularly in Europe) in pharmacies. Computer controls and sophisticated linking can make for some impressive storage solutions.

I think this project is really excellent!

Anthony.


Hiya Anthony good to have you on board (y)

I've heard that there was a paternoster at the Granada Studios, but I think it has been switched off and covered up, if it has, not sure when :thinking:

This may well get used as a small component storage unit, but it will function as a display stand for the moment.

Here it is as it stands now, some cupography included (y)

6501595017_f74b77fcc5_z.jpg
 
Last edited:
[YOUTUBE]llm4lLYXz6Q[/YOUTUBE]

Another video demonstrating the speed controller

:)
 
Update....

I'm having some minor issues with the centre posts, in regards to the depth, width is fine, about 1cm needs to be cut off each side

:)
 
If your little cup has been riding up and down since the 12th without a tea break, no wonder he's not enjoying it! :(

He's probably looking round for the stop button.
 
If your little cup has been riding up and down since the 12th without a tea break, no wonder he's not enjoying it! :(

He's probably looking round for the stop button.


He's still riding up and down, fell out a couple of times into the pit where the battery is :)
 
The centre post is now at the correct size, it now needs drilling and painting black :)
 
The chain guides and covers including the centre post have almost been completed, the floor spaces have been marked out, ready for installation of the floor sections, then the button holes can be drilled out and bathe whole thing painted black


:)
 
You have been a busy bee Robily :)
Looking good (y)
 
I've only just found this thread, what an awesome read (y)

Always wondered how the carriages got round the bends :)
 
You have been a busy bee Robily :)
Looking good (y)

I've only just found this thread, what an awesome read (y)

Always wondered how the carriages got round the bends :)

Cheers Chris and Brian (y)


It's near completed, definitely been an awesome project, I'd like to thank everyone for keeping up with it so far (y),

Have a good Christmas :)
 
Now that the festive period is almost at an end, I will start picking this up again,

The floors have been marked out, I haven't started drilling the holes for the buttons yet, as need to make sure the floors line up correctly, a mis placed button would be disastrous.

As they say measure twice, cut once and if you are not sure, don't make the cut.

:)
 
The first of the floors have been cut, they will be installed as removable shelves, to aid in matainence and maybe future upgrades of the drive components :)
 
The facade has now been prepped for painting nearly time to apply the first coat :)
 
6648690401_8852c5201e_z.jpg


Still not fully dry yet, so no paint for the moment :)
 
The first coat of paint has been added to the centre post, also the holes for the buttons have been drilled out :)
 
6668865849_5e5b734bd5_z.jpg


Centre post and floors with their first coat of paint

the buttons are installed in the tower, they just push through the holes in the thin column of wood and into the centre post where they are nutted up :)
 
Back
Top