So, over on the digital negative thread (eg
this post and some earlier ones) I described a couple of (not very good) digital negatives I made. I had a go at making cyanotypes from these.
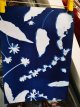
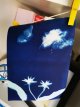
First, I used the Northlight Images black and white test image with some cut-up cyanotype paper to test exposure, at roughly 1, 2 and 3 minutes for the different strips:

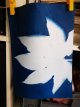
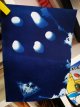
I'm not sure I interpreted this strip correctly... I assumed that because the right hand parts of the 21-step wedge at the bottom were all white, that 1 minute was an under-exposure. I think 2 minutes might have been a good exposure, but for some reason I chose 3 minutes (top part of the strip). I think I was looking for stronger blues for the dark part... So then I exposed the (over contrasty) horseman negative for 3 minutes:

TBH I'm not sure re-exposing that digital negative will have a significantly better result, as the negative does not (IIRC) differentiate as much between the tones of the horse and the trees as the original image did. I think maybe I should have a try at re-printing the digital negative...
So a couple of thoughts from this. First, I'm sure those of you who do wet printing from your negatives are aware, this process really made me look at and think about the negatives. Normally for me they are usually just an intermediate stage that I either barely look at (when I scan them) or almost never look at (when I get them scanned at Filmdev etc). I think I really ought to be looking much harder at my negatives, as there's probably a lot to learn about my (lack of) technique from them.
Secondly, from what I remember of the posts on the first page of this thread (I did mean to check back), exposure times in sunlight seem to vary hugely. In part this does seem to depend on how dense the negatives are, but I suspect that the actual amount of UV in UK sunlight also varies quite a lot with atmospheric conditions and (evn now) pollution. So I reckon I'm going to have to continue doing test strips if I do more of this.


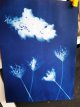
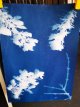
 . I just chose a photo I liked, converted to nlac and white if necessary, faffed around until it looked contrasty enough then inverted and printed on an overhead projector sheet.

")