


- Messages
- 46
- Name
- Andreas
- Edit My Images
- No
In the post
Clean, Lube, Adjust (CLA): When does my electromechanical SLR need servicing?
we asked ourselves when an electromechanical SLR needs servicing (CLA—Clean, Lube, Adjust) and what the criteria for that might be.
Today we’ll take a look at a complete CLA for a Nikon F3/T, which we’ll be performing ourselves. To do this, we’ll disassemble the camera as much as necessary.
First, we’ll look at disassembling an F3 for spare parts to gain some experience. Mistakes we make here have no consequences. Unlike with the camera we want to service.
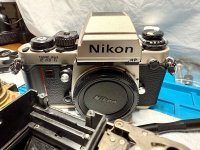
Following on from my report on the Nikon FA, let us see how to maintain a CLA for a Nikon F3/T.
The F3/T and F3 should have some technical similarities with the FA, as they were only three years apart (1980 - 1983). However, the two concepts differ significantly.
The F3 has a horizontal focal plane shutter, the FA a vertical one.
The not fully digital F3 has a metering cell in the base and a replaceable viewfinder.
A microprocessor on top of the not interchangeable prism controls the digital electronics in the FA sporting six silicon photodiodes for light measurement.
As a candidate for a CLA, I have a well-used, bright F3/T whose exposure compensation dial (ASA) is stiff. The mirror mechanism also needs to be cleaned and lubricated. And the shutter speeds need to be checked.
Disassembling an F3 isn't exactly easy, which naturally adds to the appeal

Original spare parts, new, for the F3 I have enough.
I was able to purchase remaining stock from a repair shop that had already been taken over by someone else.
A stroke of luck for me as an F3 fan and collector.

Brand new shutter …

… as well as circuit board for the F3.
Preliminary considerations
While the Nikon F3 is straightforward to disassemble and reassemble, it does present its challenges.
Removing the mirror box on an F3 Press worked, but during reassembly, I had trouble coupling the mirror box and camera mechanism. I also lost control of a pulley that connects the aperture simulator to the functional resistance element under the rewind knob.
That shouldn't happen this time.
Jim Holman, International Camera Technicians, at work
For the CLA, I'll be following the excellent four-part video series from ICT, International Camera Technicians.
Jim Holman, Master Technician at ICT, guides us through the necessary work, offering many practical tips and advice from his experience.
One of the few masters you have to seek out and find, see
ICT, International Camera Technicians: Nikon F3 - Disassembly & Service
Among other things, we'll be cleaning the contacts on the top and bottom of the camera, especially the contact for the LCD illumination with the infamous red button, which so often becomes unreliable or fails.
Whether we'll then go further and remove the mirror box to clean and lubricate the mechanics there is still an open question.
In any case, we'll adjust the electronics and the curtain travel times, using the camera tester again.
Anyway, I have two F3s for practice, decommissioned for spare parts. So the chances of a successful mission are good.
Preparing for the CLA: Removing the F3-mirror box

Here I have a decommisioned F3 body that's already missing a few parts.
However, the area under the top cover and above the bottom cover is still intact, and it can be released mechanically using the small lever on the front plate (release side).
Ideal for practicing removing and replacing the mirror box!
Let’s start right away.
Clean, Lube, Adjust (CLA): When does my electromechanical SLR need servicing?
we asked ourselves when an electromechanical SLR needs servicing (CLA—Clean, Lube, Adjust) and what the criteria for that might be.
Today we’ll take a look at a complete CLA for a Nikon F3/T, which we’ll be performing ourselves. To do this, we’ll disassemble the camera as much as necessary.
First, we’ll look at disassembling an F3 for spare parts to gain some experience. Mistakes we make here have no consequences. Unlike with the camera we want to service.
Following on from my report on the Nikon FA, let us see how to maintain a CLA for a Nikon F3/T.
The F3/T and F3 should have some technical similarities with the FA, as they were only three years apart (1980 - 1983). However, the two concepts differ significantly.
The F3 has a horizontal focal plane shutter, the FA a vertical one.
The not fully digital F3 has a metering cell in the base and a replaceable viewfinder.
A microprocessor on top of the not interchangeable prism controls the digital electronics in the FA sporting six silicon photodiodes for light measurement.
As a candidate for a CLA, I have a well-used, bright F3/T whose exposure compensation dial (ASA) is stiff. The mirror mechanism also needs to be cleaned and lubricated. And the shutter speeds need to be checked.
Disassembling an F3 isn't exactly easy, which naturally adds to the appeal
Original spare parts, new, for the F3 I have enough.
I was able to purchase remaining stock from a repair shop that had already been taken over by someone else.
A stroke of luck for me as an F3 fan and collector.
Brand new shutter …
… as well as circuit board for the F3.
Preliminary considerations
While the Nikon F3 is straightforward to disassemble and reassemble, it does present its challenges.
Removing the mirror box on an F3 Press worked, but during reassembly, I had trouble coupling the mirror box and camera mechanism. I also lost control of a pulley that connects the aperture simulator to the functional resistance element under the rewind knob.
That shouldn't happen this time.
Jim Holman, International Camera Technicians, at work
For the CLA, I'll be following the excellent four-part video series from ICT, International Camera Technicians.
Jim Holman, Master Technician at ICT, guides us through the necessary work, offering many practical tips and advice from his experience.
One of the few masters you have to seek out and find, see
ICT, International Camera Technicians: Nikon F3 - Disassembly & Service
Among other things, we'll be cleaning the contacts on the top and bottom of the camera, especially the contact for the LCD illumination with the infamous red button, which so often becomes unreliable or fails.
Whether we'll then go further and remove the mirror box to clean and lubricate the mechanics there is still an open question.
In any case, we'll adjust the electronics and the curtain travel times, using the camera tester again.
Anyway, I have two F3s for practice, decommissioned for spare parts. So the chances of a successful mission are good.
Preparing for the CLA: Removing the F3-mirror box
Here I have a decommisioned F3 body that's already missing a few parts.
However, the area under the top cover and above the bottom cover is still intact, and it can be released mechanically using the small lever on the front plate (release side).
Ideal for practicing removing and replacing the mirror box!
Let’s start right away.
Last edited:


 A word of caution


