
and the site receives a small commission

You are using an out of date browser. It may not display this or other websites correctly.
You should upgrade or use an alternative browser.
You should upgrade or use an alternative browser.
Post your best before and after processing
- Thread starter Whittie
- Start date


Yes plzThis took about 10 minutes using only basic PS tools. Anyone wants a tutorial on how to do this without having to laboriously cut the sky out, let me know.
")
OP
- Messages
- 969
- Name
- Alex
- Edit My Images
- Yes
Yes plz
x2
Mine never look that good when I do them, must be a special method?
cosmix3
David Sullivan
- Messages
- 9,438
- Name
- Stuart
- Edit My Images
- No
Yes plz
x2
Mine never look that good when I do them, must be a special method?
[S4]X3. Realy nice work.[/S4]
- Messages
- 279
- Name
- graham Kenny
- Edit My Images
- Yes

I drive past these most days and i get one album going through my mind..... :shrug:

What ablum would that be on?????
Jeff Wayne - War of the Worlds ........... Your either very young or i'm very old...What ablum would that be on?????

I posted the method for sky replacement on this thread :
http://www.talkphotography.co.uk/forums/showthread.php?t=84334
To get the reflection, make a copy of your sky and flip it horizontally and it place it above your main layer. Change the blending mode to multiply. Roughly cut around the bits you don't want with the lasso tool, then, with the main layer selected, user Select>Color Range and use the eyedropper to select the green of the foliage above the water. Fiddle with the fuzziness until you get most of the green, click OK, select your reflection layer and delete. You may have to do this a couple of times with different colour ranges, green for leaves, brown for branches. Once you get the idea, it's a dawdle.
Hi iball - thanks for the guide on how to select trees
Can I just clarify one or two things with you....(my Q's in bold after the bits I'm unsure of from your guide...)
Using a black brush, paint out the window frame and any other whites in the main image other than sky. Now using Select>Colour Range, select the whites on the image (on the 'select colour range' dialogue box that then appears, you have two options; Selection or Image - default is Selection! The sky area is actually black and the trees are white, which one do you mean?) and move the fuzziness slider until you've got the best match.(this bit threw me a bit...best match with what...? Moving the slider didn't seem to make any changes to anything on the image I was testing out the method on, and there was a slight colour fringeing on the leaves after Id deleted the sky from the main image...) Hit OK. Now you have an accurate mask of the skyline.
Thanks again.....


Using a black brush, paint out the window frame and any other whites in the main image other than sky. Now using Select>Colour Range, select the whites on the image (on the 'select colour range' dialogue box that then appears, you have two options; Selection or Image - default is Selection! The sky area is actually black and the trees are white, which one do you mean?) and move the fuzziness slider until you've got the best match.(this bit threw me a bit...best match with what...? Moving the slider didn't seem to make any changes to anything on the image I was testing out the method on, and there was a slight colour fringeing on the leaves after Id deleted the sky from the main image...) Hit OK. Now you have an accurate mask of the skyline.
I don't have PS available at the mo, so this is from memory. Usage Image and use the eyedropper to select the white, which should be the sky and the bit you want to remove. The fuzziness slider will pick up the grey, which will be semi transparent and let you have a hard mask edge or a soft one. This is what I meant by the best match - for your image. You may need to try it a couple of times until you get the best edge for your pic. The fringing is due to having a soft edge which will 'feather' the delete on the edges of the leaves. There's no right or wrong way to do it. Each image is different. If you are doing this with an image for publication, the only way to get a really good edge is to use the pen tool, which will take a good bite out of your working day.
Post again if you need any clarification.
- Messages
- 2,451
- Name
- Paul
- Edit My Images
- Yes
I like the pic a lot but your clouds are not mirrored :shrug:


- Messages
- 94
- Name
- Ashley
- Edit My Images
- Yes
Ok... Here we are (this was my first & only framed picture too!) Looking back now though, I'm ****ed I didn't crop the start of the building top right
From this...

London Phonebox by Ashley Bard, on Flickr
To a simple PS edit...
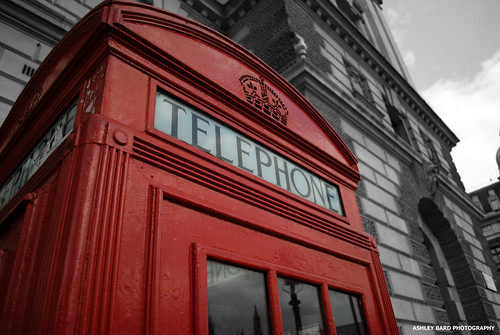
London Phonebox Print by Ashley Bard, on Flickr
From this...
London Phonebox by Ashley Bard, on Flickr
To a simple PS edit...
London Phonebox Print by Ashley Bard, on Flickr


- Messages
- 317
- Name
- Steve
- Edit My Images
- No
great stuff Steve, bet the little lad loved that
Cheers Cliff, he chuckled
- Messages
- 34
- Name
- Tony
- Edit My Images
- Yes

gun2dahead
Suspended / Banned
- Messages
- 144
- Name
- Smith Wesson
- Edit My Images
- No
/\

gun2dahead
Suspended / Banned
- Messages
- 144
- Name
- Smith Wesson
- Edit My Images
- No
Fuji S9600 'raw' setting & adjusted in Photoshop.


too plasticy for me, sorry.


cosmix3
David Sullivan
- Messages
- 9,438
- Name
- Stuart
- Edit My Images
- No
Been back and forth to NYC on business and thought i would take the 5dII and used the 70-200 F4 IS..
Here is it..


(Watermarked as in use)..
Feedback welcome..
Liked when I first sore it Chris, now I see what it came from


- Messages
- 2,775
- Name
- Ben
- Edit My Images
- Yes
Not my favourite but one I'm quite happy with.


before

pretty eyes before file by pmac1985, on Flickr
after

pretty eyes by pmac1985, on Flickr
this is one of my favourite photos also
pretty eyes before file by pmac1985, on Flickr
after
pretty eyes by pmac1985, on Flickr
this is one of my favourite photos also
Taken at a car show at the weekend, far too many people around to get any clear shots. Really liked the way the Cobra came out so I spent a couple of hours removing all the tyre kickers! Oh and the poor bloke at the back polishing it who actually owns this beast. s
Before;

After;

s Before;
After;
- Messages
- 317
- Name
- Steve
- Edit My Images
- No
BenJiRa said:Taken at a car show at the weekend, far too many people around to get any clear shots. Really liked the way the Cobra came out so I spent a couple of hours removing all the tyre kickers! Oh and the poor bloke at the back polishing it who actually owns this beast.
Before;
After;
Excellent work!