Show us your darkroom (and help setting up mine)

It takes a while when you are DIYing it especially when you've young kids. It's all coming together now. Keep at it!
Little and often, You will get there.
thanks for the support it’s kind of you to say that :)
@StephenM any suggestions on darkroom books? I’ve seen a lot used on eBay but I’m not sure if it’s worth getting as it doesn’t even show the contents of the book.
I do remember the process of printing and dodging/burning, so that’s not something I’m after.
 
Try this as an entry point


When you click on a title, it will bring up the download page plus suggestions of similar books.

If you want to search, I recommend the "advanced search" option, and just put in the words that seem best into the "any field". To get to the advanced search, click in the search box (top right) and a drop down menu appears. Also, it's probably a good idea to select "texts" as the media type to avoid films and audio recordings which have the same keywords. As well as books on printing etc., you'll find chapters in books like the "Ilford Manual of Photography", an older copy of which is on the archive, and various older books on photography.

I might see if I can copy some of them onto my OneDrive and supply a link if that would be of interest. If I get round to working on my book again, I think it could be worthwhile to put urls to archive.org alongside any books in my "further reading" sections, although that would mainly be to optics books.

Here's another useful link

 
Last edited:
Found a few more links to TP


Try this as an entry point


When you click on a title, it will bring up the download page plus suggestions of similar books.

If you want to search, I recommend the "advanced search" option, and just put in the words that seem best into the "any field". To get to the advanced search, click in the search box (top right) and a drop down menu appears. Also, it's probably a good idea to select "texts" as the media type to avoid films and audio recordings which have the same keywords. As well as books on printing etc., you'll find chapters in books like the "Ilford Manual of Photography", an older copy of which is on the archive, and various older books on photography.

I might see if I can copy some of them onto my OneDrive and supply a link if that would be of interest. If I get round to working on my book again, I think it could be worthwhile to put urls to archive.org alongside any books in my "further reading" sections, although that would mainly be to optics books.

Here's another useful link

Stephen you're a star, there's a plethora of books on the website you sent me.
went quickly through "Darkroom dynamics : a guide to creative darkroom techniques" and was fascinated with the possibilities of a darkroom print.
Looking forward to experimenting.
It looks like there's no need to buy a book with so much useful material on the link you sent me.
Again thanks very much i really appreciate it!
 
Oh meeeiinnn what a bummer…
Got everything set up, chemicals,paper and all.I was just about to start mixing chemicals and then i realised I’ve forgot to buy storage bottles for the chemicals :LOL:
Have i forgotten anything else?
The way I’m thinking about drying the prints is by removing the excess water with a car wiper and then have them sitting on a simple DIY rack. Does it sound right?

The fan seems to be quiet (or maybe I’m a bit deaf) so it doesn’t look like it needs adjusted.
I’ve uploaded a sort video of the finished darkroom.
View: https://youtube.com/shorts/UOmwZfKV_fA?si=Sduj1z1GcIgE6an-


Edit: any household materials i can use to store chemicals for a few days?
 
Last edited:
Oh meeeiinnn what a bummer…
Got everything set up, chemicals,paper and all.I was just about to start mixing chemicals and then i realised I’ve forgot to buy storage bottles for the chemicals :LOL:
Have i forgotten anything else?
The way I’m thinking about drying the prints is by removing the excess water with a car wiper and then have them sitting on a simple DIY rack. Does it sound right?

The fan seems to be quiet (or maybe I’m a bit deaf) so it doesn’t look like it needs adjusted.
I’ve uploaded a sort video of the finished darkroom.
View: https://youtube.com/shorts/UOmwZfKV_fA?si=Sduj1z1GcIgE6an-


Edit: any household materials i can use to store chemicals for a few days?
Looking good! Fan doesn't sound noisy. Have you had a good check for light leaks? But I guess might not be much of an issue as it's getting dark so early. Even so I'd cover the light on the extension socket with black electrical tape.

As for temporary diluted chemical storage then whatever you have got - clean empty drinks bottles, food storage boxes (tupperware type but you won't be able to use them for food ever again) etc.

Make sure you label them well and put them well out of reach of children.

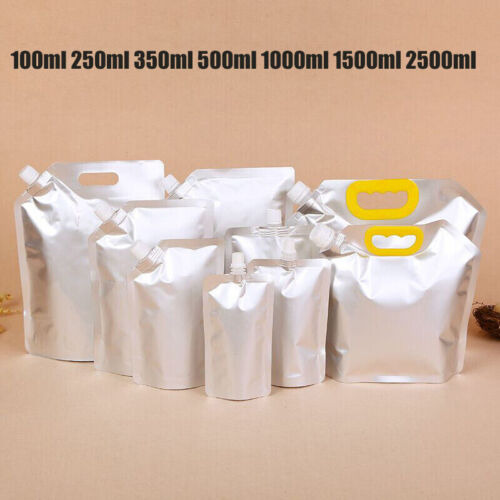
I use these in 1 litre version for dilute chem storage, easy to get the air out of:


They last about 3 years before starting to degrade with parts of the inner lining coming off but never actually leaking. Just to be on the safe side 1 pouch each of dev (for film), stop & fix live in a bucket.
 
Last edited:
Have you had a good check for light leaks? But I guess might not be much of an issue as it's getting dark so early. Even so I'd cover the light on the extension socket with black electrical tape.
Yes the light on the extension socket will be covered with black tape.
I know there's a few light leaks but i'll deal with them tomorrow.
I read that i should waste some paper (maybe a test strip).
I'll leave a coin on top of the paper having the paper in the darkroom sitting for a couple of hours.
ill develop it after a while.
Theoretically i should be able to see nothing but white

thx for the info on about the storage bottles by the way :) !
 
Last edited:
I know there's a few light leaks but i'll deal with them tomorrow.
Best way I found was stand in the darkroom for 5 mins until your eyes get accustomed to the darkness (or lack of). Fix the biggest leaks. Repeat til you have complete darkness. Then do it all again on a really bright sunny day.
 
Best way I found was stand in the darkroom for 5 mins until your eyes get accustomed to the darkness (or lack of). Fix the biggest leaks. Repeat til you have complete darkness. Then do it all again on a really bright sunny day.
I’ll do that again tomorrow after fixing the light leaks i found!
 
I’m wrecked. Just finished printing my first picture. Used 7 papers in total to get a somehow acceptable print. Took me way longer than i though but i think it’s going to get easier as i do it more often.
I will post an image in the morning when the paper is dry.
How am i supposed to wash the prints when they’re done?
I just held the paper under the tap with my hand for under a minute.
Is there a standard of how long i should wash the paper?
I have a few more questions i would like to ask but it’s getting too lateo_Oo_O:hungover:

Edit: should i buy a squeegee or let them dry just hanging from somewhere?
 
Last edited:
Let them hang.

Washing depends on the paper. RC paper doesn't need much more than a rinse, since the plastic coating protects the paper from absorbing the chemicals. Fibre paper I used to wash in 6 changes of water, swapping water every 5 minutes. Strictly, the number of changes depends on the weight of the paper - there used to be single, double and triple weight papers once upon a time.

More answers if needed tomorrow - I'm actually in bed now with my hot milk. :)
 
Last edited:
I’m wrecked. Just finished printing my first picture. Used 7 papers in total to get a somehow acceptable print. Took me way longer than i though but i think it’s going to get easier as i do it more often.
It does get easier but it won't ever be quick. I've done a fair few prints but still learning and I'm happy if I get a final print in 1.5 hours. However well done on getting your dark room up and running.

As @StephenM says hang em up. Also as he says RC paper is quicker to wash. I would avoid fibre paper to start with because of added complexity.

Are you using "test strips"? Say a cut 2" piece of your paper and then exposing a section of it for 5, 10, 15, 20 etc by holding a piece card over nearly all the strip, 5 sec exposure, moving the card a bit another 5 sec etc to get a graded test print strip so that you choose the best exposure time to the hone further. You should get 4 plus test strips from one sheet of paper. (Not the most succinct description - I'll see if I can find a link).

Edit: https://www.smoothguide-photography.com/making-a-test-strip.html
 
Last edited:
I used to hang prints (RC) up by a corner to drip dry.
 
More answers if needed tomorrow - I'm actually in bed now with my hot milk. :)
I’ve harassed you a lot with my questions, i should stop posting at midnight :LOL:
Let them hang.

Washing depends on the paper. RC paper doesn't need much more than a rinse, since the plastic coating protects the paper from absorbing the chemicals. Fibre paper I used towash in 6 changes of water, swapping water every 5minutes. Strictly, the number of changes depends on the wright of the paper - there used to be single, double and triple weight papers once upon a time.
I nearly bought 8x10 fiber paper thinking i should not compromise on quality:ROFLMAO:.
Thank God i didn’t, it would have been a waste of paper.
Rc is a really good starting point i think, I’ve got the lford mgrc pearl (seems to be somewhere between lustre and Matt).
I had the paper sitting vertically leaning against a cardboard to dry yesterday. Upon inspection today i saw a few dried droplets on the paper.
It does get easier but it won't ever be quick. I've done a fair few prints but still learning and I'm happy if I get a final print in 1.5 hours. However well done on getting your dark room up and running.

As @StephenM says hang em up. Also as he says RC paper is quicker to wash. I would avoid fibre paper to start with because of added complexity.

Are you using "test strips"? Say a cut 2" piece of your paper and then exposing a section of it for 5, 10, 15, 20 etc by holding a piece card over nearly all the strip, 5 sec exposure, moving the card a bit another 5 sec etc to get a graded test print strip so that you choose the best exposure time to the hone further. You should get 4 plus test strips from one sheet of paper. (Not the most succinct description - I'll see if I can find a link).

Edit: https://www.smoothguide-photography.com/making-a-test-strip.html
Yep, i did use test strips.
And I would like to know how i can stretch the exposure time in order to have plenty of time to Dodge and burn.
Strange how i used f8 on the Lens and started with 3 sec increments on the test strip. Turns out the exposure time was 2.5 secs
Here’s the final print.
IMG_1700_adobe_express.jpeg I burned only the sky for 3 seconds and then exposed the whole image for another 2.5
It looks a bit dark overall so might be trying again today
 
I'm now up and almost awake (to be honest, I'm horizontal on a window seat with a cat on me, but that's information overload :) ).

Assuming 35mm negatives and the degree of enlargement needed for a 10x8 print, your exposure time seems incredibly short. I assume a very bright enlarger. What is your enlarger - I think I should know.... What print developer are you using, what's the temperature and how long does it take before the first sign of an image? I'm looking for something outside my experience here.

If your lens is f/5.6 you should stop down more - 2 stops is usually suggested, which will double the time, although 7 secs is still too short.

And when Edward Weston was no longer able to print, he supervised one of his sons in the darkroom. Said son later remarked that it sometimes took 3 DAYS before his father was satisfied with the print. So, don't give up - at least until after 4 days continuous effort and decades of experience you still haven't managed it.
 
Looking again, your print looks low contrast and may not have a true black. Now this is on my tablet screen, so the tones could be way off. It does make me wonder if you are fully developing the print though, or taking it out of the developer early. It could be the negative though...
 
I'm now up and almost awake (to be honest, I'm horizontal on a window seat with a cat on me, but that's information overload :))
.I tried to reply a few times yesterday but my little one had other plans:)
Assuming 35mm negatives and the degree of enlargement needed for a 10x8 print, your exposure time seems incredibly short. I assume a very bright enlarger. What is your enlarger - I think I should know.... What print developer are you using, what's the temperature and how long does it take before the first sign of an image? I'm looking for something outside my experience here.

If your lens is f/5.6 you should stop down more - 2 stops is usually suggested, which will double the time, although 7 secs is still too short.
Enlarger is an LPL 3301D. The developer is from Bellini, it’s the BWD100. Temperature was 20(as per manufacturer). Developing time is confusing because it says to develop 90-120 secs. From 90 to 120 sec seems like a big difference. I developed for 90 sec. It takes about 20 to 30sec for the image to appear.
.
.
I think the exposure time is sorted now. I stopped down from f8 to f11. For a different negative i got 9 secs. Maybe the previous negative wasn’t as dense? Anyway. Is there any harm stopping the Lens all the way down to the smallest aperture?
.
.
Looking again, your print looks low contrast and may not have a true black. Now this is on my tablet screen, so the tones could be way off. It does make me wonder if you are fully developing the print though, or taking it out of the developer early. It could be the negative though...
The scanner or the screen probably altered the image. In reality the picture was too dark. As a matter of fact yesterday i printed one more with even less contrast. I would like to believe i understand the importance of having all tones from white to black.
I’ll post the image when I’m back home but i still think it’s not going to be a true representation of the print.
.
.
And when Edward Weston was no longer able to print, he supervised one of his sons in the darkroom. Said son later remarked that it sometimes took 3 DAYS before his father was satisfied with the print. So, don't give up - at least until after 4 days continuous effort and decades of experience you still haven't managed it.
Thanks for the encouragement, it helps to know it’s not as straightforward as it sounds:)
.
.
I really enjoyed the process yesterday since i had the chemicals ready to go.
A few things that went wrong:
  • Nearly fogged all my paper. Had the blackout curtain half open while i tried to take paper out of the pack. Thankfully only the test strips were harmed in the process. My heart skipped a beat when i realised what was happening :ROFLMAO::LOL:.
  • Dodging and burning that went terribly wrong (funny how i was asking about advanced techniques but still haven’t got the hang of Simple dodging/burning)
  • At the end of the session i realised the chemicals were not the “right” temperature. It’s meant to be 20 degrees celsius but it was 11 instead. Didn’t have any issues though. Wonder what impact does it have to the print. Prints looked fine by the way.
 
I've had no success with quoting snippets - I'll have to see how to do it. So, apologies for not having clearer quotes...

Developing time is confusing because it says to develop 90-120 secs. From 90 to 120 sec seems like a big difference. I developed for 90 sec.
As with films, contrast builds up with developing time. It's usually reckoned as important to develop to the end of the time to add "sparkle". Snatching the print out early leads to "muddy" prints. Some developers have published Watkins factors, which is a simple multiplier to apply to the time an image first appears to get the final development time. A Watkins factor of 6 means "image appears after 20 secs, development complete after 20x6 secs = 2 minutes". Overdevelopment is possible.

Is there any harm stopping the Lens all the way down to the smallest aperture?
Diffraction. Light behaves (in some circumstances) like a wave, and this explains diffraction. Specifically, the image of a point produced by a perfect lens cannot be a point because of diffraction - it gives a series of concentric rings of progressively fainter appearance around the centre spot. See Airey disc on Wikipedia for a pretty picture (from memory about Wiki). The overlap cuts the maximum resolution. The maximum resolving power of a perfect lens is limited by diffraction which is caused by light brushing against the edge of the aperture (very crude explanation, but it serves for this purpose) and at smaller stops, the edges produce proportionally more of the image. The effect depends on the wavelength of the light, but for a perfect lens it is limited to 1500/aperture number. 1500 is an arbitrary standard, and some would prefer to use 1000 instead.

For reference, the resolving power of glossy photographic paper (the highest resolution) is 30 lpm (or lppm (line pairs per millimeter), I never remember which). And the combined resolution of a system is always lower than the lowest component.

I doubt this make makes any practical different in real life enlarging, compared to the enlarger shake which becomes more likely with longer exposures though.

It’s meant to be 20 degrees Celsius but it was 11 instead.
Some developing agents (I can't recall which) don't work below 54 Fahrenheit, which according to Google is 12 Centigrade. So it would depend on the developing agents in your print developer. Most developers (at a guess) use more than one developing agent to balance the different properties. I can't recall if Carson Graves goes into this, but Anchell and Troop in The Film Developing Cookbook do.

I look forward to the next installment.
 
Last edited:
Hey @StephenM , thanks for the detailed reply. Apologies for the late reply i was sick and when i got better i spent all the free time printing. I’ve managed to figure out a lot of things by just printing out and testing things my self. Probably the best way to learn.
Also realised my exposure times were short because that particular negative i was trying to print wasn’t dense enough.
Printing made me realise i need to adjust the way i shoot film.
Had a lot of fun making dodging & burning tools and messing about in the darkroom.
Also had a lot of failures but gradually gaining more experience.

By the way i tested an LED bulb and unfortunately the results were not good as the light was not uniform. Looks like it’s not possible to use led bulb in my enlarger. The reason i wanted to change to LED is because the Traditional enlarger bulb is getting too hot for exposures of 30s and over. When i got the negative out of the film holder, it has changed shape, from flat to curved.
Anyhow it’s not a biggie as i can adjust the exposure time with the aperture of the lens.
I’ve done too much printing, i need to get out there now for the next picture:)
 
thanks for the support it’s kind of you to say that :)
@StephenM any suggestions on darkroom books? I’ve seen a lot used on eBay but I’m not sure if it’s worth getting as it doesn’t even show the contents of the book.
I do remember the process of printing and dodging/burning, so that’s not something I’m after.
One thing that sticks out for me is the garage door. It is metal and metal conducts heat like the M1 allows traffic to flow. It will also allow condensation to form in large amounts. That means it should be insulated. The easiest way is to use expanded polystyrene fixed to the door I would suggest an adhesive but don't want you to get in trouble with the wife. (like the window)some glues will eat polythene like there is no tomorrow so a water based version should make the grade.

Draft proofing would also be a good idea. Is there a main power supply into the garage, if so that's good, but it must be an earthed supply. As it is a garage it may only have a single brick skin so some sort of heating should be considered as well.

As for light proofing the window, how about a wooden frame slightly smaller than the recess and covered on the outside face with thick black polythene and edged with draft excluder foam strip and pushed into the recess and wedged in place. It can be removed when you have finished so preserving domestic harmony
 
Back
Top