Bridge, MFT, achromats, dSLR, primes - a journey of exploration

First outing with the new 100mm today! Not much time but managed to get a couple of half decent shots off. Looks sharp with or without the Raynox 150 - mag is up at about 1.7:1 according to my quick test shots. Quite encouraged as there's definitely a bit more working distance when you need it, it's definitely sharp and enough mag for 95% of what I would shoot with the MPE. (Also I am likely to pick up a Raynox 250 at some point). So the end for the MPE ? Time will tell and I'm not going to rush it but maybe just maybe...

Those look very good indeed Mike. It looks like you have found the right tool for the job. Great news!
 
I've only just seen this thread and I've not read every post yet, so forgive me if I'm repeating anything!
Anyway, I thought I'd post some images taken with a Panasonic FZ1000, raynox converter and home made snoot type thing with the pop-up flash, hand held. Comments / suggestions welcome.

That's interesting Lee. I was very attracted to using using the FZ1000 with my closeup lenses. However I decided against it when I discovered that it only went to f/8. Since it has a 1 inch sensor that means it only gets half the depth of field at its minimum aperture of f/8 compared to the f/8 minimum aperture on the FZ200 or the f/22 minimum aperture on the G3 with its four thirds sensor. (With its 1 inch sensor the FZ1000 would need to be at f/16 to get the same depth of field as the FZ200 at f/8 or the G3 at f/22. And depth of field halves for every two stops increase in aperture.)

The extending lens on the FZ1000 was another reason I would have been a bit doubtful about the FZ1000 even if it had gone to f/16. It makes life much more difficult at higher magnifications. (I've written about that somewhere in this thread, although not primarily in relation to the FZ1000 in particular, more the general issue of using closeup lenses on extending lenses. I use a non-extending 45-175 on my G3 and recently acquired G5.)

The DOF placement and focus is good for these, and in the first one the head and body are nicely sharp. Unfortunately (to my taste at least) the head is outside the range of good focus in #2 and may be in #3 too (it is difficult to be sure at this small size). That is the sort of shot (which I take a lot of - flies being one of my favourite subjects) for which extra DOF would be useful with the FZ1000. (This doesn't apply of course to #3, because it was captured with a G3 at f/16. I tend to use f/22 on my G3/G5).

Of course, you could crop to get more DOF, and with its much larger sensor the FZ1000 should have more potential for this than I have with the FZ200 with its very small sensor (that is the theory at least - although some of my experiments written up in this thread suggest that the reality may be more complicated).

Which Raynox are you using? (I generally use the Raynox 150 for flies like that).

Were these cropped much?

How are you focusing, autofocus or manual focus?

I'm interested in the shutter speeds. I see you used manual exposure. What is your thinking in keeping the shutter speed in the 1/50 to 1/80 range? Is this done to raise the backgrounds? (That's something I do sometimes, as I don't like black backgrounds, but more often I use max sync speed on my G3/G5 and 70D, and 1/1600 or so on my FZ200.)

The snoot looks to be doing a good job. The lighting looks very smooth in #2 and #3. As you may see if you read some of the more recent posts in this thread, I think harsh highlights like those in #1 are probably inevitable with shiny-bodied subjects like that. I've got to the point where I'm quite hesitant about photographing shiny-bodied subjects these days, because I know I'm not going to like the results.
 
Hi Nick, you are right, I struggle to get enough depth of field at f8 on the FZ1000. I didn't buy it with macro in mind, I bought it for general use and decided to try macro with the Raynox 150 after seeing some images taken with the FZ200. It's a brilliant camera for general all-round use and I wanted to try the 4K photo mode, which is fantastic.
I played about with the shutter speeds to keep the backgrounds correct (I don't like black backgrounds either) and I can get away with 1/50th due to the flash freezing the subject. I mainly used auto focus as it focuses extremely quickly, it's a bit hit and miss but it seems to work when hand holding. If I had a static subject I would use a tripod and probably use manual focus.

I don't find the extending lens to be a problem as I have a decent working distance with the Raynox 150. As for the highlights, the snoot is heavily diffused but as you say it's inevitable with shiny subjects.

It's early days and very much a work in progress, I intend to try a higher iso and no flash on the shiny subjects and a smaller image cropped a bit to get better dof.

The G3 I have tried has the 45-150 lens, I didn't know that the 45-175 does not extend and I might consider this, but I find the FZ1000 much easier to use and much quicker focusing.

It's all good fun and I'll keep experimenting, if we ever get a day with no wind!

Thanks for your comments.

Lee
 
Hi Nick, you are right, I struggle to get enough depth of field at f8 on the FZ1000. I didn't buy it with macro in mind, I bought it for general use and decided to try macro with the Raynox 150 after seeing some images taken with the FZ200. It's a brilliant camera for general all-round use

Yes, that's certainly the impression I get from the very positive attention it gets in the Panasonic Compact Camera Talk forum over at dpreview. I was disappointed about the f/8 issue. I would have liked to use it.

and I wanted to try the 4K photo mode, which is fantastic.
I played about with the shutter speeds to keep the backgrounds correct (I don't like black backgrounds either) and I can get away with 1/50th due to the flash freezing the subject. I mainly used auto focus as it focuses extremely quickly, it's a bit hit and miss but it seems to work when hand holding. If I had a static subject I would use a tripod and probably use manual focus.

I'm wondering whether to get an FZ300, faster (DFD) focusing and 4K photo mode being two of the attractions. The FZ200 and G5 (with Raynox 150, 250 etc) are pretty fast and positive in autofocusing compared to macro lenses - virtually no hunting, and they give very usable autofocusing well beyond 1:1 (in APS-C terms), and with very precise focus point positioning, versus manual focus only for the Venus 2:1 and Canon MPE-65 5:1 lenses. Presumably with DFD focusing the FZ1000 is even better, almost instant I imagine. Is the FZ1000 still that fast with the Raynox 150 attached? DFD focusing depends on the camera knowing the characteristics of the lens, and I haven't been able to find out yet whether using achromats like the Raynox 150 messes that up and slows down the focusing.

Nice technique with the slow shutter speeds for handling the backgrounds.

Until a few months ago I used a tripod (a bit of an odd one) most of the time. Lately I've been working hand-held, including with static subjects and manual focus.

How do you do your manual focusing with the FZ1000?

With the FZ200 (and the G3/G5 and 70D) I keep the focus fixed and move the camera to get the focus placed where I want it to fall. Of course, this is much quicker to do now I'm working hand-held, but it's difficult to get the same precision and repeatability of focus/dof positioning hand-held compared to using a tripod, especially as magnification increases. I don't really find this an issue with the 150 (I mainly use a tripod in hands-on mode to provide some stability rather than hands-off with a remote release.)

I don't find the extending lens to be a problem as I have a decent working distance with the Raynox 150.

It's not a big issue with the Raynox 150 (and even less so with the less powerful Canon 500D that I use for flowers and large insects). It becomes more of an issue as the power of the achromats increase, and I use the Raynox 250 (+8 diopters compared to the +4.8 of the Raynox 150), Raynox 150 and 250 stacked (+12.8 diopters) and Raynox MSN-202 (+25 diopters).

The working distance gets smaller as the power increases and if the lens extends you have to move the camera if you change magnification so as to restore the working distance. With the 45-175 (which doesn't extend) on the G3/G5 and the Raynoxes attached to an adaptor tube on the FZ200, I can change magnification without moving the camera. This is great for high magnification, because locating the subject is very difficult at high magnification, as is relocating the subject if you lose it, which is easy if it is moving around (and the working distance has to be correct plus or minus about 1.5mm with the MSN-202, so the impact for example of the 40mm or so extension on the 45-200 is devastating).

With my rigs I can zoom to wide angle, locate the subject, centre the subject in the frame and then zoom in on it to the magnification I want to use. The MSN-202 was virtually unusable (for me) on the 45-200 on the G3 because of the extension of the lens. With the 45-175 the MSN-202 suddenly became usable. Similarly the Raynox 250 and the Raynox 250 and 150 stacked are easier to use. The other advantage is that I can take shots of a whole subject and then zoom out to get "environmental" shots without moving the camera, and I do this a lot, often repeatedly for an individual subject. Again, this is more of an issue at higher magnifications.

It's early days and very much a work in progress, I intend to try a higher iso and no flash on the shiny subjects and a smaller image cropped a bit to get better dof.

Good luck with the natural light approach. I'll be interested to see how you get on. (I don't know if you've read my exerience with trying this yet. :))

Crop for dof should be good on the FZ1000.

The G3 I have tried has the 45-150 lens, I didn't know that the 45-175 does not extend and I might consider this, but I find the FZ1000 much easier to use and much quicker focusing.

I think the more recent G series camera focus faster. Obviously so the ones with DFD, if you are using a supported lens. But even the G5 (which I picked up for £140 recently) seems to focus a bit better than the G3. I find the ergonomics of the G5 better than the G3, which always seemed rather fiddly in terms of using its buttons, and I needed at least one more function button, which the G5 does provide. I haven't used it much yet, but so far I'm liking the G5.

The 45-175 is one of the power zoom lenses. Very small and light. But it has a bad reputation for sensitivity to shutter shock. I've recently done some experiments with it on the G5 comparing shots using electronic shutter (no shutter shock) with shots taken with the mechanical shutter. It convinced me that the 45/175 does suffer from significant shutter shock when using mechanical shutter. I haven't done a series of tests to pin down how the effect varies with shutter speed, but 1/60 to 1/100 ish is often mentioned, but I suspect it a wider than that can be affected. Mind you, I think shutter shock may be an altogether wider problem than is often recognised. I've just done some tests with my Canon 70D comparing shots taken with live view and electronic first curtain shutter versus OVF and mechanical shutter, and it looks like the issue can be seen there too, although not as strongly as with the G5 and 45-175.

This of course may be relevant to you because although you are using flash you are using slow enough shutter speeds that shutter shock might be an issue. And the G3 doesn't have electronic first curtain shutter. (It doesn't have electronic shutter either, but for the most part you can't use electronic shutter with flash anyway).

It's all good fun and I'll keep experimenting, if we ever get a day with no wind!

Yes, experiment lots! But days with no wind? I live in a windy location and have got used to working in an often gusty breeze. Especially if you are using flash it is very doable, as long as you are prepared to take plenty of shots and then wade through them to find the good ones. I also do natural light shooting in breezy conditions, flowers mainly. It needs patience, but there is often momentary stillness, or nearly so. And higher ISOs to give faster shutter speeds can help too.
 
Hi Nick, Does the FZ300 go to f11 or f8? The FZ1000 focusing is instant, no hunting, even with the Raynox 150 fitted. If use manual focusing, I use the same technique as you, move the camera back and forth.
Intersting info about the shutter shock with the 45-175, I didn't know about this.

I have done some natural light stuff, I had a m4/3 setup for a while, Olympus EM-1 and a few lenses including the 60mm macro lens which was one my all time favourite lenses despite not being the easiest lens to use.

The reason for trying m4/3 was to get the weight of my kit down as I have a painful back problem. I really enjoyed using the Olympus kit and was very happy with the IQ, but as my real passion is wildlife photography (especially birds in flight - see my website: www.wildgallery.co.uk) the Olympus just can't do birds in flight, the tracking focus is absolutely abysmal. I ended up selling the kit and and carried on using the Canon gear. The G3 was bought as a backup body when I was using the m4/3 kit and as it wasn't worth much I decided to keep it along with a couple of lenses.
The FZ1000 was bought as an all in one camera to keep with me in my van (I Work outside) but maybe a FZ200/300 would have been a better bet, especially for macro stuff.

These were taken with the EM-1 and 60mm macro in natural light:

View attachment 44051 View attachment 44052 View attachment 44053
They don't look very detailed at this size but viewed at full size they have bags or detail.

For now though, I am enjoying playing with the FZ1000 and Raynox.

Cheers, Lee.
 
Hi Nick, Does the FZ300 go to f11 or f8?

f8. I was hoping they would use a slightly larger sensor and take it to f11, like they did with the FZ50. That combination, which Mark Berkery still uses to wonderful effect with his FZ50 and snooted on-board flash, would give a little more dof. Perhaps it is just as well they didn't though because the constant f2.8 lens on the FZ200 is one of its strengths (not just that it is f2.8 all through, which isn't actually very important to me because I stick at f8 most of the time, but it is pretty sharp). In any case, I get as much dof at f8 with the FZ200 as with any of my other kit at minimum aperture so I'd be content with f8 on the FZ300.

The FZ1000 focusing is instant, no hunting, even with the Raynox 150 fitted.

That is very good news. It inclines me a bit more towards the FZ300. It's a bit difficult to justify, given that I recently bought a spare FZ200 in case I broke my FZ200, they had messed up the FZ300 so I didn't want to use it, and the FZ200 became difficult to get hold of down the line. Turns out that wasn't necessary, because an FZ300 would be fine as a replacement for a broken FZ200. But never mind. At least I didn't get the spare FZ200 until the price had dropped somewhat.

But even though the image quality with the FZ300 won't be any different - same lens and same sensor - there are other things which are appealing - weather sealing, better EVF and, what would matter more to me, better LCD. 4K photo mode might be useful too occasionally, as might 6fps continuous AF and 12fps fixed focus bursts (which I have used with the FZ200 for noise reduction and/or resolution enhancement using PhotoAcute, which while now unsupported should work fine with the FZ300 because it knows the parameters it needs for the FZ200). And of course, DFD focusing. I think I'm slowly talking myself into it. :)

I have done some natural light stuff, I had a m4/3 setup for a while, Olympus EM-1 and a few lenses including the 60mm macro lens which was one my all time favourite lenses despite not being the easiest lens to use.

The reason for trying m4/3 was to get the weight of my kit down as I have a painful back problem.

Oh. :( I'm sorry to hear that.

I really enjoyed using the Olympus kit and was very happy with the IQ, but as my real passion is wildlife photography (especially birds in flight - see my website: www.wildgallery.co.uk)

Oh my. what a treat. You have so many seriously beautiful images there. Wonderful.

the Olympus just can't do birds in flight, the tracking focus is absolutely abysmal. I ended up selling the kit and and carried on using the Canon gear.

2.5 kilos by my reckoning. Are you still using that gear with a bad back? Presumably you use a tripod or monopod, although at least for the birds in flight presumably that isn't practical and you have to work hand-held.

The G3 was bought as a backup body when I was using the m4/3 kit and as it wasn't worth much I decided to keep it along with a couple of lenses.
The FZ1000 was bought as an all in one camera to keep with me in my van (I Work outside) but maybe a FZ200/300 would have been a better bet, especially for macro stuff.

Don't know. As a general purpose camera, I doubt it. I know the reach of the FZ1000 is less, and the FZ200 has the constant f2.8 advantage, but even so in terms of image quality, given what you are used to using, I think it could be a step too far. The FZ200 is very noisy. Noise can even be a problem at base ISO, especially if you have to raise shadows, which I find I have to do quite a lot. I notice a big difference between (raw) images from my 70D and FZ200 - the 70D raw files are pretty malleable, easy and quick to handle. The FZ200 images are very awkward to handle. I use the 70D for most of the natural light work I do. I use the FZ200 for invertebrates using flash, the reason being that I find it really responsive with very good handling characteristics for my preferred way of working. (As documented at length in this thread, it turns out that I prefer using achromats on a zoom lens rather than prime macro lenses.) Oddly enough, I find the handling characteristics much better with the 70D for natural light work (mainly flowers).

I find the G3 (now G5) somewhere in the middle in terms of image quality and handling. I'm still experimenting and evaluating, but I think the G5 may turn out to be my preferred instrument for night sessions and small subjects (invertebrates in both cases)

These were taken with the EM-1 and 60mm macro in natural light:
They don't look very detailed at this size but viewed at full size they have bags or detail.

Excellent shots. I see plenty of detail on the larger images I looked at on your web site. Are the larger ones the more recent ones? (I have increased the "standard" size of my web display images several times over the past few years, and now produce 1300 pixel high versions. That really shows up the weaknesses of the small sensor images. Hopefully it doesn't show too much at display size, but I have to be pretty careful with them and its easy to miss uglinesses that creep in through the post processing.)

For now though, I am enjoying playing with the FZ1000 and Raynox.

I have found it surprising (and so have some others I think) what I can get out of less expensive gear compared to using more expensive gear as far as close-ups/macro goes. I certainly enjoy using light, responsive kit far more than heavier, more awkward to use kit, even if the post processing is more demanding and the output quality not as good (and in a lot of cases, there turns out to be some doubt about that anyway, which is what a lot of this thread has been about).
 
I've been trying out my Sony RX10 (same sensor as Lee's FX1000) to see what it'll do. It's certainly not ideal for macro as the Raynox 150 and 250 vignette through most of the range of the lens. The Marumi Achromats are better but still vignette below around '50mm'. I'm using a Nissin i40 flash as it's reasonably light and comes with a diffuser dome and I've velcro'd a Pixco diffuser on the front. I need to experiment a bit more as I was getting a good stop of underexposure at f8. The bracket in the photo is one of two alternatives I'm playing with. My subjects are Lego minifigs and are 42mm tall.

rx10flash.jpg


As close as the camera can get at '200mm'.
rx10-0.jpg


With a Marumi 330 (+3)
rx10-330.jpg


With a Marumi 200 (+5)
rx10-200.jpg

Move your flash and diffuser down as close as possible to the subject, without bringing it into frame (it looks like it should be fairly easy with that bracket) and it should sort out those highlights.
 
I've been trying out my Sony RX10 (same sensor as Lee's FX1000) to see what it'll do. It's certainly not ideal for macro as the Raynox 150 and 250 vignette through most of the range of the lens. The Marumi Achromats are better but still vignette below around '50mm'.

That's a real pity about the vignetting. The Raynoxes do vignette on the FZ200, worse when attached to an adaptor tube like I do. Still, I can use the Raynox 150 and 250 from about 7X to 24X zoom without vignetting, which I can live with. I like the larger diameter of the Marumis because of the reduced vignetting (I can use from 4X to 24X). When I tested the the Marumi 200 against the Raynox 150 I found the Marumi didn't seem to be quite as sharp, although how much real world difference that would make I don't know (it was an indoor test with a static subject, using tripod, remote release, loads of time etc - not my usual shooting conditions!).

I'm using a Nissin i40 flash as it's reasonably light and comes with a diffuser dome and I've velcro'd a Pixco diffuser on the front. I need to experiment a bit more as I was getting a good stop of underexposure at f8. The bracket in the photo is one of two alternatives I'm playing with. My subjects are Lego minifigs and are 42mm tall.

rx10flash.jpg

Am I understanding this right, that with the flash (I'm making an assumption here) at full power you are getting a stop or so underexposure at f/8? The RX10 goes to the expected (for a 1" sensor) minimum aperture of f/16, but if I've got this right your flash is three stops underpowered for that. I hope I've misunderstood.

The flash is a long way from the subject. Can you get it closer?
 
f8. I was hoping they would use a slightly larger sensor and take it to f11, like they did with the FZ50. That combination, which Mark Berkery still uses to wonderful effect with his FZ50 and snooted on-board flash, would give a little more dof. Perhaps it is just as well they didn't though because the constant f2.8 lens on the FZ200 is one of its strengths (not just that it is f2.8 all through, which isn't actually very important to me because I stick at f8 most of the time, but it is pretty sharp). In any case, I get as much dof at f8 with the FZ200 as with any of my other kit at minimum aperture so I'd be content with f8 on the FZ300.


That is very good news. It inclines me a bit more towards the FZ300. It's a bit difficult to justify, given that I recently bought a spare FZ200 in case I broke my FZ200, they had messed up the FZ300 so I didn't want to use it, and the FZ200 became difficult to get hold of down the line. Turns out that wasn't necessary, because an FZ300 would be fine as a replacement for a broken FZ200. But never mind. At least I didn't get the spare FZ200 until the price had dropped somewhat.

But even though the image quality with the FZ300 won't be any different - same lens and same sensor - there are other things which are appealing - weather sealing, better EVF and, what would matter more to me, better LCD. 4K photo mode might be useful too occasionally, as might 6fps continuous AF and 12fps fixed focus bursts (which I have used with the FZ200 for noise reduction and/or resolution enhancement using PhotoAcute, which while now unsupported should work fine with the FZ300 because it knows the parameters it needs for the FZ200). And of course, DFD focusing. I think I'm slowly talking myself into it. :)


Oh. :( I'm sorry to hear that.


Oh my. what a treat. You have so many seriously beautiful images there. Wonderful.


2.5 kilos by my reckoning. Are you still using that gear with a bad back? Presumably you use a tripod or monopod, although at least for the birds in flight presumably that isn't practical and you have to work hand-held.


Don't know. As a general purpose camera, I doubt it. I know the reach of the FZ1000 is less, and the FZ200 has the constant f2.8 advantage, but even so in terms of image quality, given what you are used to using, I think it could be a step too far. The FZ200 is very noisy. Noise can even be a problem at base ISO, especially if you have to raise shadows, which I find I have to do quite a lot. I notice a big difference between (raw) images from my 70D and FZ200 - the 70D raw files are pretty malleable, easy and quick to handle. The FZ200 images are very awkward to handle. I use the 70D for most of the natural light work I do. I use the FZ200 for invertebrates using flash, the reason being that I find it really responsive with very good handling characteristics for my preferred way of working. (As documented at length in this thread, it turns out that I prefer using achromats on a zoom lens rather than prime macro lenses.) Oddly enough, I find the handling characteristics much better with the 70D for natural light work (mainly flowers).

I find the G3 (now G5) somewhere in the middle in terms of image quality and handling. I'm still experimenting and evaluating, but I think the G5 may turn out to be my preferred instrument for night sessions and small subjects (invertebrates in both cases)


Excellent shots. I see plenty of detail on the larger images I looked at on your web site. Are the larger ones the more recent ones? (I have increased the "standard" size of my web display images several times over the past few years, and now produce 1300 pixel high versions. That really shows up the weaknesses of the small sensor images. Hopefully it doesn't show too much at display size, but I have to be pretty careful with them and its easy to miss uglinesses that creep in through the post processing.)


I have found it surprising (and so have some others I think) what I can get out of less expensive gear compared to using more expensive gear as far as close-ups/macro goes. I certainly enjoy using light, responsive kit far more than heavier, more awkward to use kit, even if the post processing is more demanding and the output quality not as good (and in a lot of cases, there turns out to be some doubt about that anyway, which is what a lot of this thread has been about).


Yes I still use the Canon gear, but I'm using the 100-400mm MK2 lens which is much lighter and more manageable for hand holding. I also use a tripod and monopod wherever I can and a walkstool, which is now an essential bit of kit.
Over the years I have increased the sizes of the images I put on my website, I think I'm putting them on at 1500 pixels across now although I haven't put any on there for quite a while and I really need to update it.

Very useful info about the FZ200/300 thanks, I think I will stick with the FZ1000 for now as it's so convenient and easy to use. I have the home-made snoot attached to a mini ball head (£2.99 from eBay) which fits in the hot shoe and I can attach it in seconds, so I can be using the camera for general purpose stuff and put the Raynox and snoot on in about 10 seconds and be ready for any insects I come across. I'll post a picture of it.

Although it's very light and easy to position I've started using a lightweight monopod when the subject is to high to put my knees or elbows on the ground and find this helps.

Image quality is so good that if I get the focus right and the image is sharp, I don't have much post processing to do at all.

View attachment 44088 unnamed-2.jpg unnamed.jpg
 
Last edited:
Move your flash and diffuser down as close as possible to the subject, without bringing it into frame (it looks like it should be fairly easy with that bracket) and it should sort out those highlights.
Thanks. Will try that next time I'm fiddling....

Am I understanding this right, that with the flash (I'm making an assumption here) at full power you are getting a stop or so underexposure at f/8? The RX10 goes to the expected (for a 1" sensor) minimum aperture of f/16, but if I've got this right your flash is three stops underpowered for that. I hope I've misunderstood.

The flash is a long way from the subject. Can you get it closer?
I had the camera on manual with TTL metering so it may just have been fooled by the light background. I'll try moving the flash closer as you and Tim suggest and use a more mid-tone background - I have some nice, large, grey Lego plates...... Or I can switch to spot metering rather than matrix.
 
Last edited:
I had the camera on manual with TTL metering so it may just have been fooled by the light background. I'll try moving the flash closer as you and Tim suggest and use a more mid-tone background - I have some nice, large, grey Lego plates...... Or I can switch to spot metering rather than matrix.

Spot metering can give pretty erratic results. I'd be inclined to leave it on matrix metering. Either way, I wouldn't depend solely on the camera's metering. You need to take charge one way or another, either by using flash exposure compensation (FEC) when using TTL flash or simply using manual flash mode and setting the flash level yourself.

Sometimes I use the following technique.
  • Camera in manual mode, flash in TTL mode.
  • Shutter at flash sync speed (unless I'm trying to bring up a dark background).
  • Aperture to taste (very small in my case, but around f/11 is more popular).
  • ISO to taste. You may need to raise the ISO from base ISO to get a reasonable flash recycle time.
  • Then have a guess at what FEC might be suitable (depending on how dark or light the scene is). Take a shot. Chimp. Adjust FEC if necessary. Try again. Etc.
You can use a similar technique with Av mode, but you have to be careful to stay aware of the shutter speed the camera decides to use, because it might be rather slow in some cases, and if flash isn't the dominant source of illumination, which it might not be on bright or even moderately bright days depending on the circumstances, these slow shutter speeds can significantly degrade image sharpness even though you are using flash.

Sometimes I get annoyingly erratic exposures from shot to shot with TTL flash, even when using matrix metering, so sometimes I switch the flash to manual mode and have a guess as to what flash power to use. Chimp. Adjust. Etc. The nice thing with this is that if you take repeated shots of a scene (which I often do) then once you get to a suitable flash power you can often get really consistent results for scenes where the camera metering flails around and keeps changing its mind as to what a good flash level would be. In fact, I find that sometimes I can leave the flash power unadjusted for quite long periods as I capture different subjects and scenes. This does depend though on how much the magnification and hence distance to the subject varies from scene to scene, as well the darkness/lightness of subjects and backgrounds.
 
I've been using manual exposure and TTL flash for as long as I can remember having TTL flash so I'll probably stick with it but with FEC adjustments as you suggest. At least FEC is easy on the Nissin.
The RX10 has a leaf shutter so doesn't have a sync speed but force of habit means I normally set 1/250th.

Something I do find amusing is that, after years of everyone saying two lights are better than one, we're basically back to John Shaw's 'butterfly bracket' with a single light over the subject.
 
I've been using manual exposure and TTL flash for as long as I can remember having TTL flash so I'll probably stick with it but with FEC adjustments as you suggest. At least FEC is easy on the Nissin.

Do you use buttons on the flash unit to alter FEC? I've found it easier to set up a button on the camera that takes me to FEC and then roll the thumb wheel to make the adjustment. (I'm using a Metz flash and changing the FEC is fiddly, slow and prone to error doing it on the flash unit.)

The RX10 has a leaf shutter so doesn't have a sync speed but force of habit means I normally set 1/250th.

Oh, excellent! It's the same with the FZ200 and I've taken to using 1/1600 or so most of the time, only slowing the exposure down if I want to raise a dark background (or try to at least).

Something I do find amusing is that, after years of everyone saying two lights are better than one, we're basically back to John Shaw's 'butterfly bracket' with a single light over the subject.

Yes, I've noticed a similar conversation recently. :)
 
Do you use buttons on the flash unit to alter FEC? I've found it easier to set up a button on the camera that takes me to FEC and then roll the thumb wheel to make the adjustment. (I'm using a Metz flash and changing the FEC is fiddly, slow and prone to error doing it on the flash unit.)
There's a nice big mechanical dial on the i40 that's either FEC in TTL or power in manual. It's big enough that I can just about see it without my reading glasses.....
 
Tried a couple this morning using a greater working distance and cropping in about 40-50%. I think it's given me a bit more depth of field?

Yes. (Nice images btw.) I don't have much experience with butterflies, but I shoot a lot of flies and although it's difficult to be sure because the fly is at a bit of an angle, it looks to me like you got about as much dof as I get at minimum aperture with my cameras.

The middle image in the top row of the first illustration in this post shows the crop I believe you would need to use to get the equivalent of using f/16 rather than f/8. If you cropped these images about that amount then I would expect you to be getting about the same dof at f/8 as I do with my cameras at minimum aperture, uncropped.

Yes I think you're right. I think the 20mp image size means I can crop in a bit more than I would normally do and still retain enough detail.
 
This one was taken as a depth of field test as I am still undecided about using the FZ1000 + Raynox for macro. Taken at a longer working distance and cropped roughly about 50%. Focal length (35mm equiv)
was 112mm, flash with diffused snoot. Do you think the depth of field is acceptable? Comments welcome, thanks.

View attachment 44602
 
Do you think the depth of field is acceptable?

The depth of field looks fine to me.

After that big crop, does the image quality look ok for your purposes? (It looks ok to me at this size, but it depends on what your target viewing size is, and it is what you think about it at that size that matters. But given the good things I read about FZ1000 image quality, and low ISO you used, I would imagine that size crop should be ok somewhat larger and perhaps, for example, up to the size I typically use, which is 1300 pixels high for on screen viewing. But like I said, it is your call.)

And printing? Again it depends on output size. You'd need to try it and see what you think.

Thanks Nick, I think I'm happy with the setup now.
 
Tests of various rigs lead to questioning the role of the G5

Prior to the latest round of experiments etc, this was how things looked in terms of preferred equipment to use for close-ups/macros:
  • Canon 70D with 55-250 STM and optionally Canon 500D - Natural light botanical subjects and larger invertebrates such as butterflies and damselflies.
  • Panasonic G5 with 45-175 and various achromats - night time shooting and very small subjects
  • Panasonic FZ200 with various achromats - Day time flash shots of invertebrates
I decided to cross check these preferences by (one more time) using different cameras for some of these areas. If I could reduce from three cameras to two that would be good, and of course one would be even better.
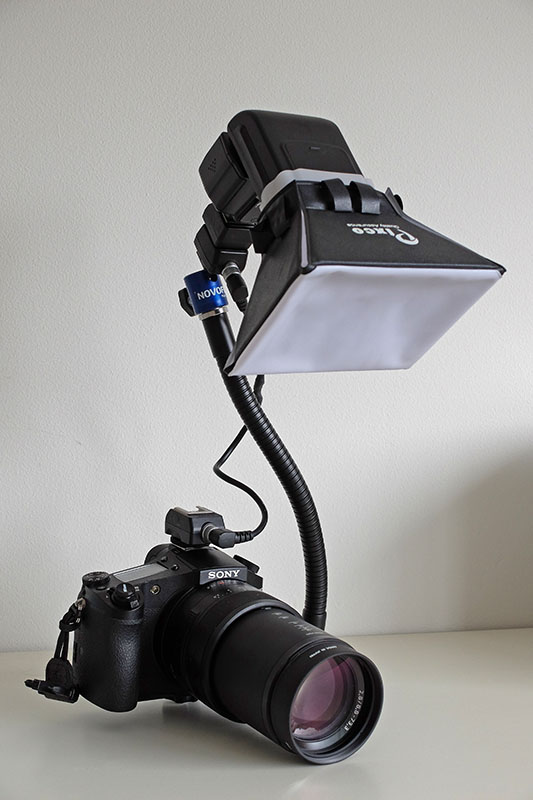
70D with flash

I have had a lot of trouble trying to use the 70D with flash. However, I used all three cameras with flash for some wasp shots and the 70D worked as well as the other two. I decided to try again with the 70D - perhaps I had been too hasty writing it off. I decided to put the ISO up to 800 so as avoid the "not enough flash power" issue.

Unfortunately, once again it simply wouldn't work well for me. I think the difference with the wasp shots was that I was working at a fixed distance with the focal length fixed for lengthy periods on a scene and subjects which the 70D and flash handled fine. I set the flash level manually, so once I had got the flash level right things went smoothly. When I tried again in ordinary use, with varying backgrounds, subjects and focal lengths (and the lens extension that goes with that) things rapidly fell apart again. I really can't pin down exactly what is going wrong, but it felt like hard work in order to get some not very good results and a lot of failures. It is still going to have to be the Panasonics for flash work.

G5 vs FZ200 for mid-sized invertebrates

I tried the G5 for daytime flash shots of mid-sized invertebrates like the flies and spiders that I normally capture using the FZ200. It was much bettter than with the 70D, but I soon swapped it out for the FZ200. With the G5 set at ISO 800 there was nothing particularly "wrong" with it, but it lacked the excellence of handling that I get with the FZ200, where everything comes to hand so easily, and operations are really quick and smooth.

G5 for flowers, and 45-175 shutter shock

I also tried the G5 for natural light shots of flowers. The G5 with 45-175 is significantly lighter than the 70D with 55-250 STM, and that felt good. The reach is a little less than with the 70D, but I could live with that. However, when I reviewed the images on the PC very few were usable, the rest being too soft/OOF. It had been quite breezy and I had been using fairly slow shutter speeds, so some blurry results wouldn't have been surprising. But I use the 70D in similar circumstances and have never had as bad a set of results as I got in that session with the G5. Then I remembered that the 45-175 has a reputation for suffering from shutter shock.

Unlike the G3, the G5 has an electronic shutter option, with which there can be no shutter shock, so I did some comparisons with the G5 between manual and electronic shutter shots. The test images are here at Flickr. The images are full size for pixel peeping, but saved with JPEG 60% compression to make the upload bearable.

There are six sets of shots, with 10 shots in each set. To make comparisons easier, the shots in each set alternate between electronic and mechanical shutter. (When capturing the shots I first captured the five mechanical shutter shots then the five with electronic shutter).

The shots were captured hand-held, with image stabilisation on.
  • Set 1: 1/80 sec, 45mm
  • Set 2: Same view, 1/125 sec, 47mm and 49mm (operator error)
  • Set 3: 1/80 sec, 175mm
  • Set 4: 1/80 sec, 45mm
  • Set 5: 1/125 sec, 175mm
  • Set 6: 1/50 sec, 45mm and 47mm (operator error, again :()
With the shots being hand-held with slowish shutter speeds there is obviously some random variation in sharpness. However, when I pixel-peeped, comparing each pair of shots, it seemed to me that in 29 of the 30 pairs the electronic shutter version is sharper/has better microcontrast (not sure which, maybe both), often by what seems to me to be a quite significant amount.

So the G5 with 45-175 does suffer from shutter shock. Perhaps this explains at least part of my preference for using the 70D for flowers, the reasons for which have never been entirely clear to me. (With live view, which I always use for flowers, you can set the 70D up with electronic first curtain shutter, which I did as soon as I got the camera. So there is no shutter shock - and no mirror slap either of course in live view.)

I did a natural light test session, mainly flowers but a couple of mid-sized invertebrates too, using the G5+45-175 and using electronic shutter. The images I selected from the session are here at Flickr. The shutter speeds range right across the problem speeds. I think they are ok in terms of sharpness.

That said (and this is a really difficult call because the differences are so difficult to pin down), I think there is something "extra" about the quality of 70D flower images. And despite the extra weight I find the 70D handles very nicely for flowers.

FZ200 for flowers

I have used the FZ200 on a couple more occasions for flowers. I have only looked at a few images so far but just as there is a difference that is difficult to pin down between the G5 and 70D for flowers, so there is between the FZ200 and the G5, with the G5 seeming to render colours and textures better than the FZ200. It follows therefore that the 70D is even further ahead of the FZ200 for flowers. Also, when photographing flowers I use the full range of apertures available to me with the 70D, from f/4-f/5.6 to f/22-f/32 depending on focal length, a range of 5 stops. With the FZ200 I have from f/2.8 to f/8, a range of only three stops. In terms of depth of field this is equivalent to around f/8 to f/22 for the 70D, so the FZ200 is limiting in terms of narrow dof images.

While I am happy to use the FZ200 for flowers if it is the only camera to hand when opportunities arise, I certainly wouldn't want to use it as my preferred camera for flowers given that I have the 70D.

Increasing reach for the FZ200


I've been wondering whether a teleconverter for the FZ200 might help with the "butterfly problem" - not having enough reach to get close enough to a small butterfly or similar to fill the frame. Unlike dSLR teleconverters, which fit between the camera and the main lens, Bridge camera teleconverters fit on the end of the lens (or preferably, as is the case with the FZ200, on an adapter tube, which is highly preferable as bridge teleconverters are very heavy).

I successfully bid for a Canon TC-DC58A 1.5X teleconverter on eBay, of a type that I had seen described as being ok in detailed discussions over at dpreview. I paid the grand sum of £16.30 for it, inclusive of delivery. The front lip was a bit dented, and I knew that might have affected the optics despite it being described by the seller (not a photographer was my guess) as "otherwise in perfect working order" (how would he know? was my thought). I did comparisons of images captured using the teleconverter and images captured with the bare camera and cropped. The cropped images were better.

More importantly, I learnt a lesson about working distances with these teleconverters - working distances are increased a lot, and so much so that even if you get as close as possible you can't get the subject nearly as big in the frame as you can without the teleconverter. So for nearby subjects like I was most interested in, they don't increase the reach. Still, better to learn about that paying £16.30 than paying several hundred for a non-dented version that wouldn't do what I wanted anyway.

FZ200 for night time sessions

I went out recently for a night time session with the G5. My first subject was a fairly small spider. As it wasn't going anywhere I decided to try it with the FZ200 to see how the two cameras compared. I switched between cameras a couple of times and ended up using the FZ200 for the rest of the session. I can't see what is going on quite as clearly on the LCD with the FZ200, but well enough for both autofocus and manual focus. And overall things went more smoothly wth the FZ200.

I need to look through some night session FZ200 images to check on image quality, but if that is ok it looks like the FZ200 could satisfactorily replace the G5 as my night camera.

FZ200 for small subjects

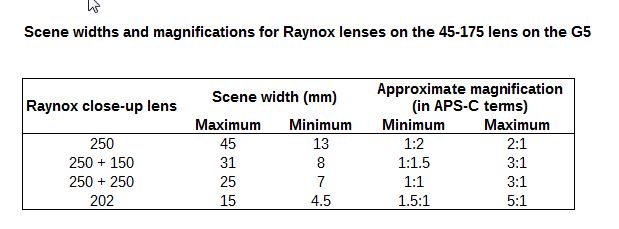
My current preference is to use the G5+45-175 with Raynox MSN-202 for the smallest subjects. I want to test the FZ200 for very small subjects but I haven't yet found anything suitable like springtails, barkflies and fruit flies, so this is still a "to do". However, in the meantime I have done a desk test, and this has shown that my preference for the G5 is based on previous comparisons that are probably invalid.

The 45-175 on the G5 has a smaller maximum equivalent focal length (350mm in full frame terms) than the FZ200 (600mm equivalent). This means that the G5 with 45-175 can't give as much magnification as the FZ200. Also, all my Raynox lenses work without vignetting on my G3, but they all vignette on the FZ200. I can only use from about 6X zoom to full 24X zoom on the FZ200 with the Raynox 150 or 250 or both stacked. The vignetting is much worse with the MSN-202 on the FZ200, and I can only use from about 12X to 24X.

What I had not realised was just how much difference all this makes for comparing the MSN-202 on the G5 and the FZ200, which is the comparison on which my preference for the G5 is based. Here are some numbers.


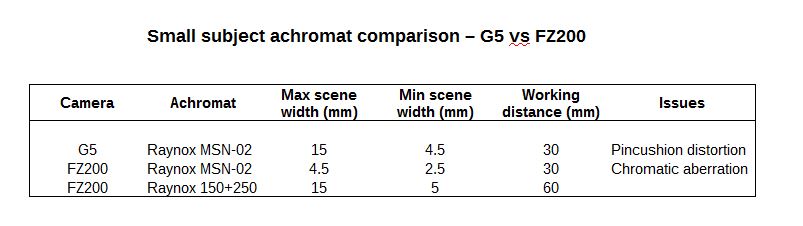
Small subject achromat comparison – G5 vs FZ200
by gardenersassistant, on Flickr

As far as using the MSN-202 is concerned, the G5 produces some quite severe pincushion distortion at lower magnifications, but I don't this matters too much for close-ups/macros. The FZ200 gives a limited range of very difficult to use extra high magnification, and produces quite severe chromatic aberration, increasing as magnification increases. This can be removed in post processing, but given the amount of it I can't help thinking that the removal process must damage image quality somewhat.

Much more important though was that I was not comparing like with like. I should have been comparing the G3 with Raynox MSN-202 with the FZ200 with Raynox 150 and 250 stacked. With the 150 and 250 stacked on the FZ200 you get the same range of magnification as with the MSN-202 on the G5, but without the pincushion distortion and with twice the working distance. I will go out with the FZ200 looking for small subjects and this time I won't take the MSN-202 with me.

The role of the G5

I recently bought a G5 as an upgrade for my G3. It does have better operating characteristics than the G3, and can produce better image quality too, especially with natural light flower shots at higher ISOs. However, in the areas in which I have seen it as the preferred tool, very small subjects and night shooting, it is looking to me, subject to some more testing and image quality evalutation, that the FZ200 may be better in those areas. Given that these tests have not revealed any other areas in which the G3 might be the preferred tool, I think I may be dropping the G3 and going back to using two cameras, the 70D for natural light shooting and the FZ200 for flash work.
 
Last edited:
Choice of achromats

It looks like it may be the end of the line for my use of the Raynox MSN-202. This leaves me with
  • Canon 500D (+2 diopters)
  • Raynox 150 (+4.8 diopters)
  • Raynox 250 (+8 diopters)
  • Raynox 150 + 250 stacked (12.8 diopters)
I bought a Marumi 200 (+5 diopters) a while ago. This was a potential replacement for the Raynox 150. It is about the same power but it has a larger diameter and so vignettes much less. This means that it covers a wider range of scene widths. As shown in the following table the minimum scene width is the same as with the Raynox 150, but the maximum scene width is much greater, 67mm against 42mm for the Raynox 150.


Raynox 150 vs Marumi 200, working distance and scene width
by gardenersassistant, on Flickr

When I first got the Marumi 200 I did a basic indoors image quality test, shooting a poster with butterflies on it. I didn't like the results compared to the Raynox 150 and so I put the Marumi 200 to one side. It recently struck me that I hadn't done a real world test. Although pixel peeping the test results had shown lesser image quality, perhaps the image quality would be good enough in real world use, with the difference in image quality outweighed by better usability/flexibility.

I initially did a ruler test to check on vignetting, working distance and scene widths. I noticed some blue fringing with the Marumi 200. Here too, I decided not to jump to any conclusions. The ruler has severe black to white contrasts which are particularly troublesome in terms of fringing. Here too, perhaps this wouldn't matter much in real world use.

I had several sessions in the garden using the Marumi 200 on the G5 and the FZ200, with flash and natural light. I got a bit carried away with being able to use the extra range of scene sizes without have to change achromats, and rather stupidly I didn't examine the results straight away. After several days I started processing one of the Marumi 200 sessions. It quickly became clear that the blue fringing was a significant real world issue. I didn't have to pixel peep to see it in one of the first images I looked at.

This was very disappointing, because I really liked using the Marumi 200. So much so that I have ordered a Canon 250D (+4 diopters), which comes in a 52mm version like the Marumi 200. I have had a Canon 250D before, but I sent it back because I didn't like the (lack of) sharpness. Perhaps it was a bad sample. I am entirely content with my Canon 500D (+2 diopters), so I'm hoping the 250D will be acceptable. As with the Marumi 200, I'll be looking at the balance between greater range as against any drop in viewing size image quality, rather than solely on the basis of pixel peeping test comparisons.

If the Canon 250D is ok, then I could use it stacked with the 500D to get +6 diopters (nicely beyond the magnification of the Raynox 150) with (I assume, and hope) no vignetting and therefore a wider range of magnifications to work with than with the Raynox 150.

For extra magnification I could use the Raynox 250 (+8 diopters) or Raynox 150 + 250 stacked (+12.8 diopters). Or I could use a Raynox 150 on the 250D (8.8 diopters) or the Raynox 250 on the 250D (12 diopters). All these extra magnifications would have (I assume) the same vignetting as I currently get with the Raynox 150, 250 and 150 and 250 stacked.

It will be several days before the 250D arrives and I can test it.
 
Last edited:
KX800 twin flash

I have purchased a Venus Optics KX800 twin flash.

KX800 construction and functions

There is a main unit which attaches to the camera's hot shoe. Attached to the top front of the main unit are flexible arms about 18 inches long with small (about 2.5" x 1" x 3/4") flash guns on them, and an LED light on a different sort of flexible arm about 11 inches long.

The unit is said to be compatible with Canon, Nikon, Pentax and Sony A mount cameras (flash adapter needed for Sony E mount cameras), but I have found that it is also compatible with my Panasonic FZ200 bridge camera and Panasonic G3 micro four thirds camera.

The flash output level is controlled manually, from 1/1 to 1/128 for each unit. The steps are one stop apart (1/1, 1/2, 1/4 power etc) so there is no fine control with 1/2 or 1/3 steps. However, the KX800 is rated at guide number 58, which is the same as my quite powerful Metz 58 AF-2. If this is the power of both flashes combined, then the adjustment for each flash may in fact be 1/2 stop. In practice, I have so far found the power adjustability sufficient.

It is very simple and quick it is to change the output level for the guns. On the back of the main unit there is a + and - for each gun and a horizontal line of 8 LEDs for each gun, with one illuminated at the current output level.

The main unit has a four-way button. The first up click turns on the LED light and subsequent up clicks turn up the power of the light for a total of 8 levels. There is a third line of LEDs on the back of the main unit showing the current output level of the LED light. Clicking the down arrow turns the LED light down and then off.

Clicking the left arrow turns the left gun off and on. When turned on it reverts to the previously set level. Similarly for the right arrow.

When the main unit is turned on the flash output levels revert to their previously set level. The LED light starts out off irrespective of its previous setting.

There is a "Pilot" button on the main unit, which triggers the guns, and an on/off switch.

On one side of the unit is a flap behind which there is a PC sync port and a three pin socket which looks like it might be for a power supply, but no cable comes with the unit and I have not seen this mentioned anywhere.

Issues

In bright light you can't see which of the LED lights in the three lines on the back of the unit are illuminated. Blocking the sunlight makes them visible.

Some of the light of an illuminated LED light in the three lines bleeds out to all of the LEDs around it. You can still tell which is the active one.

The guns stop firing every so often. This is because the main unit slips a little in the hot shoe. It is not possible to tighten the connection enough to stop this (using a wheel which is nicely large and grippable but has no locking mechanism). Trying to tighten it enough just makes it very difficult to remove the main unit from the hot shoe. This looks like it is a design issue not a fault with my particular unit because it was picked up in this review.

On my unit one of the power increase buttons sometimes doesn't work. I suppose I should do a return.

The arms that the guns are on creak alarmingly sometimes as you bend them around. I'm very conscious of there being wires in the arms, and I'm taking care to try not to stress the ends, where the arms attach to the main unit and to the guns. Even so I'm nervous about the robustness of the unit.

Diffusers

Based on what I learnt from my pie tin diffuser I have built diffusers for the guns. They are illustrated here. As shown in these photos I used three main layers of 160 gram plastic sheet with a set of concentric diffusers of decreasing size attached to the outer layer to calm down the hot area in front of the gun. The positioning of the concentric diffusers is based on the results of mirror tests.

I wondered if the number of layers was unnecessarily soaking up light and requiring unnecessarily powerful flash output and therefore unnecessarily long recycle times, so after a couple of test sessions in the garden I decided to try it with the two inner layers removed, leaving just the outer layer and the concentric diffusers. I haven't looked at any of the test session images yet, but from what I saw on the LCD (which can be very misleading of course) the light still seemed to be quite nice.

The diffusers weighed about 40 grams each with all three layers. With the two inner layers removed they weigh about 32 grams each. This compares to about 140 grams for my pie tin diffuser.

The diffusers can be arranged in a great variety of ways, as illustrated here. This makes it possible to get the lights close to the subject, as long as the subject permits it and as long as the surroundings permit it.

I have found that it is possible to illuminate some scenes/subjects better than would be possible with a single flash gun, even one that was manoeuverable. For example, images 13 and 14 show a setup like that I used for a spider in a hedge, with the camera aligned along the front of the hedge (which was to the left of the camera). Images 15 to 18 show a setup like I used for a large slug for which I used the 500D closeup lens which has a working distance of around 18 inches.

Image 3 shows a setup similar to one I used several times to illuminate backgrounds separately from the subject in order to avoid dark backgrounds. (In fact the far gun/diffuser was pointing much more away from the subject into the distance. At the angle shown in Image 3 a lot of the light would fall on the subject. As I had the far gun/diffuser turned up to full or almost full power, it was easy for light from it to overexpose the subject, which (with the FZ200) I was exposing at 1/16 power or so from the near gun/diffuser.)

I used a setup that is not illustrated for a spider on the underside of a leaf. I used a combination of illumination from the front, a bit to the side and a bit lower than the camera with one diffuser, and the other one beyond the subject, sending light down and away, pushing light through the leaf as well as illuminating the background.

The arms are strong enough to hold the guns and diffusers in position even in the most awkward positions.

I was operating in a quite strong breeze some of the time. The diffusers act somewhat as sails/wings and obviously move around a bit, but it wasn't a problem. The rig was also surprisingly robust when encountering obstructions. For example I took some photos around the entrance to a wasp's nest which is at ground level with a log above it protruding out in front of the hole. I jammed the diffusers in as close as I could get them, which involved hard contact with solid objects - log and ground. The very thin aluminium bowls of the diffusers will obviously bend if too much pressure is put on them, but the arms have a certain amount of "give" in them which can relieve the pressure on the bowls, and if the bowls do get deformed it is easy enough to bend them back into shape. In fact they work ok even when a bit deformed.

Camera-specific considerations

The flashes work well with the FZ200. With the stripped down versions of the diffusers I was operating at around 1/16 to 1/32 power much of the time for basic, symmetric from the top/front placement of the diffusers. With more esoteric arrangements the power of one or other flash could be much higher, especially when illuminating backgrounds. Even with the more ordinary arrangements adjusting the guns separately was very helpful in getting nice looking (at least on the LCD) illumination.

The KX800 will only work using a mechanical shutter with the G5 and 70D. This means that electronic shutter must be off on the G5 and electronic first curtain shutter (EFCS) must be off on the 70D. That doesn't matter when flash is the dominant light source, but it does matter when natural light contributes a significant proportion of the illumination because of the possibility of shutter shock. As mentioned in a previous post, this is a real problem for the G5 with 45-175 lens. I have not tested for shutter shock with the 70D with EFCS turned off. I'm not too bothered about this with the G5 because if I do use the G5 it will be for night working and very small subjects, and flash will obviously be dominant at night and will probably be dominant for very small subjects. In any case, as described above, it looks like I may not be using the G5 anyway.

The situation with the 70D is more complicated. I think this setup may make flash less problematic with the 70D, in part because of the ability to get the flash guns closer to the subject, which may ease the issue of the amount of power needed and the implications for ISO and/or recycle times. If, working with the FZ200, the KX800 continues to seem like a good idea after my first flush of enthusiasm has worn off, then I'll need to look again at using the 70D with flash.

Creative opportunities. And examples?

I have had five sessions with the KX800 so far. It is a strange and quirky piece of equipment that is going to take some time (if it lasts that long) to get used to and learn how to best use. For example, I have discovered that the best basic configuration seems to involve crossing the left and right arms, as illustrated in images 9 and 16. This allows for a lot of flexibility without putting a lot of pressure on the connections between the arms and the main unit. It does mean though that you have to get your head around adjusting the output of the "wrong" side. And with some of the configurations I found I had to trace the arms to work out which gun to adjust. It also seems that rotation of a gun/diffuser is best done by working on the middle of the arm rather than the potentially rather delicate connection between the gun and the arm.

There is also the issue of how the scene's appearance changes with the angle of attack, distance and power for the individual gun/diffuser, and how they work with or against one another. This appears to be non-trivial, with lots of opportunity to explore options and learn how to shape the illumination of particular types of scenes. I'm sure that there are some general principles to be discovered, but I'm equally sure that there are scene-specific considerations. As I have found with exploring backgrounds for flower images, I think scene illumination is going to turn into an exploratory, experimental and creative endeavour.

Well, I think so, just now. But then again I haven't looked through any of the session images yet so I'm going on what I saw on the LCD as I played. Hopefully I'll be posting some examples out in the forum before too long. Either that or I'll get ready to be truly embarrassed. As always, it could go either way. :D
 
Last edited:
Fly shot is superb, you've got quite a bit more depth of field than I can get with the FZ1000. Here's a Common Blue I did this morning. I'm going to try something else tomorrow as I'm still not 100% happy with this setup. This image is actually pretty sharp around the head, but by the time I have downsized it and uploaded it, it doesn't look very good?

View attachment 44768
 
Fly shot is superb, you've got quite a bit more depth of field than I can get with the FZ1000.

You've lost me Lee. Which fly shot?

Here's a Common Blue I did this morning. I'm going to try something else tomorrow as I'm still not 100% happy with this setup. This image is actually pretty sharp around the head, but by the time I have downsized it and uploaded it, it doesn't look very good?

Can't really tell at this size. I see from the image info that the image is stored at Flickr. It would be good if you used a link which allowed us to click through and see the version at Flickr. That has two advantages. You can post a version at Flickr that is larger than is polite to post here, and we can go to Flickr and see the larger size. Images often look sharper over at Flickr rather than viewing them here.

You need to click on the Share Photo icon at the bottom right at Flickr, and choose the BBCode option.

20859655451_a397c4854d_b.jpg


Choose the appropriate size in the drop down box and copy all of the text in the box. Paste this text into your post and you will end up with something like this when you preview your post and when others look at it.


0772 16 P1090616_DxO LR
by gardenersassistant, on Flickr

Clicking on the image will take the viewer over to Flickr, where they can access versions of different sizes, up to the size at which it was uploaded to Flickr.

The only way I know of doing this (I hope there is a simpler, more obvious way that someone will point out to me) is to click on the "Download" icon at the bottom right and choose "View all sizes".

20231752463_4e63661fd8_z.jpg


You then get to a screen where you can choose which size to view. Not intuitive.

As to downsizing and sharpening, I currently prepare images for viewing at 1300 pixels high, so I sharpen them for that size. If you sharpen when the image is full size and then let Flickr and/or people's browsers do the resizing then what they see won't be optimal. (Even though I post 1300 pixels high at Flickr, if people only look at them here, where I limit them to 800 on the longest side, then they won't be seeing my images as I prepared them for viewing - they won't be as sharp and they may have artefacts that the 1300 pixel high versions don't.)
 
KX800 .... On my unit one of the power increase buttons sometimes doesn't work. I suppose I should do a return.

It turned out that it was not only the button - the flash gun on the same side as the flaky button didn't fire some of the time. I have sent the KX800 back to ukdigital for a replacement. (It's an intermittent fault. I'm a bit nervous they will be in contact saying "we tested it and it worked fine".)

Hopefully I'll be posting some examples out in the forum before too long.

Lots posted, all but one post from the same, nighttime, session.

Nighttime beetle in a wall
Nighttime fly, snail and spider
Six legged spider with some smaller animals
Two nighttime spiders hanging by a thread (or two)
Nighttime weevil
Nighttime woodlice
Nighttime cricket
Afternoon grasshopper


[EDIT: The construction of the diffusers is described in this post. Since then I have had a session with both of the inner diffusion layers removed. That is the setup used for the Afternoon grasshopper shots. I then put one of the inner diffusion layers back, and that is the setup used for the nighttime shots linked here. So for these there were two complete diffusion layers, plus the concentric part layers.]

Although it's already apparent to me that I can do things with the KX800 that previously I couldn't, like illuminating dark backgrounds, it isn't straightforward and It's obviously going to take some time and practice to get a feel for how best to use it. For example, background illumination only works some of the time depending on how stuff (foliage etc) is physically distributed. Getting a good balance between the two guns is important, because you can get some rather unnatural effects otherwise. I don't know if it just a coincidence, but I found myself using some different post processing techniques, in particular using exposure gradients to rebalance the lighting (something that I've never used before).

I went out this afternoon looking for small subjects and with the KX800 gone I reverted to my pie tin diffuser. I very quickly missed the flexibility of the KX800. On the other hand, I appreciated the simplicity of the pie tin diffuser. There is nothing you can do to change the lighting other than flash exposure compensation for the single light source and a small amount of rotation of the flash head/diffuser bowl. I wasn't spending time fiddling with the arms and the flash levels, which meant I got to subjects faster and more often had an appropriate level of illumination from the first shot, and so I captured some images I think I would have missed while rearranging the KX800 arms and flash levels.

I recently bought a G5 as an upgrade for my G3. It does have better operating characteristics than the G3, and can produce better image quality too, especially with natural light flower shots at higher ISOs. However, in the areas in which I have seen it as the preferred tool, very small subjects and night shooting, it is looking to me, subject to some more testing and image quality evalutation, that the FZ200 may be better in those areas. Given that these tests have not revealed any other areas in which the G3 might be the preferred tool, I think I may be dropping the G3 and going back to using two cameras, the 70D for natural light shooting and the FZ200 for flash work.

I am content that the images linked above show that the FZ200 is ok for night shooting, which seems to bring me close to a two camera solution, dropping the G5. However, I started looking at one of my FZ200 small subject test sessions today and wasn't impressed with what I saw. Very little was in focus. It wasn't a fair test, because I had only looked at a few when I decided to go out and look for some small subjects to test the G5 with.

I changed my arrangement of achromats. Mark Berkery recently mentioned that he uses two Raynox 250's stacked. He works with one on the camera and then puts the other one on when he wants some extra magnification. I have used the Raynox 150 and 250 stacked when I want more than the 250 provides. I did some measurements.

20695821380_0621dcb28d_o.jpg


So on the G5 I would get roughly 1:2 to 2:1 with the Raynox 250, 1:1 to 3:1 with two 250s, and 1.5:1 to 5:1 with the Raynox 202. That seemed like a nice split, so when I went out looking for small subjects to test the G5 on those were the three close-up lens setups that I used.

For once I found some springtails (the easier, larger, longish ones rather than globbies), and some other things that were a bit smaller, as well as some larger subjects. I used all three setups and used a mixture of manual and autofocus (which was usable all the way to 5:1, although manual focus was better some of the time). Most of the time I used the 250s, taking the second one on and off as appropriate. I did use the 202 some of the time, and enough to conclude that unlike on the FZ200, the 202 seems very usable on the G5.

And there is no vignetting to worry about with any of these close-up lens setups on the 45-175. This avoids the bother with the FZ200 of having to check what zoom you are using so as to avoid vignetting, and avoids the annoyance of getting vignetting when not paying sufficient attention to the amount of zoom.

I felt really comfortable with the G5 with the single/double 250 and 202 setup. Subject to the images coming out ok in terms of quality, I think I will be staying with three cameras.
 
Last edited:
Fascinating thread with lots of detailed shots and great advice from Gardnershelper. Thanks
 
It will be several days before the 250D arrives and I can test it.

The 250D arrived today. I won't be using it.

I did a ruler test with the Canon 250D (+4 diopters), Raynox 150 (+4.8 diopters) and Marumi 200 (+5 diopters) mounted on the adapter tube on the FZ200.

The first thing I noticed was that I was having difficulty getting autofocus to lock on with the 250D.

With all three of these (and my other achromats) you have to get the distance within a certain range before autofocus will lock on. I'm used to that. You just move the camera a bit and try again until you do gain focus. I'm used to this being quick and easy with the Raynox 150 - I can see the image go in and out of focus as I change the distance to the subject so I can tell which direction to move in and can tell when I'm at a good distance because the image looks sharp. This is without me having to half press the shutter button to test the focus. When the image on the LCD gets to a certain degree of sharpness I know that autofocus will work.

With the 250D I didn't get clear visual signals about the direction to move in and when to stop. The image on the LCD didn't come into sharpness and I had to try gaining focus by half pressing the shutter button, and then moving one way or the other (I couldn't tell which way to go, or how far to go) and trying again. Very hit and miss. And slow. Not nice.

I shot raw using flash and with each of the three achromats captured a shot at minimum aperture of f/8 (because that is what I use almost all the time) for each of:
  • 2cm scene width
  • 4cm scene width
  • The minimum scene width I could capture
  • The maximum scene width I could capture without vignetting
I normally capture a number of shots of each combination of settings etc when I'm doing these tests, but by the time I did these shots (carefully so I could use them as illustrative comparisons) I had already seen what the situation was. Even looking at the results on the LCD it was obvious what was going on. No pixel peeping required.

I then loaded the raw files into Lightroom using my standard (very gentle) import adjustments and exported full size JPEGs at 60% compression (low, but entirely adequate for this type of comparison work). When I viewed at 100% the results were shocking. The 12 full size JPEGs are in this album at Flickr, along with six comparison screenshots captured from Faststone Image Viewer showing the centre, left edge and right edge at 100% for the 2cm and 4cm scene widths.

Here is the left hand edge of the 2cm scene width shots (the full size version of the screenshot over at Flickr shows that the chromatic aberration with the Marum 200 is rather worse than it appears at this size).


0774 14 2cm scene width, left edge
by gardenersassistant, on Flickr

The 250D, on the left, is horribly soft. The Marumi 200 on the right is better, but has significant chromatic aberration (that is not so bad as it can be corrected, but it also sometimes suffer from blue fringing, which is much more difficult to handle).

It is the same on the right edge, and similar in the centre as far as sharpness goes. The 4cm scene width shot shows the same type of differences as far as sharpness is concerned, but to a lesser (but still significant) extent.

I bought a 250D several years ago but sent it back after doing a comparison. I assumed I had been unlucky to get a bad copy, but decided just to ask for my money back as I was happy with the Raynox 150. This result means that either I have been extremely unlucky getting two bad copies, or the 250D simply isn't very good. In either case, I think I've given it a fair chance, and I'll stick to the Raynoxes as both my 150's and both my 250's give good results, as do a 150 and 250 stacked, and I suspect (haven't checked last night's images yet) the 250 and 250 stacked. In contrast, when I stacked the Canon 500D (which is fine) with the Canon 250D it was I think even worse than with the 250D alone.
 
Last edited:
Back
Top