Bridge, MFT, achromats, dSLR, primes - a journey of exploration

Interesting post Nick. I'm changing systems at the moment (Canon to Fuji)

Why the change Mike?

Is that the RX10 or RX10 II?

Not sure if I could live with reduced sharpness to get increased dof though - hmm.

Is this a general comment Mike (in which case I can understand it, although of course you know my view about it), or is it equipment-specific? (in which case I don't understand it)

Been idly pondering a Sony RX10 (top end bridge with 1 inch sensor and 24-200 lens f2.8 lens) - it could make a good macro camera with a Raynox on I reckon.

Overall you would have one stop less control over dof with the RX10 (f/2.8 to f/16 for the RX10 versus f/2.8 to f/22 with the Canon and 100 Macro). Here is how that pans out.
  • f/16 on the RX10 equates to about f27 on Canon APS-C, so you could get half a stop or so more DOF (and diffraction) than with the Canon 100 Macro, which is f/22 minimum I think. Although from what you say you may not want to go there.
  • f/2.8 on the RX10 equates to about f4.8 on Canon APS-C, so you would have about a stop and a half less in terms of minimum DOF. This would only matter to you if you are into narrow DOF images. If you normally use f/5.0 or smaller then there wouldn't be an issue.
Personally I don't fancy a swivelling LCD (as against the side articulated one I use for macro work) - no good in portrait mode. But presumably you are in the habit of using the viewfinder so that wouldn't be an issue for you.

Have you checked out how much zoom is left to you with a Raynox on the RX10 after dismissing any zoom range that has vignetting? The RX10 is fairly wide at the wide end and the tele end is relatively short, so I don't know how that would work out.
Will give me something to think about until the weather gets better :)

I've been experimenting with my Panasonic TZ60. It is more useful that I would have imagined, especially when applying DXO Prime noise reduction to its raw files like I do for the FZ200. But that isn't appropriate here as it isn't for closeups (apart from some flowers perhaps - although the 70D will always be better for that, when I have it to hand - and perhaps later in the year for larger insects like butterflies, damselflies, crane flies etc). I've been writing it up a bit at the dpreview Panasonic small cameras forum instead. I don't think there's a suitable forum here.
 
Why the change Mike?
Hmm - you may well ask! Partly a whim and partly as I have heard good things about the Fuji system and know a fair few other togs who have switched. So I have an Fuji XT-1 now with a general lens and a wide angle. Still have my Canon and a 100 prime for macro - at least for the time being ...

Is that the RX10 or RX10 II?
Was looking at the Mk1 - second hand for about £300 seemed reasonable.

Is this a general comment Mike (in which case I can understand it, although of course you know my view about it), or is it equipment-specific? (in which case I don't understand it)
A general comment - doing it 'my way' I get great sharpness but inevitably large areas out of focus, whereas 'your way' everything is in focus but perhaps not quite as sharp. I've tried stacking and found it a faff to be quite frank as the bugs are liable to moving around (as am I) so this didn't really work for me. It's a classic unsolvable conundrum which photography is full of.

Overall you would have one stop less control over dof with the RX10 (f/2.8 to f/16 for the RX10 versus f/2.8 to f/22 with the Canon and 100 Macro). Here is how that pans out.
  • f/16 on the RX10 equates to about f27 on Canon APS-C, so you could get half a stop or so more DOF (and diffraction) than with the Canon 100 Macro, which is f/22 minimum I think. Although from what you say you may not want to go there.
  • f/2.8 on the RX10 equates to about f4.8 on Canon APS-C, so you would have about a stop and a half less in terms of minimum DOF. This would only matter to you if you are into narrow DOF images. If you normally use f/5.0 or smaller then there wouldn't be an issue.
Thanks - that is interesting.


Have you checked out how much zoom is left to you with a Raynox on the RX10 after dismissing any zoom range that has vignetting? The RX10 is fairly wide at the wide end and the tele end is relatively short, so I don't know how that would work out.
No I haven't got that far into it yet - I'd probably have to buy one and 'suck it and see'...

I've been experimenting with my Panasonic TZ60. It is more useful that I would have imagined, especially when applying DXO Prime noise reduction to its raw files like I do for the FZ200. But that isn't appropriate here as it isn't for closeups (apart from some flowers perhaps - although the 70D will always be better for that, when I have it to hand - and perhaps later in the year for larger insects like butterflies, damselflies, crane flies etc). I've been writing it up a bit at the dpreview Panasonic small cameras forum instead. I don't think there's a suitable forum here.
Again interesting thanks - a premium compact eg Sony RX100 has also tempted me but no firm conclusions yet - I may just stick with my Canon rig and try and optimise what I have. The other side of it of course is the lighting and whatever I do it would have to involve my MT24-ex which mounts on the front of the lens so there are some restrictions there to be factored in.

Thanks again for taking the time, it's most appreciated. :)
 
a premium compact eg Sony RX100 has also tempted me but no firm conclusions yet

The 1" sensor seems to be getting quite popular. Have you seen the recently announced Panasonic TZ100? Also 1", and compact, but with a 10X zoom, 25-250. Fixed LCD though.

Have you read about Panasonic's 4K photo facility built into its more recent cameras, and its postfocus facility? Might want to check them out before deciding if you are going for a compact, although I imagine postfocus would be of more interest in a camera you were using for macro, because you can get a set of images focused at different focus points, which could be useful either to get the best focus placement or to get source files for stacking - were one into that. Still, even in a compact it might be useful. For example I might use a compact as my butterfly etc camera, so I might find it useful.
Intriguing! I'm off to Google right now :)
 
I have been thinking about photographing butterflies and other large insects such as damselflies, dragonflies and crane flies. I have previously written about the difficulty of getting a sufficiently magnified view of them from a sufficiently large distance to avoid scaring them away. I can get the magnification I want using the Canon 500D closeup lens on any of my cameras, but the working distance is sometimes too short. On the other hand I can get a larger working distance by taking off the 500D, but then the magnification is sometimes too small.

Following yesterday's discussion with Mike in this thread I decided to see whether my Panasonic TZ60 could be my "butterfly" camera. It is a high zoom (24-720mm equivalent) travel camera. It has a small, 1/2.3" sensor, but I'm ok with that because my go to camera for invertebrates, the FZ200, uses that size sensor. The TZ60 is small and would be a trivial addition to the other equipment I lug around. I have been exploring the potential of the TZ60 recently (not in a macro/closeup context) and have been quite pleased with what I can get out of it with careful post processing.

I have done some measurements with the Canon 70D with 55-250 STM, the Panasonic G5 with 45-175, the FZ200 and the TZ60. For the first three I did measurements with and without the Canon 500D attached. (You can't use any add-on lenses with the TZ60.)

For the measurements without the 500D I used full zoom and photographed a ruler from as close as possible to measure the scene width. For the shots using the 500D I shot from as close and as far as possible, noting the scene widths for each. Here are the results. (One little quirk. The 80mm scene width for the FZ200 without the 500D is a fudge. I have two FZ200s and it turns out that they focus differently. One can achieve a minimum scene width of 79mm, and the other 82mm.)


Scene widths and working distances with lenses at full zoom
by gardenersassistant, on Flickr

It seems that the TZ60 wouldn't really help, unless I needed to be a particularly long way from the subject. It looks to me like the FZ200 gives the best combination of working distance and scene width. (Bear in mind that these are minimum scene widths/maximum magnifications. I can of course get decreased magnification by zooming back from full zoom.)

Last year I was using the FZ200 for flash shots and the 70D for natural light shots. However, now I'm using DXO Prime noise reduction I'll be happier using the FZ200 for natural light shots, because I'll be better able to raise the ISO if I need to despite the very noisy sensor on the FZ200. I bought a spare FZ200 last year in case they got difficult to get hold of after the FZ300 became available, so I can now envisage a different two camera solution - using both FZ200s. One could be used (mainly) with the Raynox 150, 250 and MSN-202, which are most often flash shots, and one used for (mainly) natural light with the bare camera and with the Canon 500D. This would be for trips out to the nature reserves to shoot invertebrates. For flowers, in the garden, the 70D will remain my favoured camera because I think it renders flowers better and it lets me use narrower DOF than I can with the FZ200, and I do sometimes want to use quite narrow DOF for flowers (not APS-C f/2.8 type narrow DOF, but narrower than the maximum aperture of f/2.8 of the FZ200 can deliver).
 
Using DXO Optics 10 is like having a sensor upgrade for my noisy, small sensor FZ200, which is my camera of choice for invertebrates. However, it has complicated my post processing workflow and made my post processing more time-consuming. I think I may have streamlined the process.

It started with @DetailMan over at dpreview giving me some background information about DXO and the work they put into researching the camera-specific elements of DXO Optics Pro. For example, one of the things I had noticed was that DXO's geometry correction gave a different result from that of the out of the camera JPEGs and Lightroom, those two versions being identical. It seems that it may be DXO that has it correct. He also mentioned DXO's microcontrast enhancement, which for some reason I have never tried, but a quick test looked promising. I thought I might as well also try DXO vignetting correction. (This will/may correct vignetting arising from the lens characteristics at the focal length used. I also get vignetting at some focal lengths arising from the use of closeup lenses on a fixed lens adaptor. DXO will not touch that.)

So, I picked a set of images from my backlog to work on - a relatively small one from last June, containing 285 raw files of invertebrates captured in our garden. I used the same 3-stage process as before: initial selection in Lightroom, batch processing in DXO, and back to Lightroom for image-specific processing, final selection and output as JPEG. However, I simplified the process.

In the first stage I speeded things up by simplifying the processing, doing only enough (which was none in a lot of cases) so I could tell whether an image was sharp enough, with well placed centre of focus and adequate DOF to be useful and didn't have obvious nasties like legs chopped off, foliage obstructing parts of the subject etc. As usual, I copied the selected raw files (137 of them in this case) to another directory and pointed DXO Optics Pro at them.

The DXO processing is a batch process, using the same settings on all the files. I simply select them all, apply a preset and set the batch off. In this case I used a preset specifying DXO Prime (raw only) noise reduction, deconvolution deblurring ("lens softness" correction), geometry and vignetting correction, and microcontrast enhancement (I guessed a suitable value for this based on a couple of quick experiments). The batch took 62 minutes to process. (Two images are being processed at any one time. I checked the processor usage and all four processors were being used 100%, so the processing must be multi-threaded - this is on 64-bit Windows. However, even though all the processors were fully loaded, the system remained responsive, and I could browse and use Lightroom while the batch was processing. DXO is very well behaved.)

The batch process exported the processed files in DNG format back into the Lightroom directory. I then used two further simplifications. I have previously copied the settings from the first stage processing from each of the selected raw file to the associated DNG file. Even though this can be done for each pair with two or three mouse clicks it does take time. This time I didn't do this pairwise copying. This simplification worked in combination with the second simplification, which was to use Lightroom's Auto Tone button, which adjusts the Exposure, Contrast, Highlights, Shadows, Whites and Blacks. This appears to do a horrible job, messing up the image, but it turned out that pulling down the Exposure, and often also the Highlights, was often all that (to my eye) was needed, and if other adjustments were needed to Shadows etc it provided a good starting point. This proved to be much faster than going back and forth between these six sliders for each image as I was previously doing.

Unlike previously, I didn't adjust the sharpening for individual images, instead using the default, mild sharpening for all of them, and using the same sharpening mask (to avoid sharpening plain areas) for all of them. I didn't use any Lightroom noise reduction. Previously I had used a mild amount of Clarity and a very mild amount of Vibrance. This time I left their sliders in the default, neutral position.

I could then do any fine tuning, for example applying graduated filters in a few cases to even up the lighting, pulling down the luminance and saturation of the Yellows on a Choisya leaf which as usual was overly (unpleasantly and unrealistically) yellow, and going back and forth amongst the images of a particular subject so as to get them more consistent in illumination, colour etc. I also applied a second selection at this stage, dropping images that on closer examination didn't appeal, or were too similar to other images of the subject.

As usual I exported from Lightroom as 1300 pixel high JPEGs, using Sharpen for Screen with the Standard setting.

In what, thinking about it, is I suppose a fourth stage (and 5th, and 6th stage?), as usual I examined the images in XnView (because, unlike Faststone Image Viewer, this uses proper colour management and renders the images very nicely) to make sure they looked ok, and then reordered them in FastStone Image Viewer to the order I wanted them to appear in the Flickr album, and applied my usual naming convention to the file names (done as a batch process in Faststone), and then exported to Flickr and made archive copies on a separate hard drive.

From the initial 285 images I selected 137 in the first stage and cut this down to 73 in the third stage. Those 73 are in this album at Flickr, with 8 of them posted in this thread in the forum.
 
Last edited:
I made the following post over at dpreview this afternoon as it may be of interest to users of small sensor cameras like the FZ200 camera that I use. However, it is very much in the spirit of this thread so I thought I would copy it, as is, into this thread. The background may read slightly oddly for this thread - regular readers will understand that I have been a little economical with the background details. :)


Comparison of FZ200 and Canon 70D for hand-held shots in poor light


Background

For me, this is a practical question to do with photographing botanical subjects hand-held in poor light with one or other of these cameras. I have explored this with some real world, practical tests. However, I think the results may be of wider interest (possibly including a bit of a surprise).

I'm in a windy area in the south west of the UK. I usually use my Canon 70D to photograph flowers, buds, bushes etc. I usually work hand-held, often in breezy conditions (which can require faster shutter speeds) and in poor light (where getting a fast enough shutter speed can be problem even in still air). I'm often confronted with the need to use somewhat high ISOs in order to get fast enough shutter speeds.

Sometimes it would be handy to use my FZ200 for flowers etc. But would this be practical?

Approach

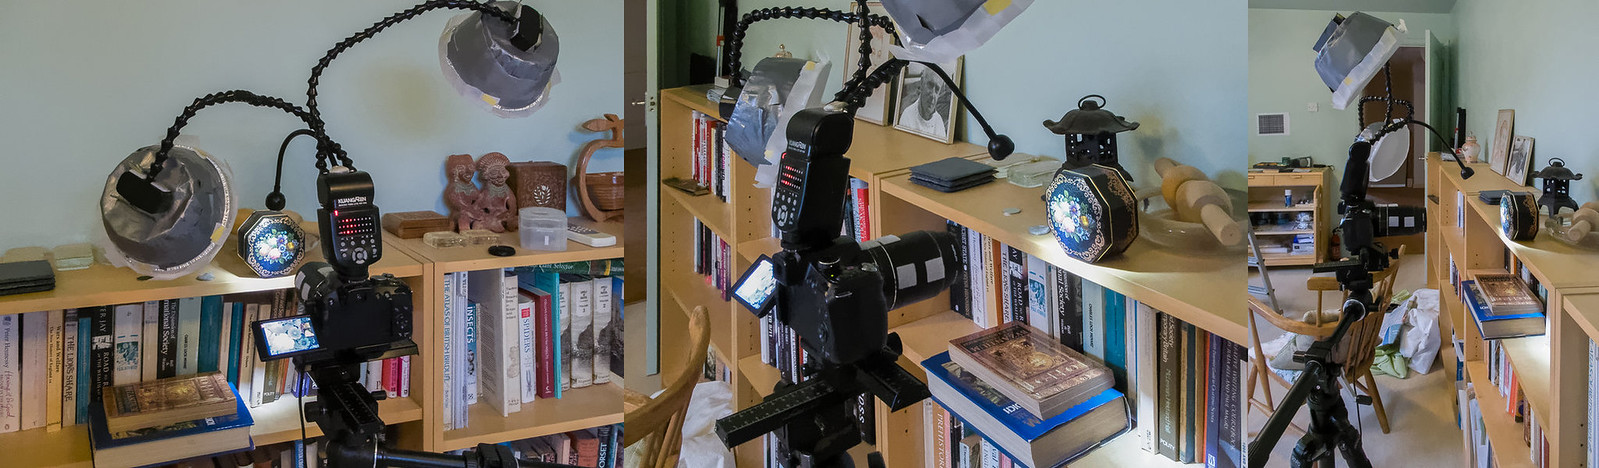
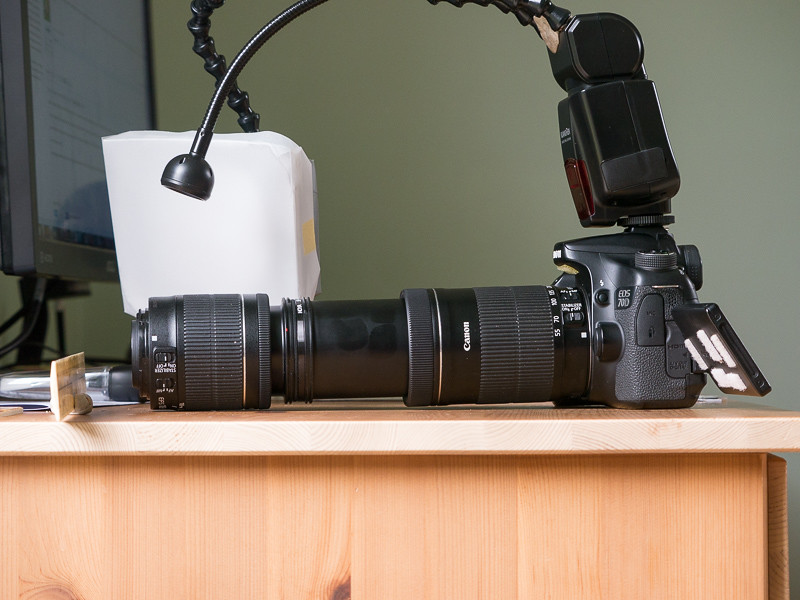
I decided to capture a set of shots using each camera in turn (using a 55-250 STM lens on the 70D). I wanted the pairs of shots to have the same angle of view and the same depth of field so I was comparing like with like. I decided to the use the same shutter speed for each pair of images. This was because shutter speed can be the limiting factor for this sort of work.

The depth of field depends on the angle of view and the aperture. The angle of view was going to be the same for each pair of shots (or as near as I could get it). Because of the difference in sensor size, in order to get the same depth of field the aperture would ned to be 3 and 2/3 stops smaller for the 70D. So for example if I was using f/4 on the FZ200 I would need to use f/14 on the 70D. f/2.8 on the FZ200 would need f/10 on the 70D. This relationship can be calculated using the Cambridge in Colour Depth of Field Equivalents calculator on this page .

In order to get the same shutter speed the ISO would need to be higher for the 70D. Other things being equal, the 3 and 2/3 stops difference in aperture would need the ISO to be 3 and 2/3 stops higher on the 70D. This would mean that using ISO 100 on the FZ200 would need ISO 1250 on the 70D, ISO 200 on the FZ200 would need ISO 2500 on the 70D etc.

However, as I started with the first test scene I discovered that the FZ200 and the 70D don't agree about what exposure is needed. With both in aperture priority mode and using evaluative metering with exposure compensation set to 0 stops, in order to get the same shutter speed the 70D ISO needed to be set at 2 and 2/3 stops or 3 stops higher than the FZ200 rather than the 3 and 2/3 stops that theory suggested. (Although the lighting was very even the shutter speed would sometimes vary by 1/3 stop from shot to shot when repeatedly taking the same shot with the same camera.)

Given this difference in exposure evaluation, I decided to capture a scene with one of the cameras and then equalise the shutter speeds by altering the ISO as necessary on the other camera. This led to using ISOs that were consistently 2/3 or 1 stop less than predicted by theory on the 70D.

Working hand-held, I captured 3 raw shots of each of 9 scenes with each camera.

The light level was quite low, so even though I was using f/2.8 and f/4 on the FZ200, and ISOs of up to 500 on the FZ200, I still got shutter speeds as low as 1/50 sec. I was using image stabilisation on both cameras, but even so 1/50 was quite slow, given that I was using 375-600mm equivalent focal length. For the 9 scenes the shutter speeds were fairly evenly spread between 1/50 and 1/250 sec.

The results were quite variable, especially at the slower shutter speeds, and the first thing I did after importing the raw files into Lightroom was to pick the best of each set of three and base my comparisons on those. In order to make it easier to do like for like comparisons I exported the selected files as JPEGs with a common height of 3000 pixels.

I also wanted to compare the pairs after applying my routine DXO Optics Pro 10 batch processing of Prime noise reduction, “lens softness” correction and mild Microcontrast enhancement, as this is my standard approach before finishing off with image-specific processing in Lightroom. Having done this DXO processing I imported the processed files into Lightroom and exported them to JPEG, again as 3000 pixels high.

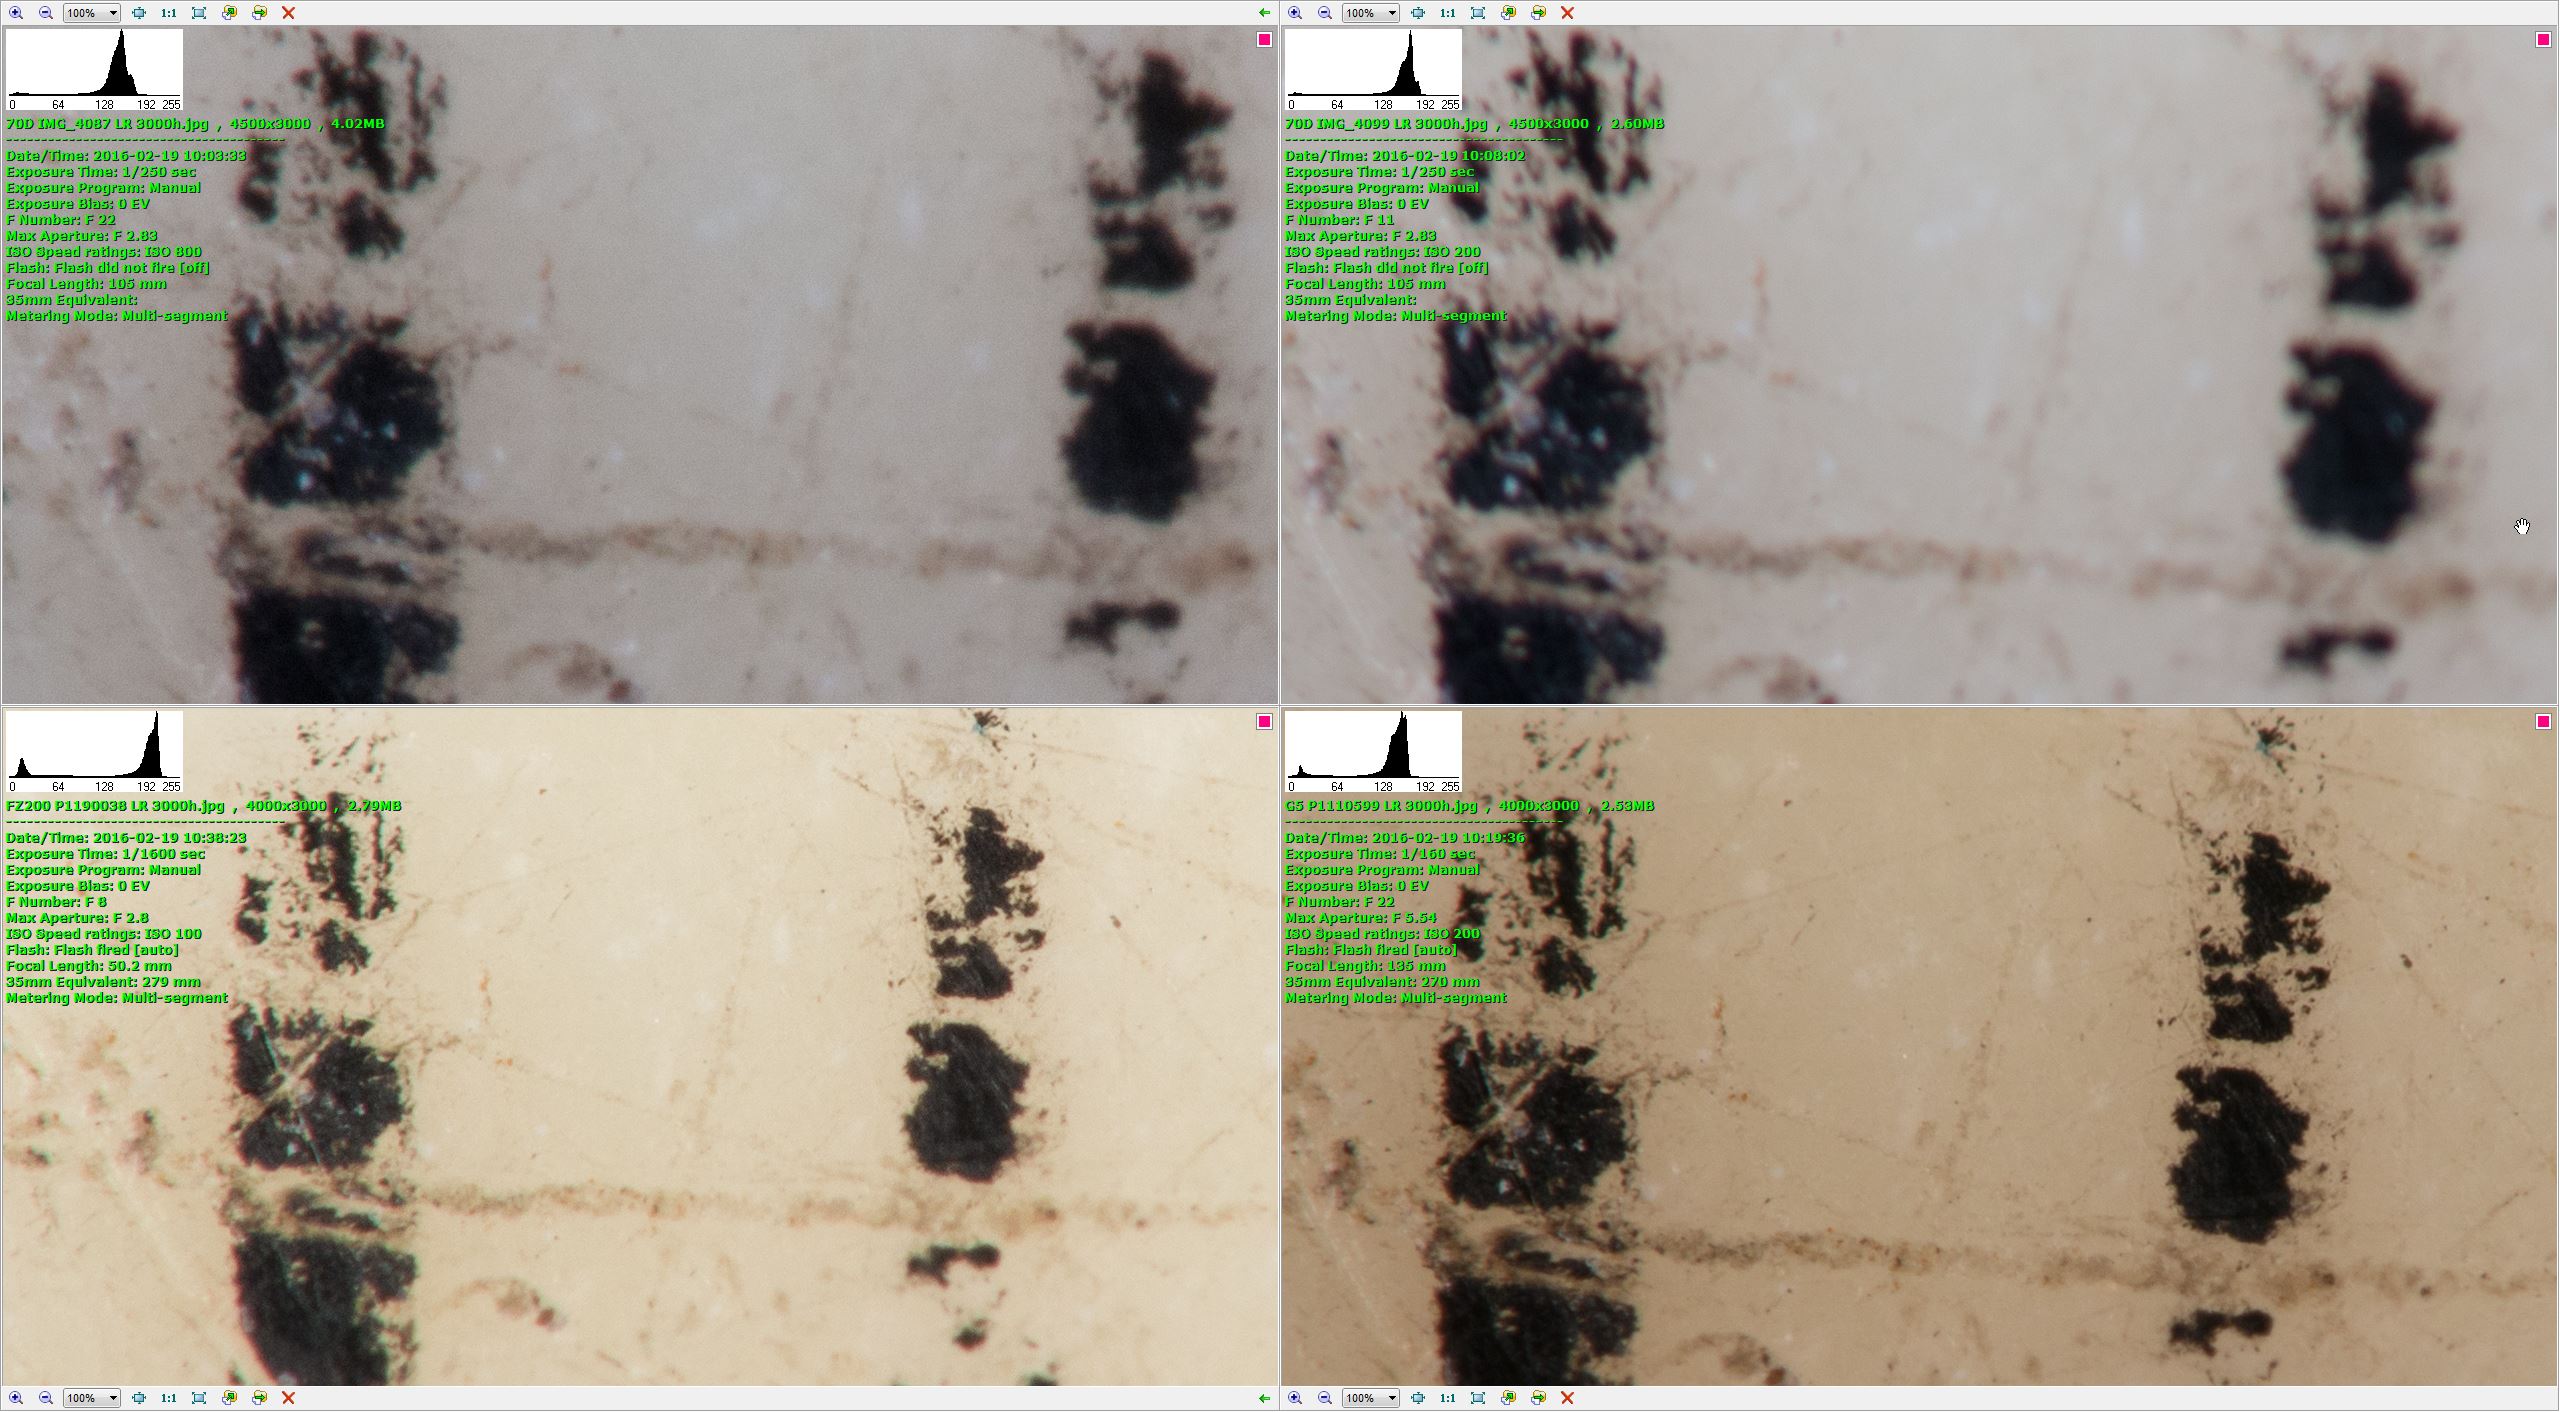
I then used Faststone Image Viewer to compare the four images I now had for each scene, two from each camera, one with and one without DXO processing. At this stage I did most of the comparison at 100%, as illustrated in this screenshot.


0814 Comparison 2a - Subject
by gardenersassistant, on Flickr

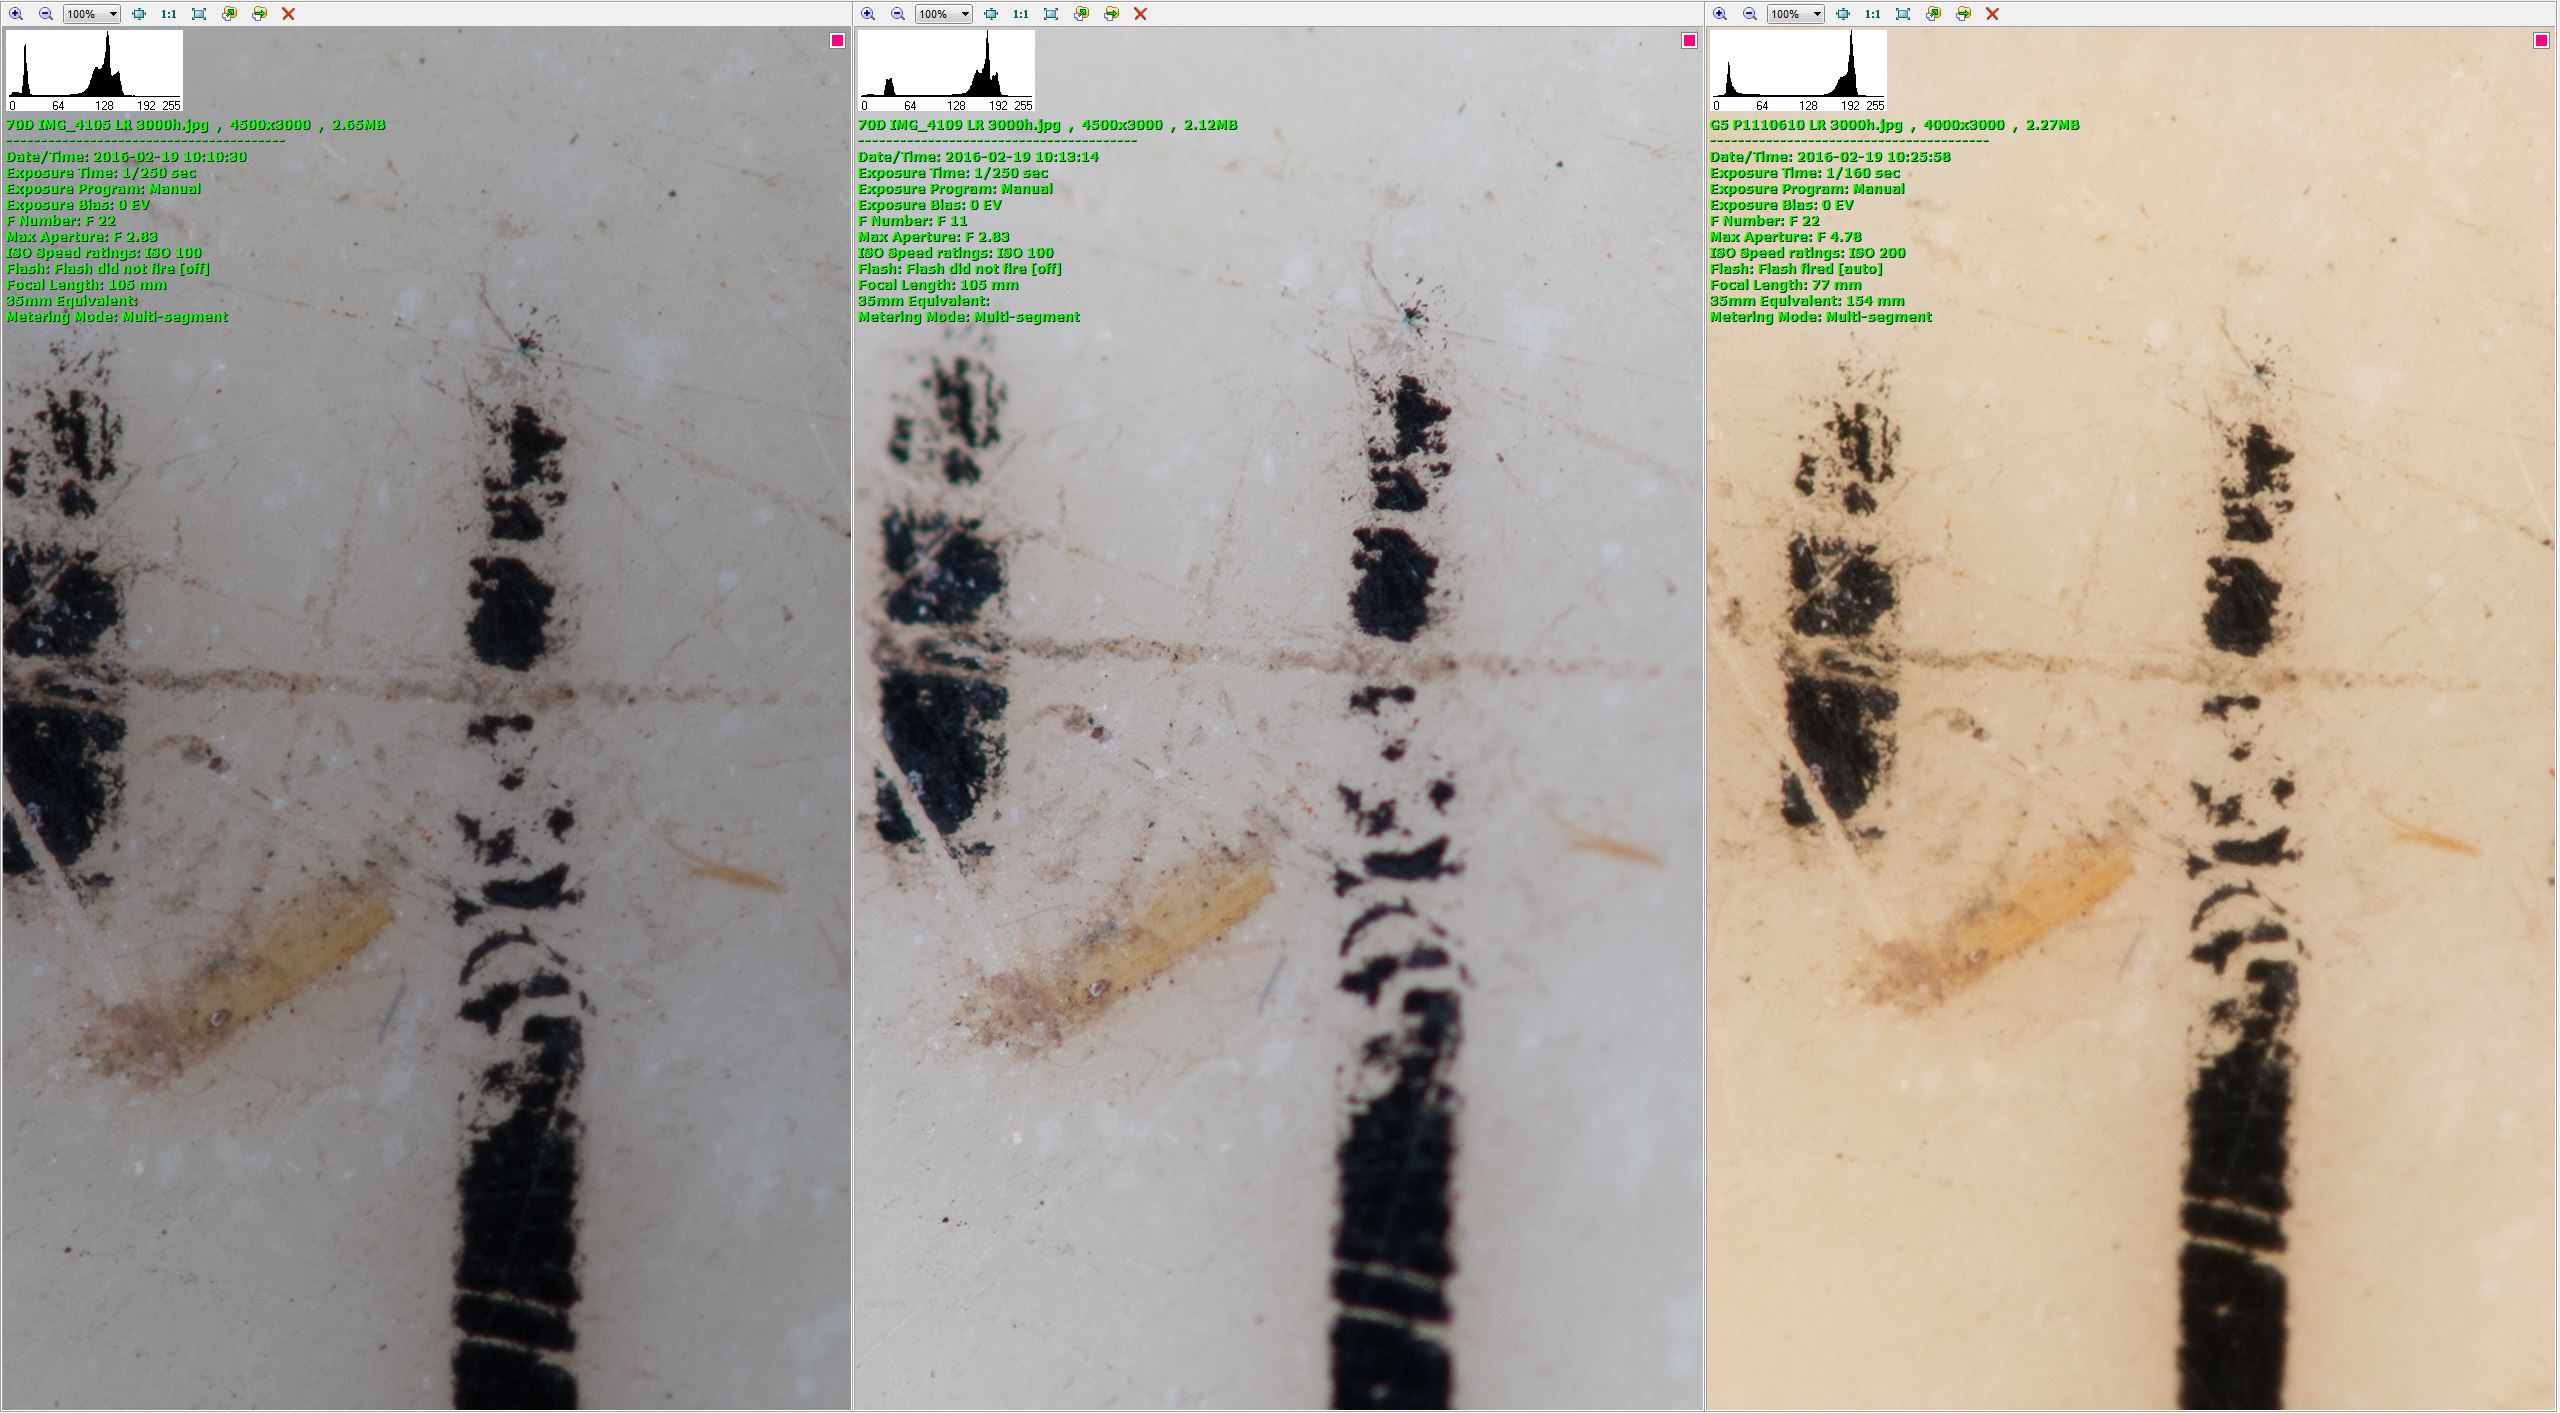
The two 70D images are at the top, the FZ200 images at the bottom. The versions taken straight out of Lightroom are on the left, the versions with DXO processing applied are on the right. In this cases I was looking at the subject, comparing sharpness, clarity, detail. Here is another view of the same scene, this time examining the noise in the background.


0814 Comparison 2b - Background noise
by gardenersassistant, on Flickr

The following table summarises the notes I made while doing these four-way comparisons.


0814 Observations on poor light equivalent comparison shots
by gardenersassistant, on Flickr

This album at Flickr contains screenshots of the four-way 100% comparisons, one screenshot for some of the nine scenes, and two screenshots (subject and background) for the others.

This album at Flickr
has versions of the images which are 3000 pixels high so you can take a closer look at some of them if you like. They have been saved with JPEG 60 compression so as to make the upload speeds bearable (I don't have a fast internet connection). The compression lowers the quality, but I believe they are good enough for comparison purposes. I didn't think clearly about this and should preferably have upload full size images, but I had got too far through the process before I realised this and couldn't stomach the reworking that would be needed. This means that for 8 of the 9 scenes, which are landscape orientation, the FZ200 images are full size. Those images are downsized for the 70D. For the first comparison, which is portrait orientation, both the FZ200 and the 70D images have been downsized.

As well as comparing the pairs of images from the two cameras, I was also interested in whether either or both of the cameras could produce usable results at these quite high ISOs. My normal outputs are images processed for viewing at 1300 pixels high on screen, so I created a version of each of the 36 image versions at this height. They are in this album at Flickr .

Thoughts/conclusions

Even at the quite high ISOs I was using (up to ISO 500 for the FZ200 and up to ISO 4000 for the 70D), I felt that both cameras were, at least some of the time, capable of producing results for this sort of subject (which is less demanding than hairy insects etc) that I would be prepared to post online at 1300 pixels high for others to view (subject to having managed to make a captures at a still enough moment to get a tolerably sharp image) without feeling embarrassed about the image quality. Apart that is from some of the smooth backgrounds where there was sufficient posterisation caused by the DXO processing (even without raisings shadows) to make me doubtful about using the images, and my normal image-specific adjustments could make this problem worse (e.g. I raise shadows a lot). Surprisingly (to me at least), there were hints that this problem was worse with the 70D.

Overall I felt the comparisons confirmed my preference for using the 70D over the FZ200 for this type of shot. Some of the reasons for this are in the above table of comments on the 100% comparisons. But I found it impossible to tell from these 100% views how significant the differences I saw would be when looking at images at my normal output size. It was when I later looked through the 1300px high DXO-processed versions that I was convinced that there were some significant differences. The 70D versions of first three and the 7th scene looked significantly better to me than the FZ200 versions, while the FZ200 version of the 6th scene looked significantly better to me than the 70D version.

With only 9 scenes to compare, and not having applied image-specific post processing, I don't think this is enough to be fully convincing, but it does chime with my previous experience with botanical work with these two cameras.

(By the way, this is not an assertion that the 70D is a better camera. That depends, for me at least, on the context, and as it happens for me the FZ200 is clearly better than the 70D for flash-based photography of insects etc.)

What is perhaps surprising (if you haven't read about equivalence) is the similarity in the noise characteristics at such different ISOs and with such a large difference in sensor size. I knew that in theory they were likely to be similar (subject to possible differences of processor generation and design etc), but I was still surprised at the similarity.

As a side note, when I was doing the initial selection of the best from each set of three images I did wonder if the 55-250 STM on the 70D was providing better image stabilisation. I have done another set of comparisons today to investigate this (10 shots at 400mm equivalent with each camera of 5 scenes, all at quite low shutter speeds). The results were very variable but I couldn't discern any pattern that suggested the 70D image stabilisation was any better, or any worse, than the FZ200 stabilisation. Here too though, that probably isn't a large enough sample to be entirely convincing.
 
I have done another comparison of the Marumi 200 close-up lens and the Raynox 150. The reason for doing this is that I decided last summer not to use the Marumi 200 because it came out badly in some tests I did comparing it to the Raynox 150. However, I recently came across some more wasp images in my backlog and some of these used the Marumi 200. They seemed to turn out ok and I posted some in this thread. This made me wonder if I had made a mistake in my previous comparison.

I am interested in the Marumi 200 because it is the almost exactly the same power as the Raynox 150 (5 diopters versus 4.8 diopters) but it has a larger diameter than the Raynox 150 and therefore vignettes less than the Raynox 150 on the FZ200. This means I can use a significantly larger range of magnifications with the Marumi 200 and given my style of shooting, which involves lot of magnification changing, that is very appealing. And I recall that when I used the Marumi for the wasp test sessions I very much enjoyed using it.

So, to test the Marumi 200 again, this time with as much care as I could muster, I used three test scenes: a coin, a calendar and the (slightly rounded) top of a painted tin.


0816 Test scenes
by gardenersassistant, on Flickr

I set up the FZ200 on the tripod to get as close as I could to capturing exactly the same shot with each close-up lens.


0816 Test shot setups
by gardenersassistant, on Flickr

Because the two close-up lenses are slightly different in power they have slightly different working distances, so when swapping them over I had to move the camera a little closer/further away. I had it lined up so I could do this by racking the focus rail slightly in or out. After changing the working distance I also had to change the amount of zoom slightly to try to get back to the same scene coverage. I did not manage to get the scenes precisely the same with the two close-up lenses, but it was quite close.

With the first subject I captured a raw shot using the Marumi 200 at f/2.8, f/4, f/5.6 and f/8 (the full range of apertures available on the FZ200). Fortunately, the KX800 is calibrated in half-stops, so I could increase the flash power by one stop (1 half-stop increment on each light) as I decreased the aperture by one stop. I then swapped the Marumi with the Raynox 150, adjusted the working distance and zoom, and took the same series of four shots. I did the same sequence for the other two scenes. The illustration above shows the setup for the third scene.

I imported loaded the raw files into Lightroom with everything set to neutral apart from the default colour noise reduction and default mild sharpening.

I did some comparisons with the images fitted into the Lighroom main window (i.e. not pixel peeping) and at each of the four apertures there were obvious, large differences with the first scene, strongly in favour of the Raynox 150. There were clear differences in the second scene and also differences in the third scene, although I had to look more carefully to see them. I then zoomed in for a closer look. This graphic illustrates the differences I saw with the first scene. These crops are taken from the f/4 images, and are 100% crops which were then downsized to make the graphic manageable (i.e. we are looking here at less than 100%. (I think it is probably 50%.)


0816 Marumi 200 vs Raynox 150 flip comparison
by gardenersassistant, on Flickr

The Raynox images were slightly sharper in the centre, but moving away from the centre the Marumi images rapidly became softer and softer, and this was the case in the direction of, and at, all four corners. The same pattern was visible in the other scenes.

Images 1.1.1 to 3.5.2 in this album at flickr show pairs of 100% crops from the three scenes, cropped from the centre, some of the corners and some of the areas half way between the centre and a corner. The following images in the album (from "Scene 1 F2.8 Marumi ..." through to "Scene 3, F8 Raynox") are 1300 pixel high versions of the complete images to give an overall impression of the significance of the differences at (my) normal viewing size.

The first image proved difficult for both lenses. Both had fringing (and possibly also some chromatic aberration in the case of the Marumi). The fringing was was worse with the Marumi, in two senses. First, there was more of it - in some pairs, the Marumi version had some fringing but the Raynox version didn't. Second, it was more difficult to deal with. The Raynox fringing was concentrated into tight lines which disappeared completely with the application Lightroom defringing. The Marumi fringing was more diffuse and while some of it could be removed with Lightroom defringing and Chromatic aberration removal, some could not, as this graphic illustrates.


0816 Fringing
by gardenersassistant, on Flickr

There was some worse fringing in the bottom left hand corner of Scene 1. Lightroom Defringing removed the purple fringing from the Raynox images, but neither Defringing nor CA removal had any effect on the more diffuse Marumi fringing.


0816 Fringing 2
by gardenersassistant, on Flickr

Now, it is possible that I have a bad copy of the Marumi 200. However, I had one previously ? a couple of years ago and sent it back because I found it significantly less sharp than the Raynox 150 and subject to CA/fringing. It is just possible that I have had two bad copies, but that seems pretty unlikely, especially as I had a rather similar experience (written up here) with the Canon 250D (as with the Marumi 200, my second one, having sent the first one back for the same reasons, perhaps three of four years ago). I'm happy with my Canon 500D, which is larger diameter too, but less powerful than the Raynox 150, Marumi 200 or Canon 250D. I'm wondering if it becomes more difficult to engineer larger diameter achromats (at a marketable weight and cost) as the strength of the achromat increases.

Anyway, my Marumi 200 will stay in the cupboard. Which is another one of the little disappointments of this journey I'm on.
 
Last edited:
Hi Nick very good test and it bears out exactly what I found with my Marumi except that I compared it with a set of tube's on the lens
I was really disappointed with the Marumi I was hoping that it would be a good handy solution for the odd occasion that I want to do real close ups
I meant to send it back but never got round to it
 
Hi Nick very good test and it bears out exactly what I found with my Marumi except that I compared it with a set of tube's on the lens

Ah, so very unlikely that it was me happening to get two bad copies. Thanks for that Pete.

I was really disappointed with the Marumi I was hoping that it would be a good handy solution for the odd occasion that I want to do real close ups
I meant to send it back but never got round to it

I suppose you could have a Raynox in the bag for those odd occasions. You might be limited in the zoom range you could use, so you might need to think carefully about which Raynox to get so as to give the best fit for your most likely magnification requirements. On the other hand, I can use a Raynox 150 or 250 on my 55-250 STM on the 70D throughout the zoom range.
 
Ah, so very unlikely that it was me happening to get two bad copies. Thanks for that Pete.


I suppose you could have a Raynox in the bag for those odd occasions. You might be limited in the zoom range you could use, so you might need to think carefully about which Raynox to get so as to give the best fit for your most likely magnification requirements. On the other hand, I can use a Raynox 150 or 250 on my 55-250 STM on the 70D throughout the zoom range.

No worries Nick it does look like the Marumi isn't that good a surprise really because I've got 2 of their polarising filters and they are excellent

I have thought about getting a raynox but I wouldn't use it enough to justify it :)
 
Since returning from my long Autumn break from photography I've been looking at some wonderful images of very small subjects from people here and elsewhere using the MPE-65 (and sometimes other bits and pieces such as extension rings and achromats). I began to wonder whether I should try the MPE-65 again, but this time give it a fair chance by taking plenty of time to get used to it. But if it didn't work out (and I can't help feeling that is quite likely), I wouldn't feel morally justified in sending one back a second time, which makes the cost a significant consideration. This in turn set me thinking about the Raynox MSN-202, the high power close-up lens that I use occasionally.

I've never been really comfortable with the MSN-202, finding it difficult to use and rarely getting results that I liked. I don't know if that is because of its limitations, or mine. Perhaps I am expecting too much of this tiny, relatively inexpensive piece of glass, especially as I'm mounting it on a general purpose, high zoom ratio (and hence not highest optical quality) zoom lens. There again, perhaps I simply don't have a talent for photographing small subjects.

One thing that puzzled me was that I had occasionally produced results that seemed ok to me. Not like the highest quality stuff I enjoy looking at so much, but still quite satisfying and rewarding, at least to me. And my impression was that these better results generally came from using the MSN-202 on my G3 (now G5) rather than on my FZ200. An obvious possibility is that the G3/G5 has a much larger sensor than the FZ200, much nearer in size to the APS-C cameras that many use with the MPE-65 than to the tiny sensor in the FZ200. And/or, the 45-175 lens I use on the G3/G5 may be of better optical quality than the much wider zoom range FZ200 lens. However, my previous investigations as documented in this thread tend to cast rather a lot of doubt on that hypothesis.

And then I realised there was another difference. On the 45-175 the close-up lens is mounted directly on to the lens filter thread, so it is close to the camera lens and it stays close. In contrast, I mount my close-up lenses on an adaptor tube on the FZ200 and this holds the close-up lens in a fixed position as the camera lens extends and contracts behind it. That means that there is a varying size, and some of the time quite large, gap between the close-up lens and the camera lens. Now, I understand that the passage of light through the air in an extension tube doesn't bend the image out of shape or soften it, and I would expect the same to be true of an air gap at the front end of the lens. However, is the optics of a close-up lens optimised for a small distance between the two lenses? I don't know how the optics work, but it certainly seemed worth a try to fit the MSN-202 directly on to the front of the FZ200 lens and see if that improved the image quality.

I spent some time today trying to do like for like comparisons of scene captures, comparing captures done with the MSN-202 on the camera lens with ones done with the MSN-202 on the adaptor tube. It turned out to be really difficult with such high magnifications to do comparisons which were sufficiently like for like to be convincing. Having got fed up capturing and poring over lots of images of the millimetre marks on a ruler and other similarly inspiring subjects, and not really getting anywhere, I decided to just put the MSN-202 on the camera lens and go out and find some real world examples to use it on. Springtails were the obvious choice. They were the right sort of size and given that it is so wet at the moment I was hopeful that I would find some.

I didn't find any. I was reduced to capturing high magnification shots of tiny stones, bits of plants etc. It was not really very instructive. I eventually found a hopper, but it was much bigger than I wanted to work with, and rather large for the MSN-202. However, I only had the MSN-202 with me so I took some photos of the hopper, using almost as low magnification as was possible with the MSN-202 on the FZ200. This turned out to be instructive in two ways. The first was that if I had had the MSN-202 mounted on the adaptor tube I wouldn't have been able to capture the images because of the massive amount of vignetting. (Using the adaptor tube, the vignetting doesn't disappear completely until 12X or 13X zoom out of 24X, and at the 4X or so I used for the hopper the vignetting is massive when using the adaptor tube.) So that was strongly in favour of mounting the MSN-202 directly on the camera lens. However ....

... the second lesson was a reminder of just how difficult it is to do higher magnification captures when changing the magnification means you have to move the camera, which was the case with the MSN-202 on the FZ200 camera lens.

To recap, the problem is (sorry for the repetition) that with the lens set up at a high magnification it is difficult (as in I find it very difficult, and time-consuming) to actually locate the subject. And if you lose the subject, finding it again is equally difficult and time-consuming (for me). However, if you have a close-up lens held in a fixed position (on a lens that doesn't extend as it zooms, like my 45-175 on the G3/G5, or on an adaptor tube like I use on the FZ200), you can zoom to wide angle, adjust the distance to the scene so you can see what is going on, find the subject, centre it in the frame and then zoom in on it. It is really quick to do. And once you have the distance more or less right, you can zoom in and out without moving the camera. This makes it far, far easier (for me at least) to find the subject and relocate it if I lose it (and also to move back and forth using different magnifications so I can get whole-body shots and wider "environmental" shots, and various magnifications and framings in between, which helps hitting the "sweet spot" for depth of field with one of the magnifications).

So, back to the second lesson. As soon as I saw the hopper it started moving, both walking and also turning around through 90 degrees and more, repeatedly, which meant I had to keep moving myself to try to get a reasonable angle on it, as well as tracking it as it walked. Trying to acquire the subject was a nightmare. I did manage it a few times, but even though the hopper remained visible for perhaps a minute, or perhaps two, almost all the time was spent trying to find and focus on the subject. It was very, very frustrating. And it reminded me what it had been like trying to use the MPE-65, which extends hugely as you increase the magnification.

Then the rain started. Yet again. Back indoors I decided to see if, by taking my time, and with some practice, I could make better friends with the MSN-202, understand it better and get some better results with it. I nipped out into the garden to pick up some bits of foliage, little wood chippings, a couple of tiny flowers and other bits and pieces, and arranged them in a bowl to do a bit of still life work on them. A small spider emerged and ran off into a tissue on my desk. I tried capturing images of it switching the MSN-202 between one of my FZ200s with an adaptor attached, and the other one with no adaptor (and switching the KX800 between cameras). After the first couple of shots, it settled into a position and stayed there for a while. With the spider and with the still life shots I confirmed that it was entirely practical (not easy, but practical) to use the MSN-202 when it was on the adaptor..

This post has the two images of the hopper that by some miracle came out ok, and two images of the little spider. The first was a grab shot with it in motion the moment I first got it into my sights. The second was when it was in the position it stayed in for a while.

I have increasingly deep respect for those people getting wonderful results with the MPE-65.

And does the MSN-202 produce better results if mounted close to the camera lens? I don't know, but to be honest it is so difficult to use in that configuration (on my FZ200) that I'm not sure I'd be interested even if the image quality was better. I'm going to try it some more on my FZ200, mounted on the adaptor and see if with practice I can get "good enough" results for my purposes. The other alternative would be to try it some more on my G5, where the MSN-202 is mounted directly on the camera lens. There are some other issues with the G5 though, which although I could live with them, make me want to try and get it to work satisfactorily on the FZ200 and only if I fail in that to try again with the G5.

The journey, it seems, is ongoing.
 
Last edited:
One thing leads to another … and back again. Round and round we go….. (Well, me, anyway).

One aside to begin with. I've mentioned several times in this thread how much trouble I've had using flash with the 70D. Since I got the KX800 I've only been using it with the FZ200 and G5 because I couldn't get it to work with the 70D. I've discovered why – I had Electronic First Shutter Curtain turned on on the 70D, which makes a difference for natural light shots at some shutter speeds. When I turned it off the KX800 worked fine on the 70D. This opened up new opportunities as it made it more practical to get light to the scene when working at higher magnifications than was the case with the single, hot-shoe mounted flash unit I have used up to now with the 70D. It is the KX800 that I used for what follows.

In the past few days I made several videos about using close-up lenses. In one of these I was very critical of the way that autofocus works so poorly with my Sigma 105 macro on my Canon 70D at 1:1 and, with extension tubes, at around 2:1. After I had put that video up at You Tube I realised that what I had shown might have been my ignorance about using prime macro lenses (with which I have very little experience) rather than a significant problem with the Sigma + 70D. To be sure, there was a very real problem – if I started with the camera a long way out of focus then it would often search around and then come to rest giving me focus confirmation when in fact the image was well out of focus (as in not fractionally out if you pixel peep with a magnifying glass, but glaringly out of focus and absolutely not usable). However, despite being real enough, was this actually significant?

It struck me that perhaps I was using the rig in the wrong way. I had noticed (and said in the video) that if the lens was almost in focus then autofocus seemed to work ok. So, perhaps the deal is that you should get the image framed up and the camera at the right distance, and then use autofocus to finish off. This is how I work with my achromats, so why should I think it unacceptable with a prime macro lens? I shouldn't. Obviously.

Which led to some (as in, yet more!) tests. The Sigma did autofocus ok when it started nearly in focus. Usability was another matter, unfortunately, but that is a story for another day. This led me to wonder whether I could use the Sigma on the 70D with the MSN-202 for high magnification work. I don't often do high magnification stuff, and am not convinced about the quality of what I can produce using the FZ200 or G5 with the MSN-202. Some is ok-ish, but when I look at what others are doing I'm blown away by the quality. I've even been considering getting the MPE-65 (again). But perhaps the Sigma 105 and MSN-202 would do the trick.

I did a simple experiment today. Photographing a ruler. Again. I used the MSN-202 on the Sigma+55-250+70D, the 45-175+G5 and the FZ200. I used the Sigma first. With the MSN-202 on it, it handled a minimum scene width of 5.5 to 6 mm and a maximum scene width of 9.5mm. Not a very big range, but if the quality was improved I could live with that.

Usability was poor. Sometimes the Sigma would autofocus if starting from being almost in focus, but if it missed focus it often ended up miles away and needed a lot of focus ring turning to bring it back to try again, and sometimes miss again, turn the focus ring back etc etc. Also, as it focuses, the scene width and hence framing changes, which adds a random element to composition and sometimes extreme difficulty in getting exactly the composition I'm looking for. And getting to the initial stage of having the framing/magnification roughly right and the camera almost in focus was tricky at times too. Still, here again, I could live with that if the quality was significantly better. And perhaps I would get better with practice. (In fact of course, with practice, some macro stuff that at first seems impossible becomes possible after all when you suddenly "get it", and later on can come to feel fairly easy and makes you wonder what all the fuss was about.) The first question then was "Putting aside issues of difficulty, can I get better image quality from the 70D/Sigma at higher magnifications?"

I did several captures of the millimetre markings on a ruler with the minimum 70D/Sigma/MSN-202 scene width of a little under 6mm. At the same magnification I did several captures of the number “230” just beneath the millimetre markings. I then did the same for the maximum scene width of about 9.5mm. I did captures using both f/22 and f/11. For the Sigma 105, at full, 1:1 magnification the effective aperture is twice the notional aperture, so for the f/22 shots the effective aperture was f/45 and for the f/11 shots the effective aperture was f/22. The f/11 shots (effective f/22) would be roughly equivalent to f/22 on the G5 and f/8 on the FZ200. The f/22 shots (effective f/45) would have more depth of field than I could achieve with the FZ200 or G5 but would be less sharp than the f/11 shots (effective f/22) because of the additional diffraction. (The effective aperture for the G5 and the FZ200 are the same as the nominal aperture, because achromats do not alter effective aperture.)

I did the same set of captures (matching the scene widths of the Sigma/70D shots as closely as I could) with the G5 and the FZ200, using f/22 on the G5 and f/8 on the FZ200.

To allow for meaningful side by side comparison I imported all the images into Lightroom and exported them at 3000 pixels high (the height of the FZ200 images, the other two cameras having a larger number of pixels vertically).

For both the millimetre markings and the number “230” beneath the markings.I picked the best of the 6mm scene width shots at both f/11 and f/22 for the Sigma/70D, and the best of the f/22 and f/8 shots for the G5 and FZ200 respectively. I then did the same for the 9.5mm scene width shots, except that I could not capture them for the FZ200 because the maximum scene width with the FZ200 was a little over 6mm because of the extreme vignetting caused by the FZ200 adaptor tube. So the three-way comparison at 9.5mm scene width is between 70D at f/22, 70D at f/11 and G5 at f/22.

The comparisons are tricky because which parts of the image are most in focus varies from one capture to the next, for a particular rig, and between rigs. Ad I didn't get the size equalisation quite right either. However, I believe the following screenshots give a fair representation of the results. (This album at Flickr contains the 3000 pixel high versions on which these comparisons are based. They are full size, but saved at JPEG 60% in order to make the uploads bearable.)

70D/Sigma results at the top, FZ200 and G5 at the bottom.


6mm scene width mm markings 100 pc comparison
by gardenersassistant, on Flickr


6mm scene width mm markings 30 pc comparison
by gardenersassistant, on Flickr


6mm scene width Number 230 100 pc comparison
by gardenersassistant, on Flickr


6mm scene width Number 230 40 pc comparison
by gardenersassistant, on Flickr

70D/Sigma on the left and centre, G5 on the right.


9.5mm scene width mm markings 100 pccomparison
by gardenersassistant, on Flickr


9.5mm scene width mm markings 40 pccomparison
by gardenersassistant, on Flickr


9.5mm scene width Number 230 100 pc comparison
by gardenersassistant, on Flickr


9.5mm scene width Number 230 40 pc comparison
by gardenersassistant, on Flickr

Looking at these examples it seems clear to me that overall the FZ200 and G5 fared better overall than the 70D/Sigma with this test in terms of focus and detail. What is more:
  • The results for the G5 and the FZ200 were fairly consistent from capture to capture. There was great variation with the 70D/Sigma with a fair proportion of even worse shots.
  • Focusing was much easier, quicker and more reliable with the G5 and FZ200.
  • Autofocus locked on over a greater (still very small, but significantly greater) range of working distance with the G5 and FZ200.
  • Getting the framing/composition I wanted was much easier with the FZ200 and the G5 because focusing did not cause the scene width/framing to change as it did with the 70D/Sigma.
  • Autofocus failures were relatively inconsequential with the FZ200 and G5. It merely necessitated moving the camera slightly to adjust the working distance and half pressing the shutter button again. In contrast, autofocus failures with the 70D/Sigma were time-consuming to recover from (and quickly became rather frustrating) and the rotations needed of the focus ring tended to move the camera away from the desired framing.
The conclusion I draw from all this is that, if these results are representative (and I strongly suspect they are), it would be better to use the FZ200 or the G5 for higher magnifications.

Given the fact that with the MSN-202 the G5 will cover scene widths from about 4.5mm to 15mm, while the FZ200 will, because of vignetting, only cover from around 2.5 to 3mm scene width to a little over 6mm scene width, the G5 appears to be the best instrument I have for magnifications in the range of scene width that would be about 1.5:1 to 5:1 for an APS-C camera. The FZ200 could be used for magnifications up to what would be about 8:1 for an APS-C camera, although at present I can't envisage wanting to go beyond 5:1 (or quite possibly not even quite as far as 5:1).

I've mentioned before that I seemed to have got the best results at higher magnification using the G5 (well, the G3 actually), from the few attempts that I have had at these higher magnifications. These tests indicate that that tentative conclusion was probably correct, and the the G5 should be my instrument of choice for any higher magnification work in future.
 
Last edited:
I haven't posted anything in this thread for a while because I have my equipment for close-ups and macros sorted out now:
  • Canon 70D APS-C dSLR with 55-250 STM for flowers and large insects, sometimes with Canon 500D close-up lens
  • Panasonic FZ200 bridge camera for most invertebrates, with Raynox 150 and, less often, Raynox 250 for subjects that are a bit too small for the 150.
  • Panasonic G5 Micro Four Thirds camera with Raynox MSN-202 for the really small stuff, but I do very little of that, partly because I find it so difficult to get reasonable quality results, and partly for lack of subjects even when I do look for them (which I'm not highly motivated to do because of the difficulty of getting half-decent results when I do find them)
  • Panasonic TZ60 travel camera for context shots (as in “this is the field I was shooting in, and “here is the bush I found this insect on”) and any butterflies/dragonflies which turn up (they don't often) when the other cameras are set up for other things.
So, sorted. At least, that is what I thought. And then ….

… I had a difference of opinion about whether autofocus was useful for macros and made a video to try to support my point of view. I enjoyed making the video so much I bought some equipment (microphone and mobile MP3 recorder) and software (Serif MoviePlus X6 – very impressed with it) and made some more videos.

Bryn @Tintin124 saw one of these videos, in which I said that you do reverse lens macro by attaching a lens backwards to another lens. Bryn told me that you can reverse a single lens on to the camera, and that on Canon kit the 18-55 kit lens could be used in this way.

I watched some videos about using reversed lenses and got interested. It seemed that the 18-55 (which I have) is the number one choice for this. But I discovered that you can't change the aperture with the lens reversed on the camera – the electrical connectors are at the wrong end of the lens and the camera and the lens can't talk to one another. In order to change the aperture you have to dismount the lens, turn it back around the right way, set the new aperture, then hold down the depth of field preview button while unlocking the lens and turning it a bit, then turn off the camera, take the lens off and put it back the wrong way round.

I told Bryn I didn't fancy this. He confirmed that it is a faff but said there was a solution that few seemed to know about – the Meike MK-C-UP Reverse Adapter. As it happens, Bryn told me, he had one of these but didn't want to use it at the moment as he now had the MPE-65. Would I like to borrow it so I could play with it? Not difficult to imagine my answer to that one. :D

The Meike arrived the very next day, but by then I had done some more thinking and video watching and had ordered several more things – a dumb adapter that would let me mount one lens backwards on another lens, a dumb adapter to reverse mount a Canon lens directly on to the camera, and another one for my G5, and some micro four thirds extension tubes. I already have Canon extension tubes (and teleconverters).

Over the next couple of days as the bits of equipment arrived I went into a bit of a testing frenzy.


Next, Panasonic options, continued in next post
 
Last edited:
Part 2 of 9

Panasonic options


Extension tubes on G5

The 10mm and 16mm micro four thirds extension tubes were disappointing on the 14-42 kit lens. I could only gain focus for part of the zoom range (a small part and a very small part with 16mm and 10+16mm respectively) and where I could gain focus the working distances were very small.

Reversed kit lens on G5

With the 14-42 kit lens reversed on the G6, at full zoom I got about 13mm scene width at about 40mm working distance, and at full wide angle I got a scene width of about 6mm at a working distance of about 20mm.

With the 14-42 kit lens reversed on the G6 and with both 10mm and 16mm extension tubes, at full zoom I got about 9mm scene width at about 30mm working distance, and at full wide angle I got a scene width of about 4mm at a working distance of about 17mm.

Unfortunately, I have not found any way of closing down the aperture for the reversed Panasonic rig. Always shooting wide open does not fit my shooting style.

Reversed kit lens on telephoto lens on G5

I mounted the 14-42 reversed on the 45-175. I had to use full telephoto on the 45-175 otherwise there was vignetting which turned into ultra-severe “porthole” type vignetting not far from 175.

At full zoom on the reversed 14-42 I got about 4mm scene width at about 11mm working distance, and at full wide angle on the reversed 14-42 I got a scene width of about 1mm at a working distance of about 13mm.

That is a lot of magnification, but very short working distances.

The reversed 14-42 was wide open, and dumb, while the 45-175 operated normally, so I could change its aperture. Autofocus worked ok at 4mm scene width, but by 2.5mm it was hunting a lot and hardly worth using, and beyond that manual focus was the only practical proposition.

With both extension tubes behind the 45-175, at full zoom on the reversed 14-42 I got about 3.3mm scene width at about 10mm working distance, and at full wide angle on the reversed 14-42 I got a scene width of a little under 1mm at a working distance of about 13mm.

Extension tubes with MSN-202 On G5

With the MSN-202 on the 45-175 on the G5 I get scene widths of between 4.5mm and 15mm at a working distances around 30 to 33mm.


0841 01 G5 with MSN-202 on 45-175 lens
by gardenersassistant, on Flickr


0841 02 G5 with MSN-202 on 45-175 lens and 26mm extension tubes
by gardenersassistant, on Flickr

Using the extension tubes increased the magnification a little, bringing the minimum scene width down to about 3.5mm with a similar working distance. We will come back to this later.


Next, Canon options, continued in next post
 
Last edited:
Part 3 of 9

Canon options

Reverse lens options with the 70D

Earlier in this thread I described the use of extension tubes and teleconverters with my 70D, albeit mainly in the context of using achromats. In this post I will concentrate on reversed lens options.

I only used the 18-55 kit lens for reversed use because I believe it is the only lens I have which is suitable for direct to the camera reverse use. The only lens to lens connection I tried was to mount the Panasonic 14-42 on one of the Canon lenses, presumably the 18-55, but I don't remember for sure. Whatever it was though, it didn't work at all.

Dumb kit lens reversal

I used an adapter to mount the 18-55 reversed on to the camera.


0841 03 18-55 kit lens reversed with dumb reverse adapter
by gardenersassistant, on Flickr


0841 04 18-55 kit lens reversed with dumb reverse adapter and 68mm extension tubes
by gardenersassistant, on Flickr


0841 05 18-55 kit lens reversed with dumb reverse adapter and 1.4X teleconverter
by gardenersassistant, on Flickr

  • Auto-exposure worked.
  • There was no autofocus.
  • There was no easy way to change the aperture. To change the aperture you have to put the lens back on the right way round, change the aperture, and then hold down the depth of field preview button while you unlock the lens and turn it to disengage it (this is with the camera still on). Once it is turned a bit the aperture will “stick” to what you set it to and you can take off the lens and put it back on again reversed.
  • Extension tubes and teleconverters worked fine.
  • In manual focus mode the focus ring did not work.

I did a suite of measurements of working distance, scene width/magnification with the bare reversed lens and with various combinations of extension tubes and teleconverters.


0841 06 Table 1 - 18-55 kit lens reversed on 70D - Working distance, scene width and magnification
by gardenersassistant, on Flickr

I got very confused while preparing this table because a day or two after doing the complete set of measurements I re-measured some of them and got different working distances and magnifications. It turns out that when you reverse the lens the focusing “sticks” at whatever it was last set to (i.e. infinity, closest focus, or somewhere in between). The working distances and magnifications of the reverse setup vary depending on the focus setting. The measurements in the above table were made with the focus set to infinity as this gives the longest working distances.

Intelligent kit lens reversal

I used the Meike reverse adapter to mount the 18-55.


0841 07 Meike reverse adapter with 18-55 kit lens
by gardenersassistant, on Flickr


0841 08 Meike adaptor on 18-55 kit lens with 68mm extension tubes
by gardenersassistant, on Flickr

  • The aperture could be changed in the normal way.
  • Auto-exposure worked, for natural light and flash, and flash exposure compensation worked.
  • Phase detect autofocusing using the viewfinder did not work.
  • Live view autofocusing did work, at all magnifications, given sufficient light, for example from the focusing lamp. I don't know if the focusing was solely contrast detect autofocus or whether it was using the 70D's “dual pixel” sensor-based phase detect focusing.
  • Extension tubes worked fine.
  • My (Kenko) teleconverters would not work. When the camera started up after I mounted one of the teleconverters behind the Meike adapter I got a message about a lens firmware update having failed. The camera would not start normally until the teleconverter was removed. (The teleconverters work fine with my other Canon lenses. And there is no update available for the 18-55 lens. So I have no idea what the problem was and searching the internet for an answer didn't help.)
  • In manual focus mode the focus ring worked.
  • As a side effect, the reverse adapter acts as a 20mm extension tube. (In fact, the part that fits at the camera end of the reversed lens looks like it is a modified 20mm extension tube.)
  • Another fitting that looks like an adapted 20mm extension tube sits on he far end of the reversed lens. This reduces working distance by 20mm.

Next, Comparisons, continued in next post
 
Last edited:
Part 4 of 9


Comparisons between setups

Having had a brief look at a number of setups I decided to compare in more detail the three that looked most promising to me. These were
  • Panasonic G5 with 45-175 lens and Raynox MSN-202,which is my current preferred setup for very small subjects
  • 70D and 18-55 reversed with a dumb adapter
  • 70D and 18-55 reversed with the Meike reverse adapter
At this stage of the proceedings I spent more time on the Meike 70D setup than the dumb adapter 70D setup as I was put off the dumb adapter setup by the lack of autofocus and the difficulty of changing aperture.

I did a number of measurements and switched between the setups as I photographed some indoor test scenes, the weather being extremely wet and windy, making outdoor work impractical. I started with man-made objects such as pottery with small-scale detail in their decorations, small pieces of jewellery, fabric, coins, pen tips and ruler markings. Later on I picked a few small flowers and leaves from the garden and brought them indoors to work on. What I didn't have was the type of subjects I envisage this sort of equipment being used for most – small invertebrates such as fruit flies, barkflies and springtails.

Working distance and angle of attack

The following table shows minimum and maximum working distance and related data at full wide angle and full telephoto for the MSN-202 on the G5 and the Meike adapter on the 70D.


0841 09 Table 2 - Working distance, scene width and magnification
by gardenersassistant, on Flickr

As a comparison, the MPE-65 has a minimum working distance of about 40mm, when working at 5:1, and the working distance increases as magnification decreases. The MSN-202 on the G5 has a working distance of around 30-35mm at all magnifications. In dumb reversed mode, the reversed 18-55 is similar to the MPE-65, with a minimum working distance of about 40mm, the working distance increasing as magnification decreases. When reversed with the Meike adaptor, the 18-55 has a minimum working distance of about 20mm – less than the MSN-202 on the G5 and only a half that of the MPE-65 and dumb-reversed 18-55. This makes it more difficult to get close enough to the subject (you are more likely to frighten it off) and more difficult to illuminate the scene for subject acquisition, focusing and capture.

Small working distances also restrict the “angle of attack”. Whatever equipment you use it is often not possible to get a completely side-on view, especially with small subjects, but I do prefer to have my images more side-on than top down. That is more difficult with short working distances.

The minimum “angle of attack" depends on the diameter of the front of the lens housing and the working distance.


0841 10 Diagram 1 - Angle of attack
by gardenersassistant, on Flickr

The Meike adapter configuration has a large lens housing diameter and some very small working distances. The following table compares the minimum angles of attack for the three configurations.


0841 11 Table 3 - Angle of attack
by gardenersassistant, on Flickr

The Meike adapter configuration is the worst performer in this respect, followed by the dumb-reversed 18-55, with the MSN-202 coming out best in this respect because of its smaller diameter.


0841 12 Diameters of Meike reversing adapter and Raynox MSN-202
by gardenersassistant, on Flickr

As the following table shows, the MSN-202 is extremely fussy about working distance. Whatever magnification you are working at, you need to get the working distance right within a range of 1 to 3mm. If you are not in that zone, you can't get good focus.


0841 13 Table 4 - Working distance tolerance
by gardenersassistant, on Flickr

The reversed lens setup is similarly fussy at around 18mm focal length, but as the focal length increases so does the size of the acceptable working distance zone, increasing to 43mm at 55mm focal length when no extension tubes are in use, and to 30mm at 55mm focal length even when all three extension tubes are in use and the magnification is around 3:1. This makes using the reverse lens setup a lot more forgiving about working distance a lot of the time, which would be nice for general use and could be very helpful indeed when a quick response is needed to a possibly time-limited opportunity turning up.

The following diagram suggests that it may often be possible to increase the working distance when operating near to 18mm focal length by using (a greater length of) extension tube and a longer focal length to get the same scene width. For example, looking vertically from 16 mm on the scene width axis you see that with the bare reversed 18-55 the working distance is 36mm, but with the 12mm extension tube added the working distance for a 16mm wide scene lengthens to 50mm, and to 55mm with a 20mm extension tube.


0841 14 Diagram 2 - Impact of extension tubes on reversed 18-55 working distance
by gardenersassistant, on Flickr

However, I doubt that exploiting this is practical in the hurly burly of subject discovery and image capture out in the field.

One thing to note here is that the Raynox 150 on the FZ200 goes down to a scene width of 15mm and does so with a working distance of around 160mm, much more than any of the working distances for the reversed lens setup. Similarly, the Raynox 250 on the FZ200 goes down to about 9.5mm scene width, with a working distance of about 100mm, which is also significantly greater than any of the reversed lens working distances.

The “Magnification Ratio” column in the previous table shows the range of magnification that can be used with each setup. The greater the range, the less often the setup will need to be reconfigured, reducing the potential for lost shots while reconfiguring is being done. The reverse lens setups have an advantage here, although that advantage is at the lowest magnifications where I would most often be using the Raynox 150 on the FZ200.


Continued in next post
 
Last edited:
Part 5 of 9

Size and weight

The G5 setup was much smaller and lighter, which would be an advantage for extended periods of hand-held use.


0841 15 Size of G5 setup vs 70D Meiike setup
by gardenersassistant, on Flickr

  • The G5 + 45-175 + MSN-202 weighs 680 grams.
  • The 70D with reversed 18-55 and Meike adapter weighs 1167 grams.
  • The KX800 flash with shallow hybrid diffusers (used for both setups) weighs 624 grams.
  • The G5 extension tubes weigh 47 grams.
  • The 70D extension tubes weigh 228 grams
  • The full G5 setup, including extension tubes, weighs 1351 grams.
  • The full 70D Meike setup, including extension tubes, weighs 2019 grams.
Subject acquisition

I found the G5 with MSN-202 very much better for subject acquisition and re-acquisition. I could zoom in and out using a small lever just behind the shutter button. Using this I could zoom to wide angle to find the subject, centre it in the frame and zoom in on it. Once the distance to the subject is about right the frame stays sufficiently in focus to see what is going on as you change magnification and you don't have to change the position of the camera. This was far faster than with the 70D setups, where I often had difficulty locating subjects at the highest magnifications. Zooming in and out required turning the lens zoom ring, which tends to induce lateral/vertical movement/rotation. The frame rapidly goes far out of focus as you change magnification making it difficult to tell what you are pointing at, and the camera has to be moved to compensate for
  • changes in working distance as magnification changes
  • extension/contraction of the lens barrel.
While hugely inferior to the G5+MSN-202 in this respect, the 70D setups were better than my recollection of the MPE-65 in this regard. The MPE-65 (or the copy I had) had a rather stiff focus ring, which has to be turned a lot to change magnification, and the lens barrel extends/contracts a large amount. In contrast, the 18-55 can be taken from 18mm to 55mm focal length with a turn of the zoom ring of about 75 degrees which can be done with one finger. When not using extension tubes, going from 18mm to 55mm focal length gives a 5X range of magnifications, as with the MPE-65. When using extension tubes the range of magnification between 18mm and 55mm focal length decreases, down to about 3.7X with all three (68mm) extension tubes in use.

From 55mm focal length (wide angle/low magnification in the reverse setup) the barrel contracts about 1cm in getting to about 30mm focal length and then expands back again by 1cm in getting to 18mm. I find this much easier to handle than I recall with the MPE-65, both in terms of physically adjusting the zoom ring and in terms of adjusting the camera position to take account of the (greater than 10cm) lens extension/contraction of the MPE-65.


0841 16 18-55 lens extension
by gardenersassistant, on Flickr

Autofocus

There is no autofocus with the dumb reverse 70D setup, and in switching between cameras I came to realise just how much I missed this. I found manual focusing hard on my eyes, and slower and less reliable than using autofocus with the other two setups. Autofocus with the Meike setup was better than I expected, and seemed similar in its speed of operation and (low) rate of “false focusing” (claiming to have found focus when it hadn't). Autofocus worked with both setups when using extension tubes, up to the minimum scene width of about 3.2mm (about 7:1) with the 70D with 68mm extension tubes, and about 3.6mm (about 6:1 in APS-C terms) with the G5 and 26mm extension tubes. However, although autofocus did work at all magnifications, at least for static, easy high contrast scenes, I think manual focus would generally be more practical at the hightest magnifications out in the field.

The G5 setup was much better for precise placement of the centre of focus as it lets you use a very small focus box. The 70D focus box is much larger.

Chromatic aberration

I use shots of the black millimetre markings on a white ruler to look for chromatic aberration (CA). At magnifications as low as 2:1 in APS-C terms (scene width about 11mm) the G5 setup showed CA that I could (just) see when reviewing the whole (high contrast, ruler) image on the camera LCD. On zooming to maximum magnification to examine a 2:1 image the CA turned out to be fairly strong towards the edges. At maximum (camera) magnification (using extension tubes) of about 6:1 in APS-C terms the CA was very clear even without magnifying the review image on the camera LCD. In contrast, I had difficulty finding CA with the 70D. At full image review magnification of a maximum magnification (using extension tubes, about 7:1) ruler image I saw some faint hints of CA.


0841 17 CA comparison wide angle
by gardenersassistant, on Flickr


0841 18 CA comparison narrow angle
by gardenersassistant, on Flickr


Continued in next post
 
Last edited:
Part 6 of 9

Aperture, Effective aperture and ultra-wide depth of field

Since the MSN-202 is an achromat, the effective aperture of the G5 setup is unaffected by magnification, so for example f/8 remains f/8 at all magnifications. In contrast the effective aperture of the 70D setups decreases as the magnification increases, so for example f/8 as set on the camera gives an effective aperture of around f/45 at 5:1. This means that the G5 setup needs lower flash power than the 70D setup. Using the same (KX800) flash unit and diffusers, the G5 handled all magnifications with f/22 aperture using base ISO and with flash running at less than the maximum output. In contrast, with the 70D at the highest magnification (around 7:1, using extension tubes with the reversed 18-55) I often had to use full flash power and raise the ISO to 800 or more. However, there is another side to this ….

…. when using much more flash power than the G5, because it was using a much smaller effective aperture, the 70D was giving a much larger depth of field. For example, for some 5:1 captures I used f/22 on the G5 and f/11, f/16 or even f/22 on the 70D, which gave effective apertures on the 70D of around f/64, f/96 and f/128 respectively. With all three extension tubes on the 70D, giving a magnification of around 7:1, an aperture of f/22 on the camera gives an effective aperture of around f/180.

Most people won't go as far as f/22, let alone these extremely small apertures, but I found it instructive to see what happens at these very small effective apertures. Since detail and sharpness are progressively lost because of diffraction as aperture decreases it is natural to conclude that an image at an effective aperture of f/90 or f/180 must be useless. On the other hand, depth of field roughly doubles every two stops, and there are 6 stops between f/22 and f/180, which would mean the depth of field would be around 8 times wider at f/180 than at f/22. Even with so much depth of field, would such a massively soft image have any conceivable use, for example at a small size perhaps? I was, you can imagine, curious.

At first sight, looking at images on the LCD, some very small aperture images looked very promising. For example, on the left here were have the G3 and MSN-202 using the minimum aperture of f/22. In this case, because the MSN-202 is an achromat, the effective aperture is also f/22. On the right is the reversed lens on the 70D, also operating at f/22, but because this was at 5:1 magnification the effective aperture was f/128.


0841 19 Ultra-small aperture comparison
by gardenersassistant, on Flickr

The f/128 version (shown as 1/132 in these illustrations – it is an approximation in any case) has vastly larger depth of field. Unfortunately, the image is so soft as to be unusable for my purposes. Here are 100% crop taken from 1300 pixel high versions of the images (1300 pixels high being my current standard output size for screen viewing.


0841 20 100pc crop of 1300 pixel high large DOF images
by gardenersassistant, on Flickr

It was the same with other examples I looked at. Ultra-small aperture images may have their uses - for identification purposes or posting very small versions perhaps – but not for my purposes.

Even if you stick with “sensible” apertures, changing from say 1:1 to 5:1 with the 70D setup changes an aperture of say f/5.6 on the camera from an effective f/11 at 1:1 to an effective f/32 at 5:1. Not being able to change the aperture to compensate for the changes to diffraction loss of detail and depth of field is a big disadvantage of the dumb reverse setup. Worse, for me at least, is that I like to vary aperture for a given angle of view/framing of a scene so as to explore the changes in depth of field and the rendition of backgrounds. In moving back and forth between the setups it became obvious to me that I would be very uncomortable being restricted to a single aperture. While it is in principle possible to change the aperture of the dumb setup, it is slow and fiddly to do (even if you have a table to rest the camera on while doing it) and I would not be keen on doing this, repeatedly, out in the field/garden.


Comparing the MSN-202 and Meike setups at normal apertures

As well as experimenting with very small aperture/very high DOF shots, I tried comparing the Meike and MSN-202 setups using more normal apertures, doing like for like images of jewellery and other man-made items. However, I found it difficult to “read” these in terms of what it would mean for the natural world images that I concentrate on, so I went out into the garden between rain showers and picked a few small flowers to photograph. I had got bored with like for like comparisons (so tedious to set up, and surprisingly difficult to make them sufficiently like for like to be convincing). I had one session with the MSN-202 setup and then a session with the Meike setup, photographing somewhat similar scenes using the same subject matter, but “going with the flow” in both cases to see what the camera would reveal to me.

I picked out the images that appealed to me most from each session. They are not very “like for like” unfortunately. The selected Meike setup images only include one high magnification shot, the rest being minimum magnification. The MSN-202 shots have a better mix of magnifications. The selected shots from both sessions are in this album at Flickr (complete with dust spots on at least the 70D sensor from all the lens changing).

I was not impressed with the MSN-202 shots. Even of these “best of the bunch” shots, too many of them looked soft and/or extremely narrow in depth of field and/or had the centre of focus not exactly where I had tried to place it. This was disappointing given that I had plenty of time, was working tripod-assisted and was moving freely between manual and auto focus as seemed appropriate.

With the exception of the single high magnification shot, the Mieke images were more pleasing to my eye and reflected what I had been trying to achieve. I wasn't convinced by the sharpness/depth of field of the single higher magnification shot. However, a significant issue surfaced which called into question the usefulness of the Meike setup – lens flare.

Bryn had mentioned that he had come across lens flare with the Meike setup. Before doing these two test sessions I had encountered what looked like some rather nasty, diffuse but heavy, image-ruining lens flare with one of my test subjects. But it was only one shot, and the other setups were having difficulty with it as well.

Over the course of several days I gradually became aware of a diffuse “haze” or “softening” or some such in some of the Meike setup images. I found it difficult to pin down because it could be quite subtle and I didn't know exactly what I should be looking for. I wondered if I was getting hyper-critical and making too much of it.

However while reviewing and picking out the best of the small flower Meike setup shots I managed to convince myself that this lens flare (which is what I assumed it was) was a genuine issue, and not just my imagination, and could be serious enough to be a “deal-breaker” as far as the Meiki setup was concerned.

Searching around on the internet I found this page, which included this comment about the Meike reverse adapter: “You will also have to fabricate some sort of lens hood as lens flare with this setup I unbelievable”. (btw the author was not negative about the device as a whole, saying that he got some “fantastic results” with it.)

I couldn't see that an all-round lens hood would be practical, because even a narrow one would make the angle of attack issue even worse. It wasn't clear from that article (or anywhere else) what exactly was causing the lens flare, as in What angles need to be blocked off to prevent it? The only practical option seemed to be a “peaked cap”, like a convex diffuser, to stop light bouncing from above on to the wide (20mm or so) internal lip of the front part of the adapter. Because of the working distances, this could extend no more than 20mm beyond the front of the adaptor or it would prevent focusing when straight on to a subject, for example on a wall, and because of the angle of attack issue it could extend only around a bit less than half of the circumference (the top half). I made a cap from extended polystyrene, but it didn't seem to cure the problem.


Continued in next post.
 
Last edited:
Part 7 of 9

Back to the drawing board

I was now in the position that each of my three favoured options had signficant issues:
  • Doubts over my ability to produce the image quality I wanted from the MSN-202
  • Doubts over lens flare with the Meike setup
  • The certainty of lack of autofocus and difficulty of aperture changing with the dumb reversed setup.
It struck me that the only one that didn't seem to have image quality issues was the dumb reversed setup, although in concentrating on the other two options I hadn't used the dumb setup enough to have any confidence about this. Still, if it was ok in terms of quality (and the results from the Meike setup that didn't have lens flare seemed to show that the reversed setup could produce nice results), what remained were usability issues. With practice these might be reducible (plenty of techniques seem unusably difficult when you don't have much experience with them), whereas the image quality issues with the MSN-202 and Meike setups (if genuine) might be intrinsic to the hardware and not susceptible to improvement.

I did some more playing with and thinking about the dumb reversed setup.

An aside - new diffusers

While all this was going on I realised that none of my diffusers for the KX800 were suitable for these three setups. For the 70D setups, especially for ultra-small aperture shots, should they prove useful in any way, it was essential to get the flashes really close to the subject. The midi hybrid diffusers were too deep and held the flash guns too far away from the subject. The mini diffusers let me get really close, but they don't diffuse very well. So I built yet another pair of diffusers, copying the diffuser arrangement of the midi hybrid diffusers but placing them in smaller, rectangular and most important shallower aluminium foil containers. I'm calling these my shallow hybrid diffusers. (More images of these diffusers, including the internal arrangement, are here at Flickr.)


0841 21 0838 01 P1970985 LR 600h
by gardenersassistant, on Flickr

Reconsidering the dumb reversed setup

So what were the problems that were specific to the dumb setup? Lack of autofocus and the difficulty with changing aperture, especially out in the field.

I was trying to settle on a high magnification setup. As magnification increases autofocus becomes less practical. And manual focusing can be improved with practice. Perhaps, given the role I envisaged for this setup, the lack of autofocusing was not a deal-breaker.

This left aperture changing. In my tests with the manmade objects and small flowers I had been changing magnification frequently and by large amounts, being in somewhat of a “creative” mode, especially as far as the flowers were concerned. Photographing springtails, barkflies, fruit flies etc is, possibly, not like that. I would be much more likely to be sticking in the 3X to 5X range. This would make the impact of using a fixed aperture less significant. For example, f/8 at 5:1 would give an effective aperture of around f/45 and at 3:1 an effective aperture of f/32. Similarly, f/5.6 would give effective apertures of f/32 and f/22 at 5:1 and 3:1 respectively. It would need some experiments, but somewhere around f/5.6 to f/8 could be fine for what I had in mind as the setup's main purpose.

And suppose I did want to change the aperture out in the field? What if I used a 1.4X teleconverter to protect the inside of the camera from dust etc? The numbers worked out quite nicely for this.

With just the bare 18-55 reversed the setup went from about 0.7X to 3.5X magnification. With the 1.4X teleconverter this changed to 0.9X to 5X, almost the same as the MPE-65. I would be happy using, or at least trying, my 1.4X teleconverter as previous experiments suggested that it produced so little image degradation that I could hardly discern it.

Unfortunately, the 18-55 is an EF-S lens and won't fit on my Kenko teleconverter, which is EF only. So I wouldn't be able to simply detatch the lens from the teleconverter, reattach it the right way round, change the aperture and then put it back reversed, with the camera internals protected all the time by the teleconverter. However, it would work if I put a 12mm extension tube on the front of the teleconverter, as the (again Kenko) extension tubes accept EF-S lenses. I could then swap the 18-55 around by detatching it from the extension tube. By a happy chance, because of the way things line up in this configuration, both the lens detachment and the “hold down the DOF preview button while unlocking the lens” maneouvre are much easier to handle than with other configurations.


0841 22 18-55 kit lens with dumb reverse adapter and 1.4X teleconverter and 12mm extension tube
by gardenersassistant, on Flickr

Adding the 12mm extension tube would change the magnification again, this time to 1.4X to 6.3X. 1.5X is the maximum magnification of the Raynox 150 (my most used achromat) on the FZ200. The Raynox 250 on the FZ200 goes to about 2.4X, so I would have a choice for those magnifications between changing the achromat on the FZ200 or using the 70D. It might not even need a change of aperture with the 70D, because for example setting f/7.1 on the camera gives a range of effective apertures from 1.4X to 6X of around f/18 to f/50, which might be usable throughout the entire range.

Adding the two other extension tubes (56mm extra) would take the magnification range to 2.6X to 10X (2.3m scene width) and would probably need a change of aperture. However, I don't currently envisage using that amount of magnfication very often.

This seemed an idea worth testing, so I went out into the garden and gathered up a few more little flowers etc and did a session doing like for like shots with the MSN-202 and the dumb teleconverter setup.

Small flower test of the dumb teleconverter option

There turned out to be a bit of a complication with the dumb teleconverter setup, namely working out what aperture to use. The teleconverter changes the aperture information passed to the camera by one stop, to reflect the fact that the camera is one stop slower with the 1.4X teleconverter. I tried to work out what that meant in terms of the aperture I should set on the camera, but couldn't convince myself that I really understood the implications. I decided to simply set an aperture and see how it worked out. In the event I set the camera to what it now (with the teleconverter adjustment to the reported aperture) said was f/11.

In the few pairs of images that were sufficiently like for like for a good comparison between the 70D and G5 setups, the 70d versions appeared to be a bit better, with a bit more detail and somewhat greater depth of field. More importantly though, for some reason I had captured a lot of ruler images with the 70D setup, and many of them had red and/or green fringing that was visible at my normal viewing size. Lightroom's automated chromatic aberration removal did not remove it, nor could I get rid of it with Lightroom's manual defringing tool. This rather put me off the teleconverter option.


Aside: LCD screen view when manually focusing

The teleconverter test made me realise that manual focusing seemed easier with the 70D setup than the G5 setup. This was because I seemed to get a clearer view with the 70D. Capturing some images of the two camera's LCD screens while manually focusing revealed what a huge difference there was. (How have I managed to be unaware of this up to now? I have no idea. As I have said before, I can be very slow on the uptake.)


0841 23 View on LCD screen at around 1-1 when manually focusing
by gardenersassistant, on Flickr


0841 24 View on LCD screen at around 5-1when manually focusing
by gardenersassistant, on Flickr


Continued in next post
 
Last edited:
Part 8 of 9

Equipment to photograph small invertebrates. All options exhausted?

So what now?
  • Get an MPE-65? (Again). No, I don't think so. I really didn't like the operating characteristics.
  • Give up on small subjects? I'm getting close.
Or a bit of lateral thinking perhaps?

As far as I'm aware, when used without a teleconverter the dumb reverse setup is ok in terms of image quality, and better than the G5 and MSN-202. (I need to double check this obviously.) Manual focus looks doable especially with practice – much more doable with the 70D because of what I see on the LCD. Working distances are no worse than with the MPE-65, and for these magnifications are probably about as good as it gets. Handling seems ok (unlike, for me, with the MPE-65) and flash usage and flash usability acceptable (especially as the 18-55 doesn't extend/contract much).

[BTW, you may remember me complaining over and over again about not getting the flash to play nicely on the 70D. I seem to be doing ok now I'm using the KX800 and now I turn off electronic first curtain shutter when using flash.]

What is holding me back from using the dumb reversed option is the aperture issue. But I've worked out that with a judicious choice of aperture I may not need to change aperture very often. But the 70D (unlike the G5) does seem very prone to picking up dust on the sensor. What if I had an easy way of cleaning the sensor, even out in the field if necessary? I bought an Artic Butterfly Sensor Cleaning Tool 18 months ago but sent it back because it was faulty. I never did find out if it worked or not (it gets mainly good reviews). It was around £100 then, and is now available for around £60. But there is a lookalike version for £28 which has mixed reviews, but I thought it would be worth trying. So I have ordered (and now received) one.

That being the case, I decided to have another go with the dumb reversed option, this time using an extension tube in my “baseline” configuration rather than just reversing the 18-55 straight into the camera. This would have two benefits. First, like with the teleconverter and 12mm extension tube option, it makes the lens reversal for aperture adjustment easier to do. Second, it lets me use a range of magnifications that fit better with my use of the Raynox 150 on the FZ200 than does the range of magnifications with the 18-55 reversed directly into the camera.

I decided to try the 36mm extension tube in my baseline configuration. This would give a range of magnifications from 1.3X (17mm scene width) to 5.2X (4.3mm scene width), with working distances of around 76mm and 38mm respectively.


0841 25 Dumb reversed 18-55 with 36mm extension tube, lens fully extended for 5.2-1 magnification
by gardenersassistant, on Flickr


0841 26 Dumb reversed 18-55 with 36mm extension tube and KX800 twin flash with Shallow hybrid diffusers
by gardenersassistant, on Flickr


0841 27 Dumb reversed 18-55 with 36mm extension tube and one flash deployed for background illumination
by gardenersassistant, on Flickr

The total weight of this setup is 1700g (3 pounds 12 ounces).


Test of dumb reversed 18-55 with 36mm extension tubes

I went out into the garden and found some more little flowers etc and brought them in to do another test run. I didn't have the heart to do like for like shots, so I did a free-flowing session using just the test setup.

I started with an aperture of f/7.1, which gave an equivalent aperture of around f/16 at lowest magnification of 1.3X and f/45 at highest magnification of 5.2X. After a few shots I felt I wasn't getting as much depth of field as I wanted for the shots I was taking and so I reduced the aperture by a stop to f/10. This gave an effective aperture of around f/22 at 1.3X magnification and f/64 at 5.2X. As I had experienced excessive softening at f/128 this would probably be a step too far at the highest magnifications, but I thought I would give it a go anyway.

Not surprisingly, I have noticed dust spots in at one of the highest magnification shots – there may be others. I had decided not to clean the sensor until I had finished this exercise and had stopped changing lenses and extension tubes around so many times a day. Dust spots become increasingly visible as aperture decreases.

I had a close look for chromatic aberration in ruler test shots at 1.3X and 5.2X magnification. There was some that was just visible at normal viewing size. After using Lightroom's chromatic aberration removal function on the 1.3X images I could not see any chromatic aberration when examining ruler images at 100%.

With 5.2X magnification ruler images Lightroom's chromatic aberration removal function decreased the impact of of the chromatic aberration to the point where I could not see it at normal viewing size. Viewing at 100% I could see that the chromatic aberration had been reduced but not removed. Lightroom's manual fringe removal tool removed the remaining fringing in some areas but only reduced it rather than removing it in a fairly out of focus corner of one of the ruler images. Given that the ruler test is fairly extreme, and that I did not notice any chromatic aberration when processing the flower images, I am content that this setup is usable in terms of chromatic aberration.

I did not notice any evidence of lens flare.

I picked out the images that I thought most likely to produce reasonable results and used my normal post processing workflow on them. I ran them through DXO Optics Pro 10, applying Prime noise reduction and mild microcontrast enhancement.

DXO's deconvolution deblurring “lens softness correction” function was not available, which was not surprising as the Exif data did not contain information about the lens used, which in turn is not surprising as the camera didn't know what lens it was using. Instead of its lens-specific “lens softness correction”, DXO offered an Unsharp Mask operation. I wasn't thinking clearly and (without taking on board the Unsharp Mask parameters, or the fact that I had already set up microcontrast enhancement) I assumed that this was a generic “defogging/microcontrast enhancement” (USM with small amount and large radius, threshold zero) being offered as a substitute for the lens-specific deconvolution deblurring. It wasn't, it was vanilla Unsharp Mask sharpening and using it rather than increasing the amount of Lightroom's sharpening I used was probably a mistake. Still, it didn't seem to spoil the images.

In Lightroom I applied Lightroom's Auto Tone function, which I routinely use as a starting point for my Lightroom processing these days as it adjusts the white and black point so as to make full use of the available dynamic range. I then tweaked the images in my normal fashion. I didn't bother cropping them (apart from the first one I worked on, which is the third image in the set). I exported the images from Lightroom as 1300 pixel high JPEGs, my normal output format. They are in this album at Flickr.

Because there is no communication between the camera and lens with the dumb setup, the Exif data does not include the lens focal length used for each shot and in consequence I can't work out the magnification for each shot (Had I done like for like I could have worked it out from the G5 focal length). However, I can identify the highest magniffication shots from the subject matter and they look soft to me. This is unsurprising, and I will have to experiment to find the smallest practical effective aperture (f/45 is my current guess FWIW).

Unfortunately, as well as being soft, the highest magnification shots also don't have enough depth of field for what I was trying to achieve with the shots. What I conclude from this is that I'm going to have to live with not having as much depth of field as I would like, at least with single shots. That said, this setup does let me get greater depth of field for small subjects than the MSN-202 on the G5, and with less chromatic aberration.

Now, these were not shots of the type of subject this setup is mainly to be used for (the setup was actually too powerful for a lot of the subjects used in this test, which is why some of the compositions look ill-considered, cutting off petals etc). However, given the indications of potential image quality that this test has produced, and the indications of usability despite the shortcomings of the 70D setup, I am going to test this setup on small invertebrates when I next come across them.


Conclusions in next and final post in this series
 
Last edited:
Part 9 of 9

Conclusions

It is early days yet, and fatal flaws may yet emerge, but as it stands a reverse lens setup opens up the opportunity of adopting a different, two camera solution, without the need to carry three cameras (FZ200 for medium invertebrates, G5 for small invertebrates, 70D for large invertebrates, flowers and the occasional bird).

The new equipment set would be FZ200 and 70D. I would no longer carry the MSN-202 and stacked pair of Raynox 150+250. Instead I would take the 55-250 STM, the 18-55 and extension tubes for the 70D. The KX800 flash can be used on, and easily transferred between, the FZ200 and 70D, so I would still only need to carry one flash device.

I haven't done the sums, but I imagine this would be close to neutral in terms of overall weight and portability of the two kitbags I have with me when out photographing, and with the tripod would still be quite a lot to carry around. But overall it doesn't look to be significantly worse.

In terms specifically of small subjects, a dumb reversed lens setup will be heavier and more inconvenient to use than the G5 and MSN-202, and may have a lower success rate because of the lack of autofocus, and may be less flexible because of the time and inconvenience of changing aperture. If however it can produce better images, that will be a price worth paying.

(And in any case, exercises like this are hugely educational – for me at least – and fun – ditto.)


To be continued in due course. :D
 
Last edited:
'Lens reversed on lens' is a technique I've used with reasonable results in the past but I've never bothered with reversing a single lens for the reasons you found. As a matter of interest, have you tried reversing a 50mm on your 55-250mm? If it works, being able to zoom from 1:1 to 5:1 could be quite interesting.
 
'Lens reversed on lens' is a technique I've used with reasonable results in the past but I've never bothered with reversing a single lens for the reasons you found.

Thanks for the feedback. That's interesting. What combination of lenses do you use for lens reversed on lens?

As a matter of interest, have you tried reversing a 50mm on your 55-250mm? If it works, being able to zoom from 1:1 to 5:1 could be quite interesting.

No - I don't have a 50mm lens. But I do have the 18-55 of course, so I just tried reversing that on the 55-250.


0842 01 18-55 at 18mm closest focus reversed on 55-250 at 250mm (required to minimise vignetting)
by gardenersassistant, on Flickr

As with the equivalent G5 setup I tried, the telephoto zoom on the camera has to be kept at maximum focal length because of vignetting. However, the G5 setup (14-42 reversed on 45-175) will work without any (or with hardly any) vignetting with the telephoto zoom at maximum focal length, but with this Canon setup you can't completely get rid of the vignetting. And with the 55-250 extended like that I wouldn't fancy hanging too much weight on it.

Here is what the view on the LCD looks like and what the captured image looks like with the 18-55 at 55mm (for minimum magnification of this setup).


0842 02 LCD view and Image captured with 18-55 at 55mm infinity focus reversed on 55-250 at 250mm
by gardenersassistant, on Flickr

And here it is at maximum magnification (18mm on the 18-55)


0842 03 LCD view and Image captured with 18-55 at 18mm infinity focus reversed on 55-250 at 250mm
by gardenersassistant, on Flickr

These are both with the 18-55 set (when fitted the normal way round) to infinity focus, which is how it remains when the lens is reversed. Here are the same illustrations but with the 18-55 set at minimum focus distance.


0842 04 LCD view and Image captured with 18-55 at 55mm closest focus reversed on 55-250 at 250mm
by gardenersassistant, on Flickr


0842 05 LCD view and Image captured with 18-55 at 18mm closest focus reversed on 55-250 at 250mm
by gardenersassistant, on Flickr

The vignetting when the 18-55 is set at minimum focus distance is less severe, but still more than I would want to work with. And as with the infinity focus example, the difference between what you see on the LCD and the image that gets captured would make composition very tricky. Also, when the 18-55 is at closest focus the working distance decreases from about 40mm to about 20mm when the 18-55 is set to 55mm focal length.


0842 06 Working distance with 18-55 at 55mm closest focus on 55-250 at 250mm
by gardenersassistant, on Flickr

The working distance increases as the focal length decreases, getting back to about 40mm at minimum focal length of 18mm.

All in all, this isn't a combination I would want to use.

You are right about it being great to zoom over a 5X magnification range. That is what I can do with the 18-55 reversed by itself. The zoom ring needs only a light touch and is conveniently placed to be turned with either index finger. And it only needs a turn of about 75 degrees to go all the way from min to max magnification.
 
I used an old Nikon 50mm f1.8 AIS on the front of a 105mm Micro Nikkor so a 2:1 mag.

I'm not surprised the 18-55mm wasn't successful as I would have thought it was to complex and too small a maximum aperture to work well. I'm pretty sure that John Bebbington used to reverse an enlarging lens on the front of his unholy mixture of prime lens, extension tubes and teleconverters. The advantage was that it had a small o/d so it was easier to get the flashes onto the subject when your working distance is three fifths of FA. It was also cheap which was a major consideration for him when I went on a couple of his courses in '99.
 
I used the 18-55 reversed in dumb mode with 36mm extension tube to capture the aphid images in this post. I think these are better than I have done before with aphids. However, I found it very difficult and time-consuming to get them. With the subject either not wanting or not able to move much I spent half an hour trying to photograph it. Normally the time available is more likely to be measured in seconds, or tens of seconds if I am lucky, rather than tens of minutes. This made me think that unless my technique improves radically with practice this setup is not looking practical.

This was reinforced late yesterday afternoon when I went out for a short time looking for small things to practice on. I found two springtails, one of the long thin ones and one of the round ones. The long thin one was rushing around and I found it impossible to catch it in focus as I (tried to) follow it around. The round one was staying in one spot for a while before moving a bit and so was much easier. (There was no breeze to confuse the issue btw.) Even though it was so much easier, I only got one shot of it that I would consider usable.


0845 01 2016--03-07 IMG_7414_DxO LR 1300h-3
by gardenersassistant, on Flickr

The rest ranged from unusably small DOF or misplaced DOF to (in the vast majority of cases) wildly and completely out of focus.

This is very disappointing compared for example to the sequence of images from 042 to 080 in this album at Flickr, where I got shot after shot in focus of a similar sized globbie, and that one was moving around a lot of the time, and as can be seen from the sequence I was changing magnification back and forth too, and changed to a different subject and back again a couple of times. The sequence was captured with the G5 and (probably) the MSN-202 on (definitely) the 45-175, using autofocus.

Now, given the results I got with the aphid using the reversed setup, it is possible that I might get better quality globbie shots using the reversed setup. But unless my technique using the dumb reverse setup improves radically any such better quality globbie images may be few and far between, and I can't see me getting sequences like that one with the G5. And would I get better quality globbie shots anyway? I haven't used the reversed setup enough to be able to do a definitive comparison, but I think it is instructive to compare the shot using the reverse setup with some from the G5 sequence. (The full size version of this over at Flickr has each of the 4 images at 1300 pixels height.)


0845 02 2016--03-07 Globbie comparison 70D reversed vs G5 achromat
by gardenersassistant, on Flickr

I found one other subject in this short session. It was much larger than the springtails (although still fairly small), and it remained completely still for a long time. So it was a very easy target and I had plenty of time. Here are two shots of it. Are these any better than what I normally get? Just possibly, slightly, although to be honest I'm not convinced.


0845 03 2016--03-07 IMG_7425_DxO LR 1300h
by gardenersassistant, on Flickr


0845 04 2016--03-07 IMG_7431_DxO LR 1300h
by gardenersassistant, on Flickr

I wondered if using autofocus with the reverse setup would make a difference, so I decided to try again with the Meike adapter as this would let me use autofocus. I put some felt around the inside of the front fitting to try to reduce the lens flare. After dark last night I found another cooperative springtail to test the felted-up Meike setup on, but after a dozen shots or so I realised that the LCD was looking extremely hazy - I could hardly see the subject. Assuming this was lens flare again I swapped back to the dumb reversed setup to capture the same subject so I could compare what I got with the two setups. Unfortunately I only got one attempt at it with the dumb setup before the subject wandered off and disappeared into a nearby crack in the wall. Looking later on the PC, neither the single dumb setup image nor any of the Meike setup images were usable.

Feeling rather frustrated by all this, I got out the FZ200 which I had brought out with me and put the MSN-202 on it. I couldn't find any springtails but I did find a very flat, wormlike animal. Perhaps it was a flatworm, I don't know. It was moving around, mostly obscured by grass and detritus, with its head end (well I think it was the head end, from the way it was moving, but there was nothing really head-like about it) waving/curling around continually and quite fast. And there was almost no structure/detail/contrast for autofocus to latch on to. All in all, a pretty difficult subject. Which I managed to photograph, using autofocus. It wasn't anything like a 100% hit rate, around 1/3 perhaps, but given the difficulty I was happy with that. Here is a 50% crop from one of the images (that is 50% of a 12 MPix 1/2.3" sensor, which is 6mm wide and about 1/10th the area of an APS-C sensor).


0845 05 2016--03-07 P1190155_DxO LR 1300h
by gardenersassistant, on Flickr

The aphid images make me want to keep trying with the reversed setups, because I may not be able to achieve that image quality with my other setups (that is still an open question in my mind, something that I need to test). On the other hand the springtail image quality comparisons make me wonder if that is true. And the springtail sequence and my experience with the flatworm strongly incline me towards a setup with responsive autofocus.

As usual, no definitive conclusions. To be continued I imagine.
 
Lovely images Paul. (Apologies for the slightly ! delayed response. I've had a four month or so timeout from photography. Got a bit burnt out I think. )

Given your comment about the bridge+achromat versus dSLR+prime macro lens (a subject dear to my heart of course:D) you may find the next post interesting.

Thanks very much Nick (my turn to appologize now mate)...Ive spent the Winter months "Birding" photographing Birds, so ive done no close up/macro work myself!

Theres nothing wrong in taking a "time out" either, its good to re-charge the ole batteries!

Ive started using yet another camera system now...Im onto the Nikon 1 system - cx lenses, 1 inch sensor, 2.7 crop factor...best of all you can attach the FT1 adapter, an use Nikon lenses(plus other lenses too). Early days yet(ive been using the system for 4 months) but things look very good.

Cheers Paul.

PS. time for me to "catch up" in this section now! ;)
 
As mentioned in this thread I have tried again with reversed lenses, the latest attempt being with the 14-42 kit lens reversed on the Panasonic G3. I quickly abandoned the attempt because of the difficulty I had in using the setup – I couldn't seem to get anything in focus. Instead I used the Raynox MSN-202 and was pleased with the results. This made me wonder if reversed lenses really was the right tool (for me) for higher magnification work.

I had another look at the MSN-505 and realised that, if I had properly understood what was on the Raynox site, it should take me to a minimum scene width of 3mm on the 45-175 on the G5, as against the 4.5mm for the MSN-202. In APS-C terms this would take me from 5:1 to 7.5:1. I decided to give it a try.

The MSN-505 arrived yesterday afternoon and I confirmed that my understanding about the minimum scene width/maximum magnification was correct. On the 45-175 it gave a maximum scene width of 10.5mm and a minimum scene width of 3mm. Autofocus appeared to work too.


0853 01 Raynox MSN-505 on 45-175 on Panasonic G5 with Midi Hybrid diffusers on KX800 twin flash
by gardenersassistant, on Flickr

The setup shown here weighs 1360g (including batteries).

I took it out in the garden for an hour either side of dusk to try it out. I used it mainly on large springtails which were in fact a bit big for the lens, so for the whole body shots that I concentrated on I didn't have much latitude for crop for DoF.

I used ISO 320/400 and f/22 for all the shots, at the G5's pitiful 1/160 max sync speed (not that that mattered in the low ambient light levels, but it does matter, in a bad way, in stronger light). I used the KX800 twin flash with my Midi Hybrid diffusers. (I had been using my Shallow Hybrid diffusers recently but there was a question as to whether they were producing excessively hot flash areas on the subjects, so I had decided to revert to the deeper diffusers. This was independent of which close-up lens I would be using.)

I posted 8 examples from the session in this post. During the almost one hour long session I captured around 400 images, 46 of which are in this album at Flickr. (There were a number of images that were pretty much as usable – or not! - as the ones in the Flickr album but which were too similar to want to include.)

Post processing used my current normal workflow of batch processing in DXO Optics Pro (noise reduction, mild microcontrast enhancement and lens-specific deconvolution deblurring (“Lens softness correction” in DXO talk) – although how much effect the Lens softness correction would have when using close-up lenses, especially a powerful one like the MSN-505, I don't know.

Here are the crops used for the posted images.


0852 49 2016_03_15 Crops for images posted at Talk Photography 1024w
by gardenersassistant, on Flickr

Apart from some captures of a slug's eyes (which didn't produce worthwhile results), all the captures used autofocus. This worked fine (although none of the shots used maximum magnification, and in fact most used around minimum magnification because I was concentrating on whole body shots of relatively large (compared to the available magnifications) subjects. (Of the 8 posted shots, 6 were at minimum magnification.)

The autofocus success rate was high for static or slowly moving subjects. It was low when I was tracking a rapidly moving subject – numbers 37 to 40 in the Flickr album are the most usable of the 23 captures of that subject, in most of which the subject was completely out of focus. (Number 6 of the posted images is one of those four.)

Images suffer from increasingly strong pincushion distortion as the magnification decreases. Here is a shot at maximum focal length/maximum magnification. From the point of view of distortion it looks more or less ok to me (we'll come on to the chromatic aberration in a minute).

0852 47 2016_03_15 P1130257 LR 1300h by gardenersassistant, on Flickr

But here is what it is like at minimum focal length/magnification. (As can be seen here, there is a small amount of vignetting at minimum focal length on this setup.)

0852 48 2016_03_15 P1130256 LR 1300h by gardenersassistant, on Flickr

This distortion gives lower magnification images a very weird (and to my eye and brain rather disconcerting) appearance. Here is an example.

0852 04 2016_03_15 P1130396-2_DxO LR 1300h Uncorrected distortion by gardenersassistant, on Flickr

Fortunately this is quite easy to improve to a large extent using Lightroom's Distortion Correction slider, and I'm sure that would be the same with other decent photo editing applications. Here is a more or less corrected version. The corners still look odd. I don't know if this is because I didn't get the amount of correction right or whether it is not possible to correct completely.

0852 03 2016_03_15 P1130396_DxO LR 1300h Corrected distortion by gardenersassistant, on Flickr

You can tell what the worse case correction needed is by taking a ruler image or similar and seeing how far you need to push the slider to get it more or less straight. In fact, I couldn't actually get it straight in Lightroom – it had a residual “wobble” about ¼ of the way in on both sides, but I think you can get it near enough so as to be not offputting for this type of image. The price of the correction must be loss of detail in the middle areas towards the edges, but for my type of images those areas aren't usually important. As long as it doesn't look weird I can live with loss of detail towards the edges.

It is also possible that you can get some sort of magnification effect by over-correcting the distortion. I happened to notice this example (same image), but I don't know if it would have any practical use.

0852 05 2016_03_15 P1130396_DxO LR 1300h-2 Over-corrected distortion by gardenersassistant, on Flickr

So I'm not too troubled by the distortion. The chromatic aberration is another matter. Like the distortion, it is serious. It is worst at higher magnifications, unlike the distortion which is worst at lower magnifications. And unlike the distortion, it wasn't (largely) fixable in the example I tried, with the software I used. In the ruler example neither the red nor the green fringing responded to Lightroom's chromatic aberration removal setting. The green was reduced by the hand-cranked fringe removal tool, but the red was untouched by it.

On the face of it, especially as this is, for an achromat, an expensive piece of kit (I paid £130 for it), the chromatic aberration is sufficient reason to send it back as not fit for purpose. However, I have noticed with other close-up lenses that the ruler test seems to be rather severe in relation to my normal close-up images, which may turn out ok even if their ruler test results are poor. So rather than send it back I took the MSN-505 out to try it.

I did have some green fringing in some of the images, and I couldn't get rid of it. On the other hand, I think (hope I'm not kidding myself here) that these are probably the best springtail images I have produced to date. And they were quite easy to produce. The 18mm working distance wasn't as problematic as I thought it would be. The operating characteristics of the G5 and (non-extending) 45-175 made subject acquisition much easier than I feared it would be (helped by the fact that the 45-175 not only has a very easy to turn (using one finger) zoom ring, but it also has a zoom lever conveniently placed on the side of the lens (which was designed with video use in mind I believe).

Illumination with the KX800 seemed to be ok in the sense that I could get light to the subject despite the small working distance, even when working up against a wall. I still got hot reflections of the flash diffusers, but that is another story, and maybe it just comes with the territory and has to be lived with.

DoF seemed ok at the lower end of the magnification range. I thought the images about half way up the range were, at best, borderline (there are a couple of them in the posted images), and not usable beyond that. But that may be because of the size of the subjects. I will be interested to see how it works out with the smaller, globular springtails, when/if I manage to find some.

Since it is a close-up lens there is no “loss of light” issue. Unlike with macro lenses, extension tubes, teleconverters, reversed lenses and bellowsthe effective aperture is (whatever the magnification) the same as the aperture you set on the camera, so for the session in the garden I set the aperture to f/22 and that is the aperture I was actually using, irrespective of the magnification. This has an advantage and a disadvantage. The disadvantage is that I can't exploit the extra depth you can get from, for example, the MPE-65, by using an aperture which takes the effective aperture out to, say f/45 (twice as much DoF as f/22) or beyond. On the other hand, it doesn't need lots of extra flash power and/or ISO increase as magnification increases. I was shooting at ISO 400 or so at ¼ flash power for most of the session, and didn't have to change the flash power when I changed magnification. Using less than maximum flash power means faster recycling times and the opportunity to shoot at a faster rate.

I enjoyed using the lens (which is a huge contrast with my experience with reversed lenses, which have been for the most part a story of frustration, annoyance and failure, with only a very few exceptions). Given that I now know that at least sometimes the MSN-505 can produce results that I like,
  • using techniques that I am comfortable with and find quick, easy and effective to use,
  • with a rig that is relatively light and easy to handle compared to some other alternative ways of getting to this amount of magnification,
  • without having to risk dusk etc intrusion by opening up the rig up out in the field to add extension tubes or teleconverters, or to re-reverse and un-re-reverse a reversed lens to change its aperture
.... I think I will be keeping the MSN-505. Hopefully it can produce acceptable (to me) results quite a lot of the time, but perhaps I was lucky with my subjects. That I'll find out in due course.
 
Last edited:
I decided to have another go with concave diffusers. I have tried them, briefly, in the past, but most of my flash work is done with the Raynox 150, and this has a working distance of around six inches, which means that any concave diffuser has to be large. Here is the setup I tried briefly. (I also tried using just one of the two layers.)

0791 15 Double concave diffusers with Midi Hybrid diffusers by gardenersassistant, on Flickr

I found this unwieldy to use, and it needed a more additional flash power and/or higher ISOs than I was comfortable with.

I have recently been doing more work than previously with higher magnifications, and shorter working distances. The MSN-202 has a working distance of around 30mm and the MSN-505 has a working distance of around 18mm. It struck me that concave diffusers could be a much more practical proposition for these lenses.

I tried building concave diffusers from the “plastic paper” that I have been using in my flash head diffusers. This one is on the MSN-505.

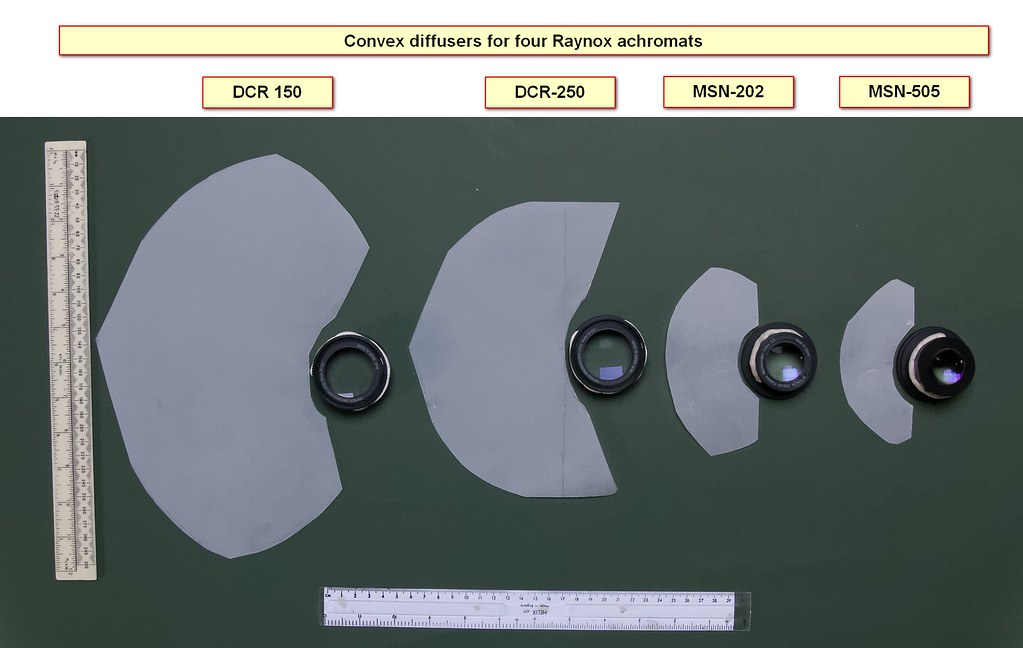
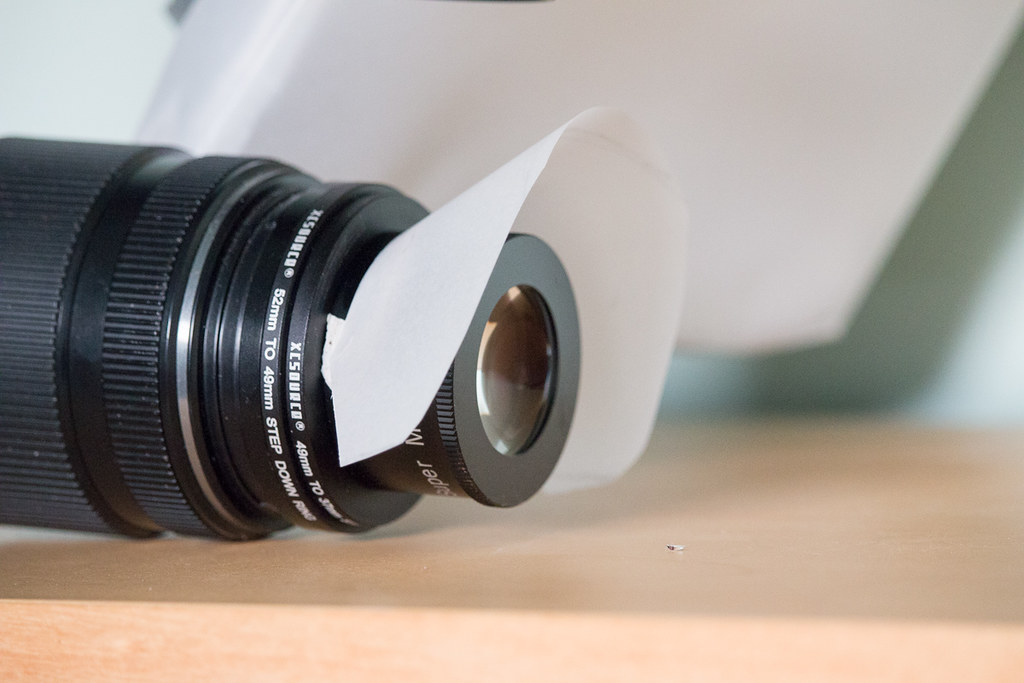
0855 01 Plastic paper convex diffuser on Raynox MSN-505 by gardenersassistant, on Flickr

0855 02 Plastic paper convex diffuser on Raynox MSN-505 by gardenersassistant, on Flickr

The diffuser is held on with Blu-Tack and so can be easily attached and removed.

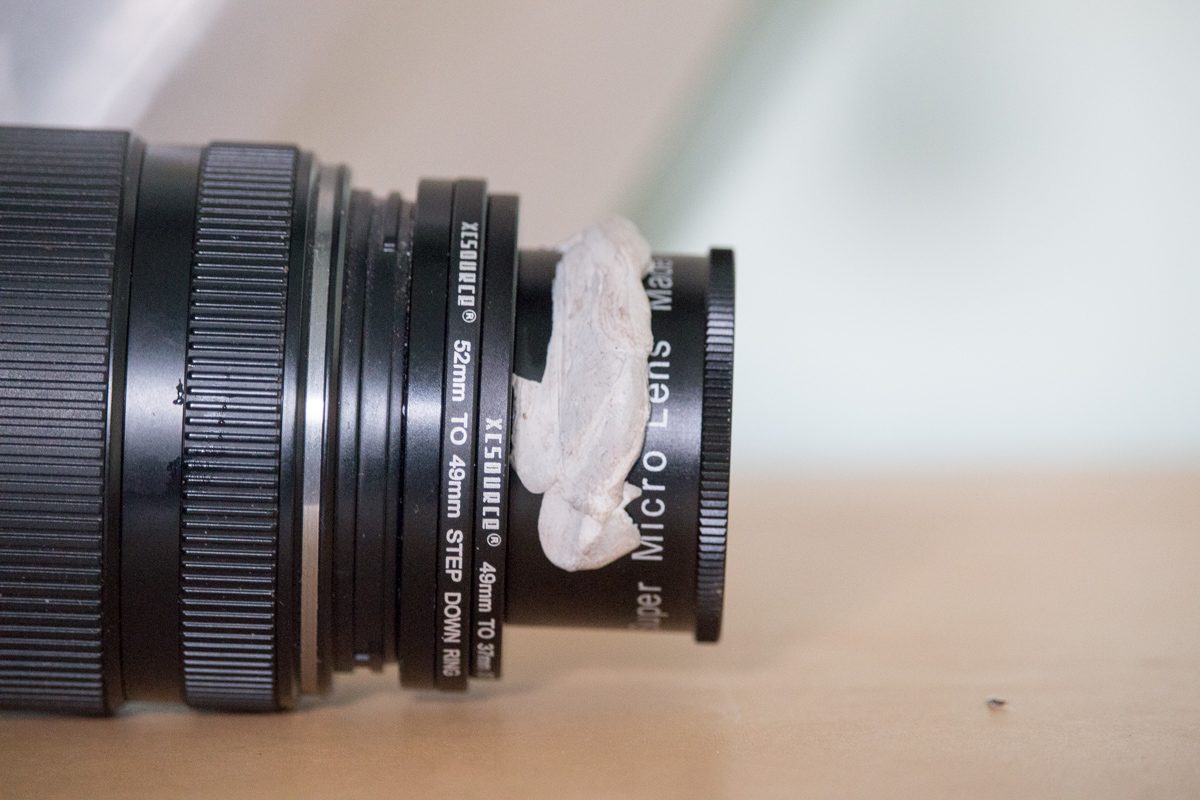
0855 03 Blu tack used to hold concave diffuser in place by gardenersassistant, on Flickr

The maximum size and shape of the diffuser (which I probably haven't got right yet) is limited by the distances and angles at which I may be shooting. In both of the following examples the camera is at the correct distance for focusing the MSN-505.

0855 04 Length of diffuser limited by 18mm focal length of MSN-505 by gardenersassistant, on Flickr

0855 05 Diffuser has to be shaped to allow varying angle of attack by gardenersassistant, on Flickr

This is the same type of arrangement for the MSN-202.

0855 06 Convex diffuser for MSN-202 by gardenersassistant, on Flickr

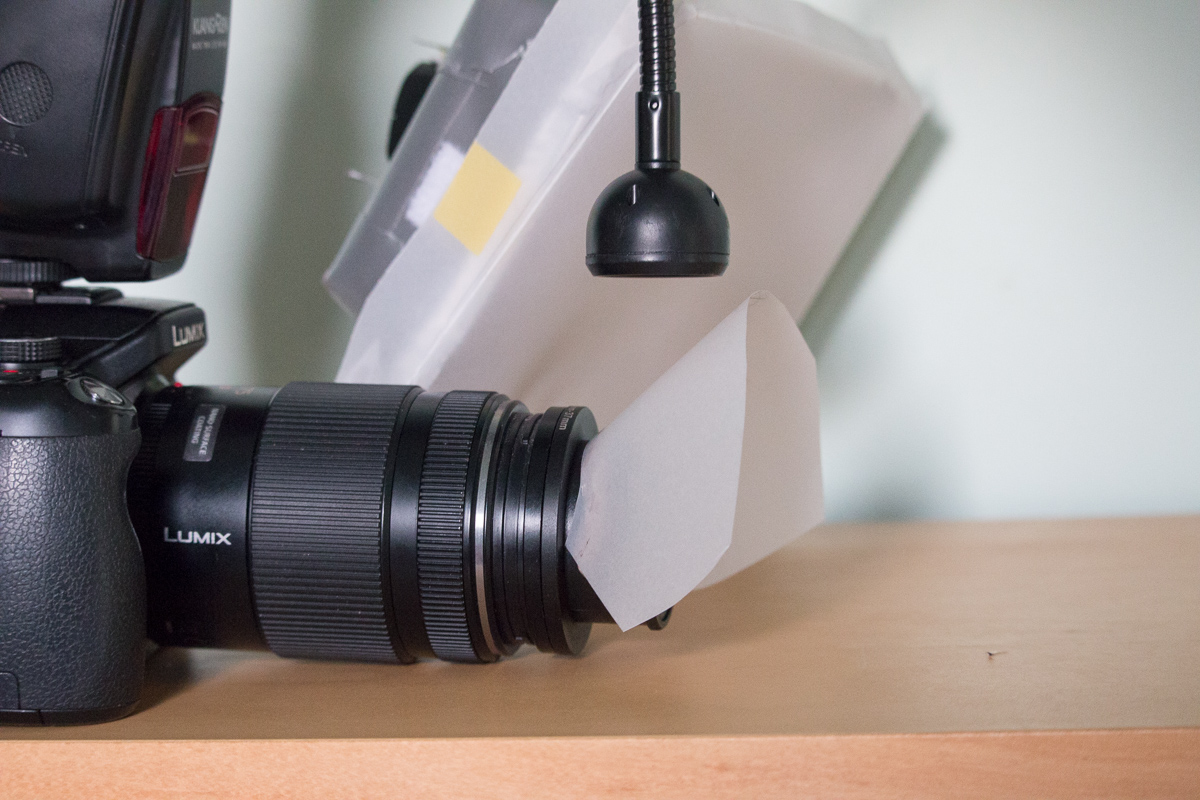
0855 07 Convex diffuser for MSN-202 by gardenersassistant, on Flickr

I did a short nighttime session in the garden to test out the MSN-505 version. I haven't tested the MSN-202 version yet.


Continued in next post…..
 
I have posted several MSN-505 shots from the test session in the first post in this thread (the images in the second post in the thread used the Raynox 250, without a concave diffuser). It is too early to be sure whether the concave diffuser improves things, because whether hot areas appear and how harsh they are seems to be critically dependent (for these particular subjects) on the exact directions involved (unlike with some other subjects such as ladybirds which are horribly reflective whatever angle you take on them). However, in comparing these MSN-505 images with the previous ones (in this album at Flickr) I have the impression that the worst of the hot areas in the concave diffuser set are not quite as bad as the worst of those in the previous set. This might be just “luck of the draw”, but given the results from other people using concave diffusers I am cautiously hopeful that there may be some benefit I can get from them.

One thing that is to do with the lens and the magnification rather than the lighting is chromatic aberration. Here is one of the images from this session. Notice the strong vertical band of green fringing on the subject's body towards the left edge of the image, and the strong green and red bands which have completely taken over one of the hairs on its underside a bit further to the left.

0854 08 2016_03_17 P1130864_DxO LR 1300h Green fringing by gardenersassistant, on Flickr

Here is a version where I have tried to correct the fringing. The strongest green fringe on the body has almost gone, but there is a small residue and the vertical fringe to its left and on the hair on the underside are pretty much untouched.

0854 09 2016_03_17 P1130864-2_DxO LR 1300h Green fringing partly removed by gardenersassistant, on Flickr

Here is a version where I have taken a much more aggressive approach to getting rid of the fringes, but this has resulted in the colours elsewhere in the image becoming pallid.

0854 09a 2016_03_17 P1130864-2_DxO LR 1300h Green fringing more completely removed by gardenersassistant, on Flickr

Even with this limited sample it looks like fringing can be real problem for some images. Time will tell how widespread and serious this is for my type of images.

In the second half of the latest test session I ran out of small subjects and so I took some photos of some larger subjects, switching over to the Raynox 250 for these. One of these subjects was a very difficult type of slug, extremely reflective, which I didn't get any usable shots of because of intense reflections, like this (which is the best of a mainly very bad bunch).

0854 16 2016_03_17 P1130960_DxO LR 1300h by gardenersassistant, on Flickr

What caught my attention was the reflection of the diffusers in the eye. This was using the Raynox 250, with no concave diffuser, and the diffusers are very clearly portrayed.


0854 17 2016_03_17 Annular ring from flash diffuser
by gardenersassistant, on Flickr

As mentioned in a previous post, I threw these diffusers together very quickly and didn't test them for evenness of output as I went along. Looking closely at the reflections of the diffusers you can see in both of them a bright centre and then a darker ring and then bright again outside that. It seemed to me that removing the larger of the two expanded polystyrene layers might even this out somewhat, so I have made that modification to what are now my “Mark 2” Shallow Hybrid diffusers.

The construction of the Shallow Hybrid Diffusers is shown in this album at Flickr.

This is the layer I removed ….

0838 10 Upper expanded polystyrene layer in original version of Shallow Hybrid Diffuser by gardenersassistant, on Flickr

…. leaving the Mark 2 version looking like this.

0838 11 Mark 2 version of Shallow Hybrid Diffuser with upper expanded polystyrene layer removed by gardenersassistant, on Flickr

A quick mirror test suggested that the output may indeed be more even than it was. If it does work nicely with that layer removed that would be good, because it would require a stop or so less output/lower ISO than the original version. I obviously need to test the Mark 2 version to see if it works ok.
 
Last edited:
I decided to try constructing a concave diffuser for the Raynox 250 on the same lines as those for the MSN-202 and MSN-505. Obviously it had to be much larger, to match the much larger working distance of the Raynox 250, around 100mm as compared to around 30mm and 18mm for the MSN-202 and 505.


0855 08 Convex diffuser for Raynox 250 P1060489 LR 800h
by gardenersassistant, on Flickr

I took it out into the garden for an hour or so, at night again, to see if it was usable. It was. The usability is much helped by the fixed working distance for each achromat and the fact that the 45-175 and the FZ200 with adapter tube don't extend when changing focal length. This means that for as long as you keep using the same close-up lens you don't have to adjust the diffuser or the lighting as you change focal length/magnification. There is an added step of removing the diffuser before removing the close-up lens, and adding the diffuser when a close-up lens is attached, but that turns out to be very quick and easy to do.

The diffusers are easy to carry around because they are flat when not in use and they can simply be slipped into an A4 plastic folder. They can also get wet without harm, for example from dew on the ground and plants, as happened during the test session. They may crinkle slightly when wet, but that isn't a problem.

There are some images from the session in this album at Flickr.

In terms of the effectiveness of the diffuser I thought there was probably some improvement. However, it is difficult to tell. For example, this shot shows that there were still plenty of nasty highlights in some cases.


0857 15 P1140275_DxO LR 1300h
by gardenersassistant, on Flickr

However, the varying nature of the highlights along the subject's body illustrates that the extent, shape and intensity of the highlights depends on the angles involved. So the fact that there appeared to be some improvement might simply be because of the angles at which I happened to shoot that night's subjects. That said, I have been shooting woodlice and slugs, at night, quite a bit in the last few days, and I did gain the impression that the nasty highlights were significantly less intense than previously. For example, I don't think I have ever got an acceptable flash illuminated image of very shiny slugs like this one no matter what post processing I applied. The highlights are still pretty nasty in this image, but I think they are better than I have previously achieved and it seems to hover somewhere around the borders of acceptability to my eye.


0857 17 P1140301_DxO LR 1300h
by gardenersassistant, on Flickr

Similarly, the next shot has a “flash line” down the middle of the subject's back, as I often get with woodlice, but it seems very subdued compared to what I have seen previously, and it is I think the worst of the six woodlouse shots in the linked Flickr album.


0857 09 P1140229_DxO LR 1300h
by gardenersassistant, on Flickr

When I got back indoors I did some of my “shiny man-made objects nasty highlights” test shots, on some coins, the tip of a ballpoint pen and a battery, and these seemed to come out quite well too. (They are at the end of the linked Flickr album.)

Encouraged by these results I made a concave diffuser for the Raynox 150, which is very similar to the one for the Raynox 250, just a bit bigger. Here is how the four concave diffusers compare in terms of size.


0855 12 Convex diffusers for four Raynox achromats
by gardenersassistant, on Flickr

I did a few indoors test shots with the Raynox 150, shooting manmade objects, and these seemed promising. They are in this album at Flickr
.

And then …...

Continued in next post
 
…. I decided to do some controlled like for like tests. I used the Raynox 250. Indoors, using manmade objects, I captured a test scene with the camera on a tripod, using the concave diffuser, and then took off the concave diffuser and captured the test scene again.

One of the things I wanted to know was how much extra flash power I would need because of the extra layer of diffusion, so I tried to adjust the flash power with the non-concave-diffuser shots so they matched the preceding concave diffuser version. This proved to difficult. I realised after capturing half a dozen scenes that the reason for these difficulties was that the concave diffuser did not just alter the intensity of light falling on the scene (by perhaps 1/3 to 2/3 stop) – it also altered the distribution of light around the scene. That meant that which of the images looked darker or brighter depended on where in the image I looked. Some parts got darker and some got lighter. For the seventh to tenth scene I captured multiple versions of the non-concave-diffuser versions with varying levels of flash power so I could decide later which versions to use.

The captured images from the tests are in this album at Flickr. In each case the version using the concave diffuser is first. For the first six scenes there is one non-concave-diffuser version. For the seventh to tenth scene there are two, the first of which is the closest match I could get with the brightness of the subject in the concave diffuser version, and the second is the closest match for the background.

These comparisons show clearly that if the two versions have a similar brightness of the subject, then the version using the concave diffuser has a brighter background.


0856 32 With similar subject brightness, the background is lighter if the concave diffuser is used
by gardenersassistant, on Flickr

Whether one thinks this is a good thing or not is a matter of taste. The non-concave-diffuser versions have more impact because of the greater contrast between the subject and the background, and this will appeal to many people. Others, like me, who don't like dark backgrounds (because, in my case, I feel it gives an image a “this was done with flash” look to it that I don't like), may prefer the concave-diffuser version. And some may have mixed feelings (actually I think I fall into that category).

The comparisons show that the concave diffuser produces a more even spread of light and reduces the harshness of highlights, as in this example.


0856 33 The concave diffuser produces a more even spread of light, reducing harsh highlights
by gardenersassistant, on Flickr

However, there appears to be a downside to this more even lighting – apparent loss of detail or sharpness. I think this is difficult to demonstrate convincingly with side by side comparisons like this. When comparing images I flick back and forth between versions of the image so that one version immediately replaces the other. I keep my eye on one part of the image and the differences really jump out as I flick back and forth. I will give a side by side example here, but you may not find it convincing looking at it here side by side. But when I flick between these two versions and keep my eye on the area shown here I can see very significant differences.


0856 34 Concave diffuser versions have less microcontrast and appear to have less detail
by gardenersassistant, on Flickr

I suspect that what is happening is that the concave diffuser versions have less microcontrast, which gives an impression of less sharpness and/or less detail. If this is a microcontrast issue then increasing the microcontrast for images captured using a concave diffuser may improve matters. If the images don't respond adequately to this treatment, this may suggest using a concave diffuser only when it is needed to control difficult highlights.
 
Last edited:
I have been pursuing the problem of unsightly flash highlights, which is really bugging me. I have done yet more experiments, for example trying to understand the characteristics of different diffusion arrangements by taking loads of photos of subjects such as those in this album at Flickr, a number of which are highly reflective and have rounded shapes (making it more difficult or in some cases impossible to get, by accident or design, a "good" angle on them which reduces or removes flash highlight issues).

My current thinking is that controlling these highlights may involve three things in combination: decent diffusion, under-exposure, and some additional (not terribly taxing or time-consuming) post processing. I have made a video explaining my thinking about this. I used the approach described in the video for the nighttime session (and subsequent post processing) from which I produced the images in this album at Flickr, a number of which I have just posted in these threads:

Close encounter of three kinds
Spider and prey
Wood lice
Snails
Slugs


That session used a Raynox 250 on my G5, with a concave diffuser in addition to the diffusers on the KX800.

This afternoon I went out with the Raynox 150 on my FZ200, using the same diffusers on the KX800 and a convex diffuser (larger than with the 250 because the working distance is longer for the lower magnification 150). I just posted some images from that session in A couple of flies. Unlike the nighttime session with the G5, the images were not radically underexposed. I went by what I was seeing in live view (reviewing the look of a scene after capture, not taking any notice the histogram), and I didn't see any indication that radical underexposure was needed. There were hardly any subjects around, but the few I did find were much easier - much less reflective than the slugs, snails, woodlice and earwigs I was photographing in the nighttime session. I didn't have to do much by way of "clever" post processing with them (unlike some of the nighttime images that I had to put more effort into).

The early feedback on a few of the nighttime images is promising. We'll have to see how this pans out.
 
White balance complications ....

In this post @Kodiak Qc said he thought the spider and prey images were too yellow for his taste. As you can see from my reply there, I agreed, and posted a revised version, reducing both the yellow and the magenta. I took a bit of a complicated route to get there (nothing new there then :)), and along the way learnt some things that might be widely known, but they were new to me.

An early thought was that the camera white balance was set wrongly. (I shoot raw, so in principle it doesn't matter what white balance is set on the camera, but I generally use auto white balance and whatever the camera chooses gets carried over into Lightroom and I rarely change the white balance in post processing.)

I was using flash, and since I was shooting at night the flash was the only light source. I assumed (or sort of "assumed unconsciously" without really thinking about it) that the camera would find it easy to set the right white balance in this simple situation. After all, it knew I was using flash, and flash white balance is standard. Right?

Wrong. On both counts. It seems (from page 53 of the RawTherapee 4.0.10 User Manual) that Canon, Pentax and Olympus use one white balance (Temp 6000, and presumably Tint 0), while Nikon, Panasonic, Sony and Minolta use another (Temp 6500, and presumably Tint 0). Just to confuse matters, if you tell Lightroom to set the white balance to "flash" it sets it differently again (Temp 5500, Tint 0).

And, the KX800 is a manual flash and I suspect the camera doesn't know that flash is being used, therefore it wouldn't simply set the white balance to "flash" (whatever numbers it decided to use for that). And I don't even know that is how it works even if the camera does know flash is being used.

It gets worse. Give the same file to several applications and even when the image was shot with auto white balance, and even when the applications show the white balance as "as shot", they will use different values for the white balance. For example, I opened the same raw file in Lightroom, Photoshop CS2, RawTherapee and DXO Optics Pro. Here are the white balance values they showed:
  • Lightroom - Temp 5650, Tint -3
  • CS2 - same as Lightroom
  • RawTherapee - Temp 5526, Tint 1.016 (I don't know how to translate this into the small + and 1 numbers you normally see for Tint)
  • DXO Optics Pro - Temp 5400, Tint 0

When that raw file was read into DXO Optics Pro and output as DNG (however much or little processing was done to it), when the DNG file was read in Lightroom it had Temp 5500, Tint +14 (a significant and visible move of Tint towards magenta).

When the raw file was converted to DNG in Adobe DNG converter the white balance was read in Lightroom as Temp 5650, Tint -3 (at least the Adobe stuff managed to be consistent) but read in RawTherapee as Temp 5677, Tint 1.094 (which, whatever it means, is different from the 1.016 when the raw file was read directly into RawTherapee).

I thought Temp and Tint were solid, absolute, standard numbers you can rely on. Well, I know better now!

To illustrate the difference that apparently (from looking at the numbers) small changes in white balance can make, here is an animation showing an image with four white balances as exported from Lightroom:
  • After being imported into Lightroom after conversion to DNG by DXO
  • After being imported into Lightroom directly from the original raw file and using the "As shot" white balance setting
  • After being imported into Lightroom directly from the original raw file and using the "Flash" white balance setting
  • After being imported into Lightroom directly from the original raw file and using a custom" white balance setting which reduced the yellow (Temp) as Daniel suggested, and reversed the move to magenta (Tint) that DXO Optics Pro had caused.


0869 31 white balance comparison
by gardenersassistant, on Flickr

This animation shows a couple of other things too if you compare the "raw" version (which was when the file was imported directly into Lightroom) with the versions before and after it (which have been through DXO, including its "lens softness correction" and a mild application of its microcontrast adjustment).
  • Looking at the hairs on the spider's legs, it does seem that the DXO lens softness and microcontrast adjustments do make a (positive to my eye) difference.
  • Oddly, my eyes seem to be telling me that the white balance can also change the apparent sharpness of the image (comparing the three versions other than the "raw" version, all of which had the same DXO processing but just have different white balances). But the more I look the more unsure I am as to whether that's what I'm seeing or not. It was certainly my first impression though.
  • Lightroom and DXO are handling the image geometry differently. DXO has a "distortion correction" function, which I believe was turned off in this case, but whether it is turned on or off the geometry that DXO produces is different from the geometry that Lightroom produces when it reads the raw file directly.
 
Other factors to consider include any changes to the flash light balance caused by the diffuser and colour shifts caused by reflective surfaces (something we have discussed previously).

My own approach is to shoot in something other than auto white balance. I fear I might struggle to keep consistency within a series if the wb is constantly being re-assessed and usually am able to correct wb in one frame before applying those changes to the others.

I've not heard or experienced wb impacted sharpness before though.
 
Other factors to consider include any changes to the flash light balance caused by the diffuser and colour shifts caused by reflective surfaces (something we have discussed previously).

Yes indeed, these can affect the colour balance. In this case though I was concerned with how the white balance of the same image is interpreted differently by different pieces of, and combinations of, software.

My own approach is to shoot in something other than auto white balance. I fear I might struggle to keep consistency within a series if the wb is constantly being re-assessed and usually am able to correct wb in one frame before applying those changes to the others.

That's a good point. I think I shall set the white balance to "flash" on the Panasonics and leave it there. I may leave the 70D on auto white balance - I don't use flash with it and it seems to handle white balance rather well for my botanical stuff.

I've not heard or experienced wb impacted sharpness before though.

Probably my imagination. Where I wondered if I saw it was in the two-image gif that I put in this post. I've spend some time looking at the full (1300 pixel high) version as it flips between the versions. (You may have to download the image from Flickr if you want to try this. For me at least the gif animation doesn't work when viewing the image at Flickr.) I was looking most at the bottom two or three segments of the spider's front left leg, where the hairs show against a plain background. When I first looked at it I thought the colder version made the hairs stand out more. Looking at it subsequently I don't see the same thing.
 
Hi Nick - glad to see you are still fighting the good fight! Some fascinating stuff up there ^^^

You may be interested to know I have purchased a shiny new Sony RX10iii - 1 inch sensor and stunning 24-600 equivalent Zeiss lens which seems almost unbelievably sharp right through the range.

I have strapped my MT24-ex and Raynox150 on it and tried a quick test shot - no bugs yet but found a nice flower. Looks decent to me (honest opinions welcome) but the acid test will be to see what a nice bee or hover fly looks like.

The below was shot at f16, 1/200, iso100 and around 200mm equivalent - flash at 1/16th I think (less flash power needed for the smaller sensor?).

There's loads of working distance and if I whack it up to 600mm there's plenty of magnification also. More field tests required but if it pans out I will sell my Canon 760 and 100mm - we shall see :)


Sony RX10iii Macro Test Shot
by Mike Smith, on Flickr
 
Hi Nick - glad to see you are still fighting the good fight! Some fascinating stuff up there ^^^

Thanks Mike. As you can see I haven't written anything here for a couple of months as my equipment portfolio has settled down, for now at least. I've been concentrating more on software, and spending a lot of time on a thread at dpreview which started here 6 weeks ago as a raw and JPEG thing and morphed into post processing products and techniques and is still going on here (dpreview threads are capped at 150 posts, so with Part 9 almost finished it is up to around 1350 posts and still going strong). It has been soaking up a huge amount of my time, but the payback is that it has been very educational for me - there is a good group dynamic to the thread which is bringing in really useful contributions from various people about a variety of software and techniques.

You may be interested to know I have purchased a shiny new Sony RX10iii - 1 inch sensor and stunning 24-600 equivalent Zeiss lens which seems almost unbelievably sharp right through the range.

Yes, I am interested. :)

I've been looking at 1" for a while, but the FZ1000 wasn't a runner because it only goes to f/8. I read good things about the RX10iii. I'm waiting to see how the Nikon 24-500 pans out. It is the fully articulated screen and the focusing that interest me. The trouble with all the large zoom 1" cameras from my point of view is the effect of the lens extension on my style of achromat use. Given the resolution equalisation of the small apertures I use I can't see that there would be any advantage for me for invertebrates of the Raynox 150 and smaller variety. What I am thinking though is that the 24-500, or the RX10iii, or whatever Panasonic come out with next might replace my 70D. I really dislike changing (camera) lenses and getting 24 to 500 or 600 or similar is very attractive. Depending on how such a camera rendered subtle colours and textures (and given that the lens extension isn't important for the low power achromat I might use on it some of the time), it might replace the 70D for natural light work - botanical, large invertebrates, birds, sunsets. (I've taken to taking a little TZ60 (24-720 equivalent) with me when I go out for a walk along the coast path. It's surprising what you can get out of such small cameras these days.)

I have strapped my MT24-ex and Raynox150 on it and tried a quick test shot - no bugs yet but found a nice flower. Looks decent to me (honest opinions welcome) but the acid test will be to see what a nice bee or hover fly looks like.

Like you say, an invertebrate or two would be more telling I think.

The below was shot at f16, 1/200, iso100 and around 200mm equivalent - flash at 1/16th I think (less flash power needed for the smaller sensor?).

Yes, that is one of the advantages of a smaller sensor. So for example with the FZ200 I have two stops flash advantage over the RX10iii, which in turn has about 1.5 stops flash advantage over Canon APS-C.

f/16 is equivalent to f/27 on Canon APS-C so I think that image might benefit from some more sharpening/deblurring. That is what I have found DXO Optics Pro particularly good at, with its lens-specific "lens softness correction" (which I believe uses deconvolution deblurring) and microcontrast enhancement. I use that all the time as a "pre-processing" (stage one, batch) step for my invertebrate images. It is sometimes too much for flowers though - it can make delicate petal textures look silly and overdone.

There's loads of working distance and if I whack it up to 600mm there's plenty of magnification also. More field tests required but if it pans out I will sell my Canon 760 and 100mm - we shall see :)

I shall be very interested to see how that works out. My guess is that it will be fine.


Sony RX10iii Macro Test Shot
by Mike Smith, on Flickr[/QUOTE]
 
Back
Top