THE PP GAME!

Well Done Rob :clap:

Here is my edit:

IMG_5200.jpg


Opened in LR4:
Increased the clarity, shadows,
Brushed the water then increased the contrast and clarity and decreased the temp
Increased the hue and saturation of yellow
Decreased the luminance and saturation of green
Increased the saturation of blue
Done!

Took me about 10-15min :)
 
Blimey, what to do with this.
In PS.
Open in RAW, apply basic adjustments, open in PS.
Copy background.
With crop, crop LH side, increase canvas on RH side.
Make a selection of out of focus foreground, edit-copy edit paste.( creates new layer of selection)
Duplicate layer.
SAVE
Edit-transform-flip vertical. Edit-transform flip horizontal then move to the RH side.
Switch bg and bg copy off, merge visible layers, switch bg and bg copy back on.
Name layer, foreground.
Using the spot healing tool go over obvious similarities and anomalies.
SAVE
On this layer, image-adjustments-exposure, knock it back a bit, then knock levels back a bit.
Filter blur-lens blur ,apply a small amount.
On the background copy layer adjust the main image to liking.
Flatten image.
SAVE
Done.

IMG_52002web.jpg


Rhodese.
 
great photo! I really like the sea in this one.


cliffs by btyreman, on Flickr

opened as RAW in LR4.4

cropped,
boosted contrast,
decreased highlights,
increased whites,
decreased blacks,
clarity +3,
vibrance boosted,

tonecurve: changed to medium contrast and increased highlights,

colours: desaturated yellows, oranges and greens,
increased blues, aqua and reds.

changed the hue of the blues to a slightly more green,

added lens correction + chromatic aberration,
colour noise reduction,
sharpened and added quite a lot of grain.

created some filters on the right, bottom and top whilst adding a post crop vignette.

used the healing brush to get rid of the bird at the top in the sea,

brush tool was used to decrease saturation where the sea meets the rocks to give it a less yellow tint,
exported as jpeg.(y)
 
Last edited:


Fiddled with clarity and various levels in camera raw, added a grad filter on top and bottom (!) to concentrate my eyes on the bird in the middle of the shot.

Plopped it into photoshop proper and did a little unsharp mask, a little levels and hue and saturation adjustment then added a colour lookup adjustment layer and used a redblueyellow preset from the devicelink presets. Also cropped the pic to make the bird in the middle the central feature.

Then I blurred the rocks on the left hand side a little tiny bit more, mostly for giggles.

Don't know if I like what I've done much but that's what I'm sticking with!
 
My edit done in Lightroom 4.
Gave it a crop, and cloned out the flowers....
I adjusted the highlights and vibrance down
Increased the clarity, and adjusted the orange, green and blue slider.
Used the adjustment brush, and added more clarity on the water..
And, used a Lightroom preset to finish......

Time taken 10 minutes-ish


Thanks to everyone that's taken part.

I'm going to go with Stephens edit - I really like the crop you came up with, for that reason I think you just edged it over the others, so well done!

I'd also like to give an honourable mention to Graham too, you got some great detail and colour out of those rocks.

So it's over to you Stephen, I look forward to seeing what you put up...
 
Good 'un' Stephen (y)

And good 'un' Graham as if looks as if you are in second place (y)


P.S. Stephen get your shot up :)) ) as I am keen to take part as I had to miss this last one as I've been off colour the past few days.
 
Thanks to everyone that's taken part.

I'm going to go with Stephens edit - I really like the crop you came up with, for that reason I think you just edged it over the others, so well done!

I'd also like to give an honourable mention to Graham too, you got some great detail and colour out of those rocks.

So it's over to you Stephen, I look forward to seeing what you put up...

Thanks!

Not sure if there's much fun to be had with this shot but let battle commence!

https://www.dropbox.com/s/hdrwnbdxe979nnc/_1030667.RW2

should be the link to a dodgy raw file.

And if we're having a quicker turnaround how does a Tuesday teatime deadline sound?
 
Last edited:
Cheers Rob, (y), but well done chuckles.. :clap:


Couldn't help myself........

11030667dev3hdr3edit800.jpg


Made a couple of exposures at different EV's
Merged then to get a greater contrast in the smoke and the sand
Cloned out the half towers to the left and right edges of the shot
Moved the lady back a bit into a less central position (increased size very slightly)
Let the dog run a bit further into the shot to provide a lead in (no pun intended) (reduced its size too)
B&W conversion
Selective colour on the coat, :D
Cloned out a couple of bits from the top edge of the beach
Light vignette

about 30 minutes
 
Last edited:
1030667web.jpg


If this is a dodgy one, I would like to see one of your best.
Not a lot done actually.
Contrast +25
Whites +40
Blacks +25
Clarity +10
Vibrance +10
Saturation + 10
Cropped the sky, used spot healing on lights mast on far right, dodged and burned a bit.

Rhodese.

PS Graham, wish I'd thought of doing that, dam.
 
Last edited:
8692471322_6ee3b93225_b.jpg

Temperature 6600
tint +17
Contrast +25
Whites +40
Blacks -24
Clarity +100
Vibrance +82

Then went in with ajustment brush
Exposure -0.30
Highlights -100
Shadows -100
Clarity +92
Sharpness +65

Then run though details mod in colourfx pro and reduced noise
in the sky
time about 10min gowing for sun set look with sun low in the sky giving a nice orange warmth
 
Last edited:
My edit done in Lightroom 4
I used the transform slider to slightly alter the perspective, and then cropped accordingly.
I decreased the highlights, and increased whites, blacks and clarity
I increased the slider for red, orange and yellow, and decreased blue
Time taken, about ten minutes...

 
well done stephen! :clap:
Here is my edit:

123.jpg


In camera raw:
Increased the temp, contrast, highlights

In Photoshop:
Opened the sky in new layer,
Positioned it in the right place
Clicked on ALT + layer mask,
Then with eraser i brushed the sky
Export image
Cropped in Picasa
Done :)

took me about 20-30 min :)
 
I've gone for squeezing the most quality from this as I can. Very little done to the image really, apart from colour and tonal adjustments.... I like it as it is.

Lightroom:
  • removed CA
  • slight sharpen with minimum radius, and no detail.
  • Export as 16bit TIFF

PS CS6:
  • created a black and white adjustment layer, increasing cyan/blue to lighten the smaller, grey plume from the right hand chimney and increase tonal separation in the sky and smoke
  • Increased reds/orange to help tonal separation in foreground.
  • Faded back the mono later with opacity to 85%, then flattened
  • increased saturation to bring colours back to normal.(this process uses the tonal definition from a filtered mono layer, but retains the original colour)
  • basic S curve applied to add punch
  • burned in the top of the sky.
  • High pass filter applied to duplicate layer, and merged using overlay with low opacity.
  • Added a scanned piece of slightly fogged, but otherwise blank Kodak Portra medium format film as a layer and added as overlay to add a real film grain structure and colour shifts from the film base layer, then re-white balanced.

10 minutes.. ish.


CLICK FOR BIG, THEN CLICK AGAIN TO ZOOM IN


What camera was that taken on? Some weird noise artefacts in the sky when you pixel peep.
 
Last edited:
What camera was that taken on? Some weird noise artefacts in the sky when you pixel peep.

I did a whole set of beach/industry shots on a GF3 with a 28mm Vivitar manual lens. It had a couple or three graduated filters to keep the sky etc in so this might be the reason for weirdness, maybe?

Or there was gunk/sand/muck on the filters or lens. I'm far too amateurish to always have a clean lens!

I called the pic dodgy just because it was down to luck rather than judgement - a bright sun behind me and a GF3's lack of viewfinder mean I could see little for focus so I just stopped the lens down a bunch and guessed at the distance, hoping the depth of field would be big enough to get the interesting parts in focus!

Anyway, all the edits so far look great! I will put my judge's wig on tonight and try and give a result.
 
here's mine, colour was not working for me on this one.


woman_+_Dog_industrial_beach_240ppi by btyreman, on Flickr

opened the RAW in LR4.4:

cropped a bit of the top off,

changed WB to 'auto',

changed to BW mode with NO colours adjusted,

- exposure,
- highlights,
-blacks,
+clarity

tonecurve: + highs, + lights, + darks, - shadows and linear curve.

split tone: blue highlights, yellow shadows.

sharpened and added lots of grain,

post crop vignette added,

extras: added a filter to the beach increasing clarity, then another filter on the sky again increasing clarity.

used healing brush to clone out towers on the left and right of the image I found distracting.

created a slightly blue tinted brush for the tallest chimney smoke whilst increasing exposure slightly.

sharpened again on jpeg export set to 'high' screen as it is a very soft image.

(y)
 
Last edited:
All in Picasa although had a very quick go in LR.

Cropped, sharpened, 60's effect but not too much.

I had very little time for this so done last minute taking only a few minutes unlike some of my others that take me days :LOL:

 
Well, they're all very good work and very interesting to look at from someone who knows the pic quite well but I'm going to plump for symmetricalOCD's very moody black and white one.

To generalise about all the edits, it's absolutely amazing what people can come up with. And a bit of distance from things seems to get people's brains percolating quite nicely!

It's over to you, symmetricalOCD, for your image and deadline.
 
:clap: Good un Ben :clap:
 
Stephen not sure if you are aware but when the winner is announced the member who posted the pic for editing should put up their own edit of it.
 
Poo!

I did not realise this - sorry chaps. I will have a go tomorrow morning and plop it up here.


I've had a go in camera raw - added a grad filter there, adjusted the clarity, the exposure and a few other things then into photoshop where I did a little high pass sharpening, adjusted the contrast and not much else.

I think you lot made a much better fist of it than I have!
 
Last edited:
I thought we are supposed to upload images at 1024x long edge size? ...

bigger the better, surely.... It's easy to get something to look OK at 1024pixels across.
 
ACR: lowered the exposure
Increased shadows
Lowered highlights

CS6: Bumped colour in lab (don't know why, because my last step was to lower the saturation)
High pass filter (merged with layer below at 40% opacity)
Massive contrast increase on new layer, then merged with layer below at 40% opacity
New layer, desaturated then merged with bottom layer (can't remember opacity)
Bit of a crop


Took about 10 minutes, then took another 15 minutes to sign up with imgur and work out how David embeds his images on here. ;)
 
In LR4 cropped, used a preset (I hasten to add it's one I made earlier :razz:) , used brush to burn a bit more detail in left hand corner, used brush to bring out more colour here & there, sharpened quite a lot, light vignette, resized for web & that be it.

As soon as I saw the shot I knew which way I wanted to take it (makes a real change from my usual dithering, and yet more dithering :nuts:). What really helped was using a preset which I have made from having other similar shots to work on. So 15 minutes roughly.

Ben are we allowed to put a second one in on your shot, or will RoboCop jump in and squish me :puke:

 
Lightroom:

CA removal
Highlight recover

PS:

Crop
levels
Curves
selective saturation adjustments on RGB channels
Dodged the guy's face a little
Film grain layer added.

Done

3 minutes.


Click for big, then click again to zoom in more.
 
Last edited:

image 6 (1 of 1) by Alex Dutton Photography, on Flickr

Missed a few due to my own terrible timekeeping. Doh :puke:

Warmed the image a little 6881
+5 contrast
-33 blacks
+40 clarity
-19 vibrance
split tone highlight hue 51 sat 40
sharpened with a mask
vignette
- .95 grad at both top and bottom of the shot.
adjustment brush with a slight +ev to brighten the dancer.
Wasted 15 mins in nik silver efex - realised I really don't know what I'm doing and went back to this. :bang:
 
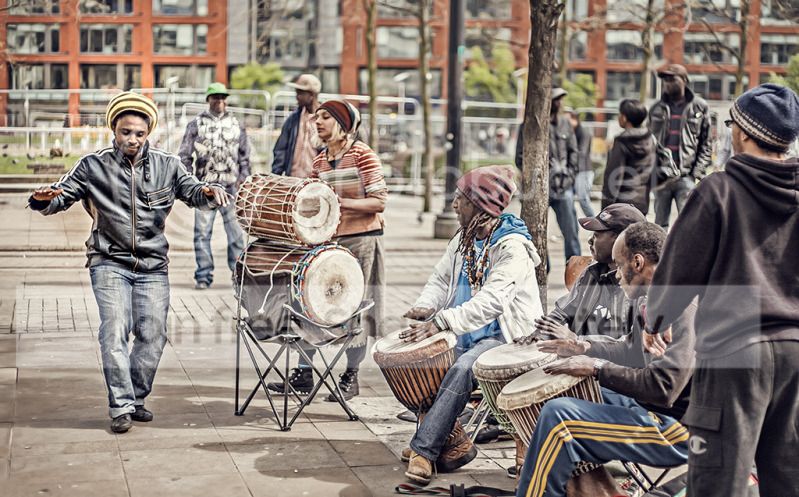
1manchesterreggaedancer.jpg


Made three exposure from the dng file in ACR (warmed via WB slightly)
blended them to get the highlights in the white jacket, and ends of drums, as well as the details in the darker areas
treated first the scene as a whole
then masked and treated white jacket chap, and dancer seperately
lifted shadows in dancers face
upped saturation except on yellow / green areas via mask
crop RHS bike chap, crop top
slight vignette
resize
slight sharpen

30 mins

edit - did originally move the bucket in, and replicate the missing LHS, but decided it looked better completely removed.
 
Last edited:
manchester_reggae_dancer.jpg


In LR4:
Decreased the contrast, Exposure, Highlight
Increased the Blacks, clarity
And some other small touches
Done!
Took me about 5-10 min :)
 
LR4.4:

Cropped
Clarity up
Vib Down
Darkned Highlighs and Whites
Sligt temp adjustment

Used a brush on the dancing man
Clarity and Sat whacked right up
Made warmer
Up'd contrast
Reduced shadows
Reduced noise

Done

20mins

manchester_reggae_dancer.jpg
 
My first attempt. I've recently bought the Nik software suite and this is a trial run.

[url=http://www.flickr.com/photos/zambog/8701957490/][/URL]

Dfine - noise reduction
Viveza - Brighten and increase structure on principal players. Darken the pavement. Reduce saturation on man on right and green cap of man in background.
Color Efex - Tonal contrast, detail extractor, and lighten centre filters.
Sharpener Pro - Output sharpening for display
Elements - heavy crop to get rid of distractions on right. Cloned out bin (badly) and lower right corner changed Adidas trackies to jeans.

Incidentally was this taken in Piccadilly Gardens?
 
Last edited:


Mostly just some curves, slight crop, more contrast to dancer, blurred the background a tiny touch more, took the bin out, and thats about it
 
Last edited:
Not a lot done, basic adjustments to levels and curves, moved the dancer forward to make more prominent. Added colour to green hat, bit of dodging, Crop and stroke for border line.

manchester_reggae_dancer.jpg


Rhodese.
 
Last edited:


Not too much done!

Some adjustments in camera raw - bit of added clarity. Then in photoshop a quick selection round the band and a hue/saturation adjustment layer on the background to desaturate it a bit and seperate it from the band.

then invert the selection and punch up the contrast and colour of the band to make them stand out more.

Finally a high pass sharpening of the whole image. And bob's your uncle!
 
thanks to everyone who entered.

It was a close call between rhodese and ALZ_D, but in the end Rhodese wins for me, I like the vibrant colours which is quite similar to my own edit, the border you added was creative. well done!

here's my edit:


manchester_reggae_dancer_TP_edit by btyreman, on Flickr

changed WB to 4850 temp +3 tint,
Highs; -81
Shadows; +23
Blacks; -19

Clarity +21
Vibrance +62

tonecurve: Highs +27; Lights -16.

Colours: Hue: Reds -16

Split Tone:
Highs: Hue = 264 Sat = 11
Shadows: Hue = 0 Sat = 8

Sharpening +31

defringed the greens in lens correction.

post crop vignette then exported as jpeg.
 
Back
Top